|
|
Cigarette Lighter Spy Cam. |
| | Home | User manual | Spy Cam | |
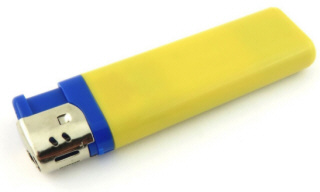
This cigarette lighter is the ultimate decoy for a spy item. Looks exactly like your standard lighter but has a built in camera and microphone. The lighter measures at L81 x W23 x D10mm so looks exactly the same as a standard lighter, but please be aware it does not work like a normal lighter.
The camera can begin recording when activated by sound so you can use it as a dictaphone to record meetings and lectures etc. The lighter records video at 720 x 480 for up to two hours and you can capture up to ten hours of footage on a 32GB micro SD card (multiple charges). The camera does not include a micro SD card but will support up to 32GB.
You can use the lighter as a card reader so simply put in your micro SD card and it will display on your PC like a standard removable disk.
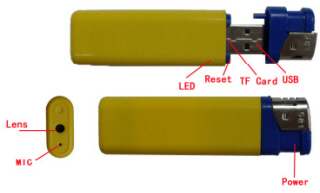
MINI DV Camera Lighter User Manual1. Charging
2. Power On + Sound Activated Recording
3. Take Photo Whilst in standby mode (light glowing solid) press the button and let go to take a photo, the light will go out and come back on to confirm the photo has been saved. The file resolution for photos is: 1280 x 960
4. Standard Video Recording This can only be done whilst the lighter is in standby mode.
5. Power Off Whilst in video/ photo standby mode (light glowing) hold the button down. You will see a the light flash and eventually go out. Once it has gone out you can let go, and the device is powered down.
Please Note: • Please make sure a T-flash (Micro SD) card has been inserted, if not,
it will power off automatically after 15 seconds.
6. Time set The device comes with a feature which embeds the current time and date
on to your captured photos and videos. To set the time and date of the device,
please follow the instructions below.
7. Auto-power off function The MINI DV will save file and turn off automatically in the following
circumstances:
8. Connecting computer You can connect the lighter camera to the USB port of your computer to view the photographs or video. You can also use it as a memory stick. You may need to press the reset button when you have unplugged it from your computer to return it to camera mode.
Notice: 1. If your computer does not identify the camera within 30 seconds
remove the camera from the USB socket press the reset button and insert
it again.
9. PC Camera If you wish to use the lighter camera as a web cam please contact us and we will supply the drivers.
 10. Reset If the Camera Lighter starts to act unusually, press the Reset button with a paper clip.
11. Notice Please follow the laws of your country. Do not use it illegally.
Specifications Photo resolution: 1280 x 1024 |
| • GF-07 • A9 • SQ11 WIFI • SQ11 • TK905 • XD • Mini A8 • Q7 • GF-09 • SQ10 • SQ8 • GF-21 • 70mai • MD81S-6 • MD80 • T189 • SQ16 • 70mai Pro • SQ13 • A10 • SQ23 • iMiniCam • TK921 • U21 • HERO6 • HERO5 • A10 • SQ9 • SQ12 • X009 • GT300 • Mi 4k • R3 • Mini DV • SJ7 • M10 • DV135S • U8 • BV01 • DV 600 • PC • X10 • H5 • H180 • Gl4000 • H360 • M20 • DWL7 • H7+ • SJ5000 • Cigarette Lighter • Q5 • |
| cigarette lighter spy cam |
|---|
| © «Org-Info.Mobi» |