|
|
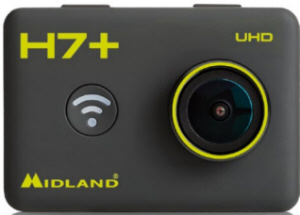
H7+ UHD camera |
| | Home | User Guide | H7+ UHD | |
Key Features• Video resolution: 2880x2160p@24fps, 2.7K@30fps, 1080p@60fps, 1080p@30fps,
720p@120fps, 720@60fps, 1440p@30fps
How to use your cameraTurn on / of Turn on: Press and hold the Power button for 2 seconds, the LED indicator will turn red. The camera defaults to video mode when turned on. Turn off: Press and hold the Power button for 2 seconds.
Modes Midland H7+ has 3 different operative modes: Video, Picture and Play back. The camera switches automatically to video mode when turned on. To switch to different modes you have to press Shoot button for 1,5 seconds: Video → Picture → Playback
Take a Video By default, the camera is on video mode when it is turned on. • Press Shoot button once to start recording; • Press Shoot button again to stop recording, the video clip will be automatically saved.
Shooting Single Picture • Press and hold Shoot button for 1.5 seconds to switch from video mode to picture mode. • Press Shoot button once to shoot a single picture.
Playback mode • Press and hold the Shoot button for 1.5 seconds to switch from Picture mode to playback mode. In this mode you can review all your captured videos and photos. • Use the WiFi button to scroll, the Shoot button to enter and play, the Power button to enter, to protect/delete file menu. • Press and hold the Shoot button for 1.5 seconds to shift to video mode.
Charging the camera Before using the H7+ for the first time, please fully charge the battery first. • Connect the camera to the charger via USB cable. The red indicator will be on, charging is in process. • When the battery is fully charged, the red indicator will turn off. It takes around 3.5 hours to fully charge the battery. Some functions, such as the WiFi function, cannot be used if battery is going to be low.
Insert the TF Card • Insert a Micro SD card into the card slot according to the direction shown on the camera. • Unit supports Micro SD card up to 32 GB.
Note: a. We suggest using ≥CLASS 10 (High speed) Micro SD card for smoothly shooting purpose. Lower CLASS of Micro SD Card may cause video jammed. b. There is only one correct direction to insert the Micro SD card into the slot. Do not force the card into the card slot, as it may damage both the camera and the Micro SD card. c. A new Micro SD card should be formatted with the camera before using.
How to use the waterproof case The camera can support underwater 30meters if mounted in the waterproof case. • Ensure the case is dry and clean • Open the waterproof case latch. • Insert the camera properly. • Close the waterproof case buckle. • After the use, please carefully clean the case with clean water and dry with a soft cloth.
Setting your cameraVideo mode setting When the camera is on video mode, press the Power button once (release immediately, if it is held too long, the camera will switch off), then enter the picture setting menu. Use the Wi-Fi button to scroll, the Shoot button to confirm, the Power button to go back to the latest menu.
Resolution: select between 4k@24fps - 2.7k@30fps - 1080p@60fps - 1080p@30fps - 720p@120fps - 720p@60fps - 1440p@30fps Loop Recording: The video will be separated into difference files by the Time Length. • Selected “Off”: the video will be separated into different files by every 12mins if 4K selected; by every 25mins if 1080p/720p is selected. • “3 Min”: the video will be separated into difference files by every 3 minutes. • “5 Min”: the video will be separated into difference files by every 5 minutes. • “10 Min”: the video will be separated into difference files by every 10 minutes. • For example, if you select “5 Min”, time length, a 20 Minutes video will be separated into 4 Video Clips (5 Minutes each Clip).
Time-lapse Record: this feature allows you to set the intervals at which a frame is captured. You can set the time intervals as: Off - 1Second - 5Seconds - 10Seconds - 30Seconds - 1 Minute - 5 Minutes - 10 Minutes Slow Motion: this feature allows you to create a slow motion video. This option is available only at 720@120fps resolution. After recording a video with this feature ON, the video will be played at 1:4 speed ratio. For example, recording for 5 minutes the unit creates a 20 minute video slowed by 1:4 ratio GYRO: activating this function, the built-in Gyroscope will start to make the video shooting more steadily, less shaking. Exposure: this function allows users to choose exposure parameter from options including +2.0 +1.7 +1.3 +1.0 +0.7 +0.3 0.0 -0.3 -0.7 -1.0 -1.3 -1.7 -2.0 High exposure suits to dark environments. White balance: The default set is auto, you can adjust the mode as concrete lighting condition. Color Mode: users can choose different color mode from options: Normal - Black&White - Sepia - Dive Mode Metering: this option allows to select the way the unit measures and adjusts the exposure. Users can choose Average - Center - Spot Sharpness: users can setup sharpness to: Strong - Standard - Low Saturation: users can setup saturation to: High - Standard - Low Record Audio: Select “On”, shoot video with sound Select “Off”, shoot video without sound. Date Stamp: You can display the time and date on video or not.
Picture mode setting When the camera is in photo mode, press the Power button once (release immediately, if it is held too long, the camera will switch off), then enter the picture setting menu. Use the Wi-Fi button to scroll, the Shoot button to confirm, the Power button to go back to the previous menu.
Capture Mode: • Single: Shoot a single picture; • 2S Timer: Shoot a single picture every 2 seconds; • 5S Timer: Shoot a single picture every 5 seconds; • 10S Timer: Shoot a single picture every 10 seconds;
Resolution: select value between 12M - 8M - 5M - 3M Burst: the camera will shoot 3 pictures quickly. You can use this function even together with timer set in “Capture Mode”. Quality: set the image quality: Fine - Normal - Economy. Metering: this option allows to select the way the unit measures and adjusts the exposure. Users can choose Average - Center - Spot Sharpness: users can setup sharpness to: Strong - Standard - Low White balance: The default set is auto, you can adjust the mode as concrete lighting condition. Color Mode: users can choose different color mode from options: Normal - Black&White - Sepia - Dive Mode Saturation: users can setup saturation to: High - Standard - Low ISO: to determine how sensitive the camera sensor is. Options are: Auto - 100 - 200 - 400 Exposure: this function allows users to choose exposure parameter from options including +2.0 +1.7 +1.3 +1.0 +0.7 +0.3 0.0 -0.3 -0.7 -1.0 -1.3 -1.7 -2.0 High exposure suits to dark environments. Anti Shaking: activating this function, the built-in Gyroscope will start to make photo shooting more steadily, less shaking. Quick Review: show quickly the taken picture. Select OFF - 2 seconds - 5 seconds
Date Stamp: display the time and date on pictures or not; • Off: does not display date & time on pictures; • Date: displasy date on pictures • Date/Time: displays date & time on pictures.
General Settings When the camera is in photo or video mode, press the Power button once, then press and hold the Shoot button for 1.5 seconds, then enter the General Settings. Use the Wi-Fi button to scroll, the Shoot button to confirm, the Power button to go back to the latest menu.
Screen Save: Select 1, 3, 5min option, the camera LCD screen will be off if no operation after 1, 3, 5min. Date & Time: The default format is YY/DD/MM. You can set the date and time, time sequence by yourself. Auto power off: Select 3, 5 or 10min option, the camera will be off if no operation after 3, 5 or 10 min. Beep Sound: Off: Turn the key tone off. On: Turn the key tone on. Language: there are 7 languages at your choice, including English, French, Spanish, Italian ect. TV Mode: Select the NTSC or PAL to suit your TV system. TV Out: this option allows to output the video on USB port. Users can choose OFF or ON. The display of the unit will turn OFF. Frequency: Select correct light frequency to avoid strobing. Format: You can format the TF card on camera. Default Setting: this operation will return all the menu settings to factory defaults. Version: you can check your camera OSD software version Wi-Fi SSID: Set the Wi-Fi ID by yourself. The default SSID is “WIFI_H7Plus”. Wi-Fi Password: Set the Wi-Fi password by yourself. The default Wi-Fi password is “12345678”.
Wi-Fi set-upNote: Make sure your camera is full of power before using the Wi-Fi function. a. Download the App “MelifeCam-I3” to your smart-phone or tablet from Google play store or Apple App store. b. Turn on the camera, then press the Wi-Fi button to enter into the Wi-Fi mode. c. Go to Wi-Fi setting of your smart-phone or tablet, then you can see “WIFI_H7Plus” in your list. d. Input password “12345678” to connect the camera with your smart-phone or tablet. e. Open the App “MelifeCam-I3”.
Remote Control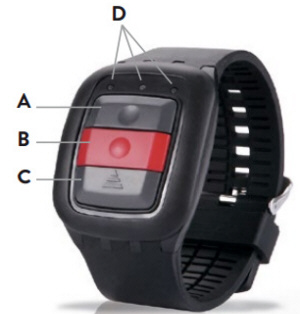
A. Picture key B. Video key C. Power Off key D. Indicator
Note: before using the remote control, please charge its battery. 1. Picture key: Press once to take a single picture. 2. Video key: Press once to start recording a video, press again to stop. 3. Power off key: Press and hold for 4 seconds to turn off the camera. 4. Indicator function: Left indicator: when the Wi-Fi is connected, it flickers blue; Middle indicator: When paired, the light is blue; During charging, the light is red; During charging when camera is on, the light is purple; Right indicator: When video recording, it flickers green; When a picture is captured, it flickers once for each single picture.
Pairing your camera and remote control 1. Make sure your camera and remote control are fully charged. 2. Press and hold the “Photo” & “Video” buttons of the remote at the same time, and turn the camera on. 3. When the camera turns on, release the “Picture”&”Video” buttons of remote. 4. When the pairing is finished, the middle indicator lights up blue.
Note: the camera must be paired only once, afterwards it will recognize automatically; Wi-Fi function & remote controller cannot be used simultaneously.
PC Camera (Webcam)The Camera can be used as a PC camera (webcam) • Connect camera and PC via the USB cable provided. • The camera will turn on automatically, and will show two options, “Mass Storage” & “ PC Camera”, then choose PC Camera.
Connect with TVYou can playback captured videos and pictures on TV via a HDMI cable. • Connect the camera to TV via a HDMI cable. • Power the camera on. • The displayed images on the TV are all the same with the camera screen. You can operate same as the camera also. • Press and hold the Power button for 2 seconds to turn off the camera.
Transferring files to PCYou can transfer the captured videos and pictures to PC. • Connect camera and PC via a USB cable. • The camera will turn on automatically, and will show two options, “ Mass Storage” & “ PC Camera”, then choose “Mass Storage”. • Select the files you want to transfer to your computer.
Reset the CameraThe “Reset” button is under the connector’s cap, near to the USB and TF card interface. • When the camera does not work properly or is jammed, you might use a pin to press the “Reset” button for 2 seconds to reset the camera, so that you can restart the camera for properly shooting.
FAQThe camera cannot turn on. Why? Check if the battery is running flat, if yes, charge the battery via USB cable or AC adaptor first.
The camera freezes. What should I do? reset the camera.
The video and photos are blurred. Why? The lens may be dirty, please clean the lens.
The camera cannot connect with PC. Why? Try another USB cable or computer USB port.
The camera will auto turn off. Why? A: Check if auto power off in the general setting is on, if so, turn it off. B. Check if the battery is running flat, if so, charge the battery first.
Cautions• Do not drop your camera. • Do not place heavy objects on the camera. • Keep the camera away from water and liquids (unless used in the waterproof case). This may cause the camera to malfunction. • Recharge the battery via the USB cable. • The camera should not be in heat over 65°C. • When the camera cannot work well, please don’t disassemble it by yourself, if your behavior cause damage, the original factory will not undertake responsibility and the warranty will become void |
| • GF-07 • A9 • SQ11 WIFI • SQ11 • TK905 • XD • Mini A8 • Q7 • GF-09 • SQ10 • SQ8 • GF-21 • 70mai • MD81S-6 • MD80 • T189 • SQ16 • 70mai Pro • SQ13 • A10 • SQ23 • iMiniCam • TK921 • U21 • HERO6 • HERO5 • A10 • SQ9 • SQ12 • X009 • GT300 • Mi 4k • R3 • Mini DV • SJ7 • M10 • DV135S • U8 • BV01 • DV 600 • PC • X10 • H5 • H180 • Gl4000 • H360 • M20 • DWL7 • H7+ • |
|
|
| | EN | IT | DE | |
| h7+ uhd |
|---|
| © «Org-Info.Mobi» |