|
|
Getting started |
| | Home | User Manual | HERO6 | |
| Welcome to your new HERO6 Black! Let’s get started.
MICROSD CARDSTo capture video and photos, you need a microSD card (sold separately).
Use brand name memory cards that meet these requirements: For a list of the recommended microSD cards, visit gopro.com/workswithgopro.
If the memory card becomes full during recording, your camera stops recording and displays FULL on the touch display.
NOTICE: Use care when handling memory cards. Avoid liquids, dust and debris. As a precaution, power off the camera before inserting or removing the card. Check the memory card manufacturer’s guidelines for information about use in acceptable temperature ranges.
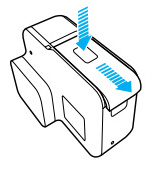
Inserting the microSD Card 1. Hold down the Latch Release button on the battery door, then slide the door open.
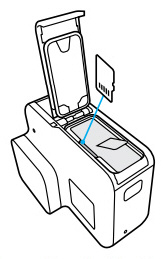
2. Insert a microSD card with the label facing the battery, then close the door.
Note: To remove the card, press it into the slot with your fingernail and it will pop out.
Reformatting Your microSD Card
To reformat your card, swipe down, then tap Preferences > Format SD Card > Delete.
CHARGING THE BATTERYFor the best experience with your new camera, fully charge the battery before first use.
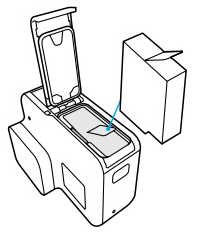
1. Hold down the Latch Release button on the battery door, then slide the door open.
2. Insert the battery, then close the door.
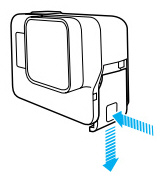
3. Hold down the Latch Release button on the side door, then slide the door open.
4. Connect the camera to a computer or other USB charging adapter using
the included USB-C cable. The camera status light turns on during charging
and turns off when charging is complete.
The battery charges to 100% in about 2 hours. For more information, see Battery Information (page 30).
PRO TIP: For fastest charging, use GoPro’s Supercharger (sold separately) and its included cable. You can also charge your camera with a USB-compatible wall charger or auto charger. |
UPDATING YOUR CAMERA SOFTWARETo get the latest features and best performance from your GoPro, make sure your camera is always using the most current software.
Updating with the GoPro App When you connect your camera to the GoPro app, you are automatically notified if an update is available. 1. Download the app from the Apple© App Store© or Google Play.™
Updating with the Quik Desktop App When you connect your camera to the Quik desktop app, you are automatically notified if an update is available. 1. Download the Quik desktop app from gopro.com/apps.
Updating Manually (with an SD Card Reader/Adapter) 1. Visit gopro.com/update.
PRO TIP: To see your current software version, swipe down from the main screen, then tap Preferences > About This GoPro.
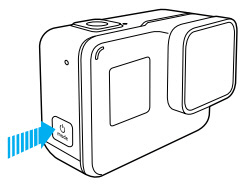
POWERING ON + OFFTo Power On: Press the Mode button [
To Power Off: Press and hold the Mode button [
WARNING: Use caution when using your GoPro as part of your active lifestyle. Always be aware of your surroundings to avoid injury to yourself and others. Abide by all local laws when using your GoPro and related mounts and accessories, including all privacy laws, which may restrict recording in certain areas.
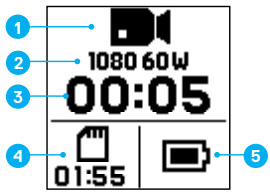
CAMERA STATUS SCREENYou can see the basics for your current setting on the front screen of the camera:
1. Camera Mode
Note: The icons and settings that appear on the camera status screen vary by mode. Those shown above are for Video mode.
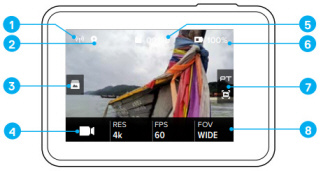
TOUCH DISPLAYThe touch display’s main screen contains the following information about modes and settings. The settings that appear vary by mode.
1. Wireless Status
Note: The touch display does not work under water
*Icon is visible only if your memory card contains footage. Swipe right to access your video and photos.
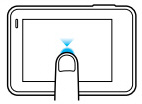
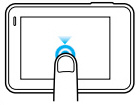
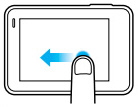
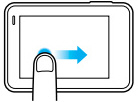
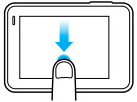
TOUCH DISPLAY GESTURESUse these gestures to navigate the touch display. When swiping, swipe from the edge of the screen.
Tap
Press and Hold
Swipe Left
Swipe Right
Swipe Down
PRO TIP: You can automatically lock the touch display to prevent accidental input. For details, see Auto Lock (page 24).
|
| • GPS GF-07 • A9 Wi-Fi mini DV • SQ11 Wi-Fi mini DV • SQ11 mini DV • GPS TK905 • XD Wi-Fi mini DV • GPS Mini A8 • Q7 Wi-Fi mini DV • GPS GF-09 • HERO6 • |
| hero6 black |
|---|
| © «Org-Info.Mobi» |