|
|
Advanced Controls |
| | Home | User Manual | HERO6 | |
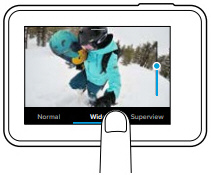
ZOOMThe Zoom setting lets you adjust how close or far away the subject appears in your video or photo. The default is no zoom.
Adjusting the Zoom Level
This setting is available for all capture modes, with these exceptions:
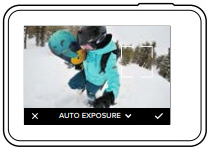
EXPOSURE CONTROLBy default, your camera uses the entire image to determine the appropriate exposure level. However, Exposure Control lets you select an area that you want the camera to prioritize when determining exposure. This setting is particularly useful in shots where an important region might otherwise be over- or underexposed.
When you change this setting, the touch display immediately shows you the effect on your image. If you change capture modes, the camera returns to using the entire scene to determine the correct level of exposure.
Using Exposure Control with Auto Exposure
Suppose your camera is mounted on your dashboard. You might want to select
the upper part of the touch display so that the exposure is based on the
scene outside of the windshield and not on the dashboard (which might cause
the scene outside to be overexposed).
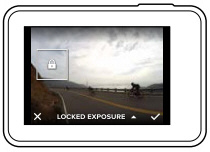
Using Exposure Control with Locked Exposure With this option, the camera locks the exposure. That exposure level remains until you cancel it.
For example, suppose you are snowboarding on a sunny day. By manually setting the exposure level based on your subject's jacket, the images that you capture throughout the day are based on the jacket. So, they are less likely to be underexposed compared to the bright snow. 1. Press the touch display until a square outline shrinks to the middle
of the screen.
Canceling Exposure Control Exposure Control is automatically canceled when you select a different capture mode or restart the camera. You can also cancel this setting manually (below). When you cancel the exposure setting that you previously set, the camera returns to using the entire scene to determine the correct level of exposure. 1. Press the touch display until a square outline shrinks to the middle
of the screen.
PRO TIP: For advanced exposure settings, see Exposure Value Compensation.
PROTUNEProtune unlocks the camera’s full potential, yielding stunning image quality and cinema-caliber video and photos optimized for professional productions. Protune gives content creators more flexibility and workflow efficiency than ever before.
Protune is compatible with professional color correction tools, the Quik desktop app, and other video and photo editing software.
Protune enables manual control of color, white balance, shutter speed, and more for advanced control and customization of your video footage and photos.
Protune is available as an advanced setting for all capture modes, except
Looping and Time Lapse Video. To access this advanced setting, see
Navigating with the Touch Display (page 3). The options
for this setting are Off (default) and On. When Protune is on, [
Some Protune settings are not available when you use Exposure Control. Protune is available for all video resolutions.
Changes that you make to Protune settings in one capture mode apply only to that capture mode. For example, changing the White Balance for Night photos does not affect White Balance for Burst photos.
Color lets you adjust the color profile of your video or photos. When you change this setting, the touch display immediately shows you the effect on your image. |
| Color Setting | Resulting Color Profile |
| GoPro Color (default) | Provides GoPro color-corrected profile (same great color as when Protune is turned off). |
| Flat | Provides neutral color profile that can be colorcorrected to better match footage captured with other equipment, offering more flexibility in post-production. Due to its long curve, Flat captures more details in shadows and highlights. |
|
White Balance lets you adjust the color temperature of video and photos to optimize for cool or warm lighting conditions. When you change this setting, the touch display immediately shows you the effect on your image.
Options for this setting are Auto (default), 2300K, 2800K, 3200K, 4000K, 4500K, 5500K, 6000K, 6500K, and Native. Lower values result in warmer tones.
You can also select Native to create a minimally color-corrected file from the image sensor that allows for more precise adjustments in postproduction.
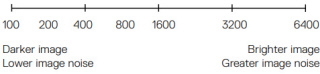
ISO Minimum and ISO Maximum let you set a range for the camera’s sensitivity to light and image noise. ISO settings create a balance between brightness and resulting image noise. Image noise refers to the degree of graininess in the image.
In low light, higher ISO values result in brighter images, but with greater image noise. Lower values result in darker images with lower image noise. When you change this setting, the touch display immediately shows you the effect on your image. The default for ISO Maximum is 1600 for video and 3200 for photos. The default for ISO Minimum is 100.
For the Video and Photo capture modes, ISO behavior depends on the Shutter setting (in Protune). The ISO Maximum that you select is used as the maximum ISO value. The ISO value that is applied might be lower, depending on the lighting conditions.
PRO TIP: To lock the ISO at a specific value, set ISO Minimum and ISO Maximum to the same values.
The Shutter setting in Protune applies only to the Video and Photo capture modes. This setting determines the amount of time that the shutter is open. When you change this setting, the touch display immediately shows you the effect on your image. The default setting is Auto.
For Photo, the options for this setting are Auto, 1/125, 1/250, 1/500, 1/1000, and 1/2000 second.
For Video, the options for this setting depend on the FPS setting, as noted below. |
| Settings | Example 1: 1080p30 | Example 2: 1080p60 |
| Auto | Auto | Auto |
| 1/FPS | 1/30 sec | 1/60 sec |
| 1/(2xFPS) | 1/60 sec | 1/120 sec |
| 1/(4xFPS) | 1/120 sec | 1/240 sec |
| 1/(8xFPS) | 1/480 sec | 1/960 sec |
| PRO TIP: To reduce the amount of blur in your video and photos
when using the Shutter setting, mount your camera on a tripod or other surface
that is stable and cannot move.
Exposure Value Compensation affects the brightness of your video or photo. Adjusting this setting can improve image quality when shooting in environments with contrasting lighting conditions.
Options for this setting range from -2.0 to +2.0. The default setting is 0.
When you change this setting, the touch display immediately shows you the effect on your image. Higher values result in brighter images.
For Video, this setting is available only if Shutter is set to Auto.
For information about adjusting exposure based on a certain area of your scene, see Exposure Control
PRO TIP: Exposure Value Compensation adjusts brightness within the existing ISO setting. If brightness has already reached the ISO setting in a low-light environment, increasing the Exposure Value Compensation does not have any effect. To continue increasing the brightness, select a higher ISO value.
Sharpness controls the quality of details captured in your video footage or photos. Options for this setting are High (default), Medium, and Low.
When you change this setting, the touch display immediately shows you the effect on your image.
PRO TIP: If you plan to increase sharpness during editing, select Low for this setting.
This setting applies only to the Video capture mode and creates a separate .wav file for your video, in addition to the standard .mp4 audio track. You can select the level of processing to apply to the RAW audio track. This setting is useful if you want a separate .wav file to share or use in post-processing. |
| Option | Description |
| Off (default) | No separate .wav file is created. |
| Low | Applies minimal processing. Ideal if you apply audio processing in post-production. |
| Med | Applies processing based on the Manual Audio Control setting (wind and/or stereo). If Manual Audio Control is turned off, the camera automatically switches between wind filtering and stereo audio. |
| High | Applies full audio processing (automatic gain and AAC encoding). |
| PRO TIP: Audio files in .wav format are captured in the same
location and with the same file name as .mp4 files. To access them, insert
your microSD card into a card reader and locate the files with your computer’s
file explorer.
Reset
|
| • GPS GF-07 • A9 Wi-Fi mini DV • SQ11 Wi-Fi mini DV • SQ11 mini DV • GPS TK905 • XD Wi-Fi mini DV • GPS Mini A8 • Q7 Wi-Fi mini DV • GPS GF-09 • HERO6 • |
| hero6 black |
|---|
| © «Org-Info.Mobi» |