|
|
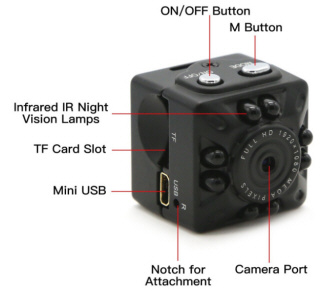
SQ10 mini camera |
| | Home | User manual | SQ10 | |
 Before Using.• Boot up the camera without TF card, the camera will shut-down automatically
after the red and blue indicator flashing for 5 seconds at the same time.
Basic Instructions.How to charge The camera built-in rechargeable lithium battery, please charge it before the first using.
Methods: 1. Connect the camera to computer, charge it with USB cable. 2. Charging while recording: Connect to external USB 5V charger or power bank.
* The red indicator light is on and flashing normally when you charge the camera. When the red indicator light keeps on but stops flashing means charging is completed. ( Please charge for more than 30 minutes to make sure the battery is fully charged.)
Note: When the battery power is low, the red and blue indicator lights flash at the same time for about 5 seconds, the camera will shut-down automatically, enter into the protection state (The recording file will save automatically), the camera should be charged under this condition.
Charging While Recording Insert TF card, connect USB 5V charger or power bank with USB cable, start recording videos while charging the camera. Click any button to stop recording. Or the camera will keep recording until out of battery.
Reset If the machine crashes, the button can not be used normally, you can use sharp objects to press reset (R) hole, then it can be used normally
Power Off If you want to shut down the camera under the video recording, photo taking, motion detection mode. Press ON / OFF button for about 6 seconds to shutdown the camera. (The indicator light is off.) When the camera is under standby mode, the camera will shut-down automatically after one minute without any working mode.
Time Setting The camera will automatically create a TXT text document in the TF card directory.( As the pic ) Shutdown the camera, connect the camera to computer with USB cable, open TIMEREST.txt document. Edit and save the time you need in the document. ( Such as “ 20160804174726 Y ”) Boot up the camera to shoot videos, the video will show the time watermark you save in the txt document. You can use the same method if you don’t need time watermark.
For example: 20150608192526 Y ( Have time watermark) 20150608192526 N ( Don’t have time watermark)
Notice: • Be sure to insert the T-flash (Micro SD) card into the product. If the card have not TF/SD card inside, the camera can not be used normally when the red and blue indicator light flash at the same time. • Please keep the lens at the distance of 50cm or more in the environment with sufficient lighting. This way makes the images and videos stable with natural color, and scenery is clear.
Connect to a computer The camera can be directly connected to the computer under boot up, standby, or shutdown mode. It can be used as normal U disk and you can copy/paste/delete the file as usually do. Connect the camera to the computer, after a few seconds the computer will pop up the removable disk logo, when the blue indicator light is on, means the computer can identify the USB device and carry out data transmission. The red indicator light is on and flashing normally when you charge the camera. When the red indicator light keeps on but stops flashing means charging is completed.
Note: • After the unit is connected to the computer, if the computer does not recognize it, or if the removable disk is not ejected after 30 seconds, please reset it and try again. • It is recommended to use the TF card reader to read the video file directly to play, if you directly use the USB connection to save the machine built-in memory in the video file, the transmission can not keep up because of the data may be too large and resulting in playback is not smooth. |
Mode InstructionsRecording Mode 720P: 1. Boot up the camera, enter the standby mode. (The blue indicator light is on.) 2. Click the power button. (The blue indicator light flashes 3 times then off.) Start recording 720P HD videos. 3. The video will safe video as segmented video every 5 minutes. The video will be loop covered if there is no enough storage. 4. Click the power button again to stop recording, back to standby mode. 5. Push the power button for a long time under the recording mode will shut down the camera. Recording file will be preserved automatically.
Recording Mode 1080P: 1. Boot up the camera, enter the standby mode. (The blue indicator light is on.) 2. Click the M button to enter 1080P recording standby mode. (The blue and red indicator light both on.) Click power button once, start recording 1080P HD videos. (The blue light is on, the red light flashes 3 times, then both off.) 3. The video will safe video as segmented video every 5 minutes. The video will be loop covered if there is no enough storage. 4. Click the power button again to stop recording, back to standby mode. 5. Push the power button for a long time under the recording mode will shut down the camera. Recording file will be preserved automatically.
* Under standby mode without any operation the camera will shut down automatically after 1 minute.
Infrared Mode 1. Boot up the camera, enter the standby mode. (The blue indicator light is on.) 2. Press the power button for 2 seconds (The red indicator light flashes twice.) Start IR infrared mode. 3. Press the power button again for 2 seconds to shut down IR infrared mode. (The red indicator light flashes twice.) 4. The infrared mode and recording mode/motion detection mode can be open in the same time. • You can open the infrared mode with recording mode. Click the power button to quit recording mode, back to recording standby mode. Press the power button again for 2 seconds to shut down IR infrared mode. (The red indicator light flashes twice.) • If you want to use infrared mode and motion detection at the same time. You have to open the infrared mode first then open the motion detection mode.
Photographs-taking Mode 1. Boot up the camera, enter the standby mode. (The blue indicator light is on.) 2. Click the M button twice to start taking photographs. (The red indicator light is on.) 3. Every click on the power button is taking a pic. (The red indicator light flashes with each clicking.) 4. Photos will be preserved automatically as 12M (4032*3024) 5. Push the power button for a long time will shut down the camera.
Motion Detection Mode 720P: 1. Boot up the camera, enter the standby mode. ( The blue indicator light is on.) 2. Push the "M" button for 3 seconds, to get the motion detection working. (The blue indicator light is on and the red indicator light flashes 3 times, both flashes once then off.) 3. The camera will shot 1 minute video automatically. Then the blue light will be on, the red light will flash for 6 times, then both off to start motion detection. 4. Once the camera detect the object is moving, the camera starts recording. (The red and blue indicator light both flashes once then both off.) If there is no object moving the camera will stop recording. 5. Click any button to quit motion detection mode, back to 720P recording standby mode.
Motion Detection Mode 1080P: 1. Under the 1080 recording mode (the blue and red light both on). 2. Push the "M" button for 3 seconds, to get the motion detection working. (The red light flashes 3 times, then blue indicator light is on and the red indicator light flashes 3 times, both flashes once then off.) 3. The camera will shot 1 minute video automatically. Then the red light will flash for 3 times, blue and red light both flash for 3 times, then the red light will flash for 3 times, blue and red light both flash for 3 times then both off to start motion detection. 4. Once the camera detect the object is moving, the camera starts recording. (The red and blue indicator light both flashes once then both off.) If there is no object moving the camera will stop recording. 5. Click any button to quit motion detection mode, back to 1080P recording standby mode.
TV-OUT Mode Connect to TV with the USB TV cable, boot up TV you can be see images through the TV screen, you can take pictures, video, open motion detection mode in the mean time.
USB Cable USB Cable and TV-OUT Cable is combined to one cable. Functions: 1. Insert to computer to transfer files and charge. 2. TV-OUT. 3. Insert exterior 5V charger or power bank.
Relevant ParametersVideo Format: AVI Video Code: M-JPEG Resolution: 1920×1080P; 1280×720P Frame Rate: 30fps Proportion 4:3 Resolution: 12M (4032×3024) Picture Format: JPG Motion Detection: Support Battery type: Built-in high-capacity lithium polymer Battery capacity: 200mAh Working time: 100 minutes Voltage: DC-5V Memory: Max up to 32GB Speed: High speed USB2.0 Port: Mini 8pin USB Support System: Windows me/7/8/10/2000/XP/2003/Vista; Mac Os; Linux Playing Software: Default Software
|
| • GPS GF-07 • A9 Wi-Fi mini DV • SQ11 Wi-Fi mini DV • SQ11 mini DV • XD Wi-Fi mini DV • F9 mini DV • GPS TK905 • GPS Mini A8 • GPS GF-09 • GPS GF-21 • iMiniCam Wi-Fi mini DV • A10 Wi-Fi mini DV • Q7 Wi-Fi mini DV • SQ10 mini DV • |
|
|
| | EN | HU | CS | FR | DE | IT | NL | ES | SV | DA | VI | JA | RO | EL | KO | SK | SL | BG | RU | |
| sq10 mini dv |
|---|
| © «Org-Info.Mobi» |