|
|
Gl4000 Spy Glasses |
| | Home | User manual | Gl4000 | |
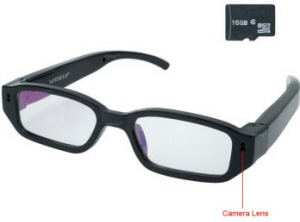
WISEUP 16GB 1280x720P HD Hidden Camera Glasses Mini DV Camcorder with Audio Recording FunctionNever Miss A Chance To Record Your Life's Special Moments
Key Features:
Operation• Please make sure your glasses are fully charged before using. • Please make sure the Micro SD card is securely fitted into the SD card slot on your glasses. Glasses will not work without a Micro SD card.
• Insert a Micro SD card into the SD card slot
VIDEO RECORDING • Power on the glasses by holding down the Power «On/Off» button. • Press the Power «On/Off» button for 2 seconds and the glasses will automatically enter into video record mode. • The camera indicator light will flash 3 times then go out indicating the glasses are recording video. • To stop video recording, press the Power «On/Off» button once and the glasses will enter into a standby mode and the indicator light will be solid red. • Press the Power «On/Off» button for 2 seconds to resume video recording.
CAMERA/STILL PHOTOGRAPHY • Power on the glasses by holding down the Power «On/Off» button. • From standby mode, the camera indicator light will be illuminated red, which will allow you to begin taking pictures. • Press the Power «On/Off» button every time you want to take a photograph. • The camera indicator light will flash red every time you take a picture.
CHARGING • Connect the glasses to your computer or a DC5V charger adapter by using the USB cable attached. The red light will flash slowly indicating the battery is being recharged. The battery will be fully recharged in 5 hours. • In order to maximize the battery life, please run out the battery before the first 3 times battery recharge.
SET THE DATE/TIME STAMP • Connect the camera to your PC computer with the USB cable • Removable disk drive folder appears • Click on the drive in the root directory and inside the root directory, create a «TXT» document file named «time». • Input the current date and time in the «txt» file with the format:
Year-Month-Day Hour:Minute:Second: example(2015-11-30 15:36:39)
• Restart the glasses and the system will upgrade the program automatically.
RESET To reset the glasses use a toothpick or non-mental pointed object to push the reset button. This will not reset the time or delete any files. Use this only if the glasses are not responding.
VIDEO & IMAGE FILES • Connect the camera to your PC computer with the USB cable • Removable disk drive folder appears • Click on the drive in the root directory to view, copy or delete video and image files. |
| • GF-07 • A9 • SQ11 WIFI • SQ11 • TK905 • XD • Mini A8 • Q7 • GF-09 • SQ10 • SQ8 • GF-21 • 70mai • MD81S-6 • MD80 • T189 • SQ16 • 70mai Pro • SQ13 • A10 • SQ23 • iMiniCam • TK921 • U21 • HERO6 • HERO5 • A10 • SQ9 • SQ12 • X009 • GT300 • Mi 4k • R3 • Mini DV • SJ7 • M10 • DV135S • U8 • BV01 • DV 600 • PC • X10 • H5 • H180 • Gl4000 • |
|
|
| | EN | DE | FR | ES | IT | RU | |
| gl4000 camera glasses |
|---|
| © «Org-Info.Mobi» |