|
|
HERO5 Session |
| | Home | User manual | HERO5 | |
 Quik stories Capture then kick back as your footage moves to the GoPro app and transforms into an awesome video—automatically.
Voice Control Enjoy hands-free control of your GoPro using simple voice commands.
Compact Mounting Sleek and compact, HERO5 Session captures amazing new perspectives.
4K Video + 10MP Photo Stunning 4K video, 10MP photos in Single, Burst, and Time Lapse modes.
Advanced Video Stabilization HERO5 Session can capture stunningly smooth video handheld, mounted to your favorite gear and more.
Simple One-Button Control A single press of the shutter button powers the camera on and starts recording automatically.
Rugged + Waterproof Durable by design, HERO5 Session is waterproof to 33ft (10m) without a housing.
Wear it. Mount it. Love it. Capture life in a whole new way with 30+ GoPro mounts and accessories, including 3-Way, Remo and more.
Access + share from anywhere. With a GoPro Plus subscription, HERO5 Session can automatically upload photos and videos directly to the cloud for easy viewing, editing and sharing on the go. User manual
• Capturing Time Lapse content
• Controlling your GoPro with your voice
• Accessing All Modes and Settings
• Time Lapse mode: Capture modes
• Protune
• Battery
• Getting startedCharging the batteryFor the best experience with your new camera, we recommend fully charging the battery before first use.
1. Open the door. 2. Charge the battery using the included USB cable.
Note: The battery cannot be removed from the camera.
The camera status lights turn on during charging and turn off when charging is complete. When charging with a computer, be sure that the computer is connected to a power source. If the camera status light does not turn on, use a different USB port. The battery charges to 100% in about 2 hours. For more battery information, see Battery.
TIP: For fastest charging, use GoPro’s Supercharger (sold separately). You can charge your camera with a USB-compatible wall charger or auto charger
Inserting + removing microsd cards• Insert the card (sold separately) at a downward angle with the label
facing down. For a list of the recommended cards, visit gopro.com/workswithgopro.
NOTICE: Use care when handling memory cards. Avoid liquids, dust, and debris. As a precaution, power off the camera before inserting or removing the card. Check manufacturer guidelines regarding use in acceptable temperature ranges. |
Updating your camera softwareTo get the latest features and best performance from your GoPro, make sure your camera is always using the most current software. When you connect to the Capture app or Quik for desktop, you are automatically notified if an update is available.
1. Download these apps: • Capture from the Apple© App Store© or Google Play™ • Quik for desktop from gopro.com/apps
2. Connect your camera to your smartphone/tablet or computer. If an update is available, the app provides instructions for installing it.
You can also update your camera manually using the microSD card and a card reader/adapter (sold separately). For details and information about the latest software version, visit gopro.com/update.
PRO TIP: To see your current software version, press the Menu button. Your camera scrolls through several settings, including the version number.
Powering ON + OFF HERO5 Session™ powers on when you press the Shutter button
[
The camera automatically powers off to conserve battery power when you press the Shutter button to stop capturing or after a period of inactivity.
PRO TIP: When carrying your camera in a bag or pocket, place the camera upside down in a frame (with the Shutter button covered) to protect the camera from accidentally capturing video or photos. To prevent the frame from marking the surface of the camera, leave the latch on the frame open.
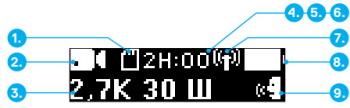
WARNING: Use caution when using your GoPro as part of your active lifestyle. Always be aware of your surroundings to avoid injury to yourself and others. Abide by all local laws when using your GoPro and related mounts and accessories, including all privacy laws, which may restrict recording in certain areas. Displaying status infoPress the Menu button to cycle through status information about your camera.
1. Remaining microSD card memory for each mode 2. Mode 3. Settings 4. Protune status (not shown) 5. Spot Meter status (not shown) 6. Video Stabilization status (not shown) 7. Wireless status 8. Battery status 9. Voice Control status
Note: The icons and settings that appear on the camera status screen vary by mode. Those shown above are for Video mode • QuikcaptureQuikCapture is the fastest way to capture video or time lapse content with HERO5 Session. Because the camera is powered on only when it is recording, you also conserve battery power. Capturing video with quikcapture1. With the camera powered off, press the Shutter button
[ 2. To stop recording, press the Shutter button again. The camera stops recording, beeps several times, and automatically powers off to maximize battery life. Capturing time lapse content with quikcapture1. With the camera powered off, press and hold the Shutter
button [
Your camera powers on, beeps several times, and begins recording in the time lapse capture mode that you last used (Time Lapse Photos, Time Lapse Video, or Night Lapse). The camera status lights blink while the camera is recording. 2. To stop recording, press the Shutter button again. The camera stops recording, beeps several times, and automatically powers off to maximize battery life.
• Camera icons
• Navigating your GoProYour HERO5 Session has three modes: • Video
Each of those modes has three capture modes.
Video - Capturing Video
Photo - Capturing Photos • Single
Time Lapse - Capturing Time Lapse • Time Lapse Photo
• Changing modes + settingsYou can change almost all video and photo settings using the buttons on the camera. To access all settings and modes, see Accessing All Modes and Settings.
1. Press the Menu button to turn on the status screen. 2. Press the Menu button repeatedly to move to Camera Settings,
then press the Shutter button [
3. To change the mode, press the Shutter button repeatedly to display the mode that you want (Video, Time Lapse, or Photo).
4. Press the Menu button to move to the next field.
5. Press the Shutter button repeatedly to display the capture mode that you want. 6. Press the Menu button to move to a setting, then press the Shutter button to display the option that you want. 7. When you are finished, press the Menu button to move to [
• Capturing VideoIn Video mode, HERO5 Session has three capture modes:
TIP: When the camera is off and you press the Shutter button, the camera powers on and captures video in the mode that you used most recently (Video, Video + Photo, or Looping). Capturing VideoThe fastest way to capture video content in the same mode you used last time is to use QuikCapture. But if you want to change the video capture mode or settings, follow the steps below.
1. Press the Menu button to turn on the status screen. 2. Select a capture mode (Video, Video + Photo, or Looping) and settings: a. Press the Menu button repeatedly to move to Camera Settings,
then press the Shutter button [
b. Press the Shutter button repeatedly until you get to
the Video icon [
c. Press the Menu button to move to the next field, then press the Shutter button repeatedly to select a capture mode. d. To change a setting, press the Menu button to move to the setting, then press the Shutter button repeatedly to display the option that you want. e. Press the Menu button to move to [
3. Press the Shutter button. Your camera beeps and the status lights blink during recording. 4. To stop recording, press the Shutter button again. The camera stops recording, beeps several times, and automatically powers off to maximize battery life.
TIP: When the camera is off and you press the Shutter button, the camera powers on and begins recording in the video mode you used most recently (Video, Video + Photo, or Looping). Hilight HiLightYou can mark specific moments in your video during recording with HiLight Tags. HiLight Tags make it easy to find the best highlights to share. To add a HiLight Tag, press the Menu button. HiLight Tags are visible during playback in Capture or Quik for desktop.
TIP: You can also add HiLight Tags during recording with the Capture app, Voice Control, or the Smart Remote. • Capturing PhotosIn Photo mode, HERO5 Session has three capture modes. Photos are captured at a resolution of 10MP.
Capturing Photos1. Press the Menu button to turn on the status screen. 2. Select a capture mode (Photo, Burst, or Night) and settings: a. Press the Menu button repeatedly to move to Camera Settings,
then press the Shutter button [
b. Press the Shutter button repeatedly until you get to
the Photo icon [
c. Press the Menu button to move to the next field, then press the Shutter button to select a capture mode. d. To change a setting, press the Menu button to move to the setting, then press the Shutter button repeatedly to display the option that you want. e. Press the Menu button to move to the check mark, then press the Shutter button to select it.
3. Press the Shutter button. Your camera beeps once, then beeps once for each photo that is captured. The camera status lights blink while the camera is capturing photos.
Note: To capture continuous photos at a rate of 5 photos per second, select the Photo capture mode, then hold down the Shutter button. Photos are captured until you release the button.
4. To power off the camera, press the Menu button to move to Exit Photo Mode, then press the Shutter button to select it. Capturing photos in the mode that you used last timeTo take a photo using the capture mode that you used most recently (Photo, Burst, or Night), use the shortcut below.
1. Press the Menu button to turn on the status screen. 2. Press the Menu button to move to Enter Photo Mode, then press
the Shutter button [
3. Press the Shutter button. The camera beeps once, then beeps once for each photo that is captured. The camera status lights blink while the camera is capturing photos. 4. To power off the camera, press the Menu button to move to Exit Photo Mode, then press the Shutter button to select it. • Capturing Time Lapse contentIn Time Lapse mode, HERO5 Session has three capture modes:
Capturing time lapse contentThe fastest way to capture time lapse content in the capture mode that you used last time is to use QuikCapture. But if you want to change the time lapse capture mode or settings, follow the steps below. 1. Press the Menu button to turn on the status screen. 2. Select a capture mode (Time Lapse Photos, Night Lapse, or Time Lapse Video) and settings: a. Press the Menu button repeatedly to move to Camera Settings,
then press the Shutter button [
b. Press the Shutter button repeatedly until you get to
the Time Lapse icon [
c. Press the Menu button to move to the next field, then press the Shutter button repeatedly to select a capture mode. d. To change a setting, press the Menu button to move to the setting, then press the Shutter button repeatedly to display the option that you want. e. Press the Menu button to move to the check mark, then press the Shutter button to confirm the selection.
3. Press the Shutter button. Your camera beeps once, then beeps once for each photo that is captured. The camera status lights blink during capture. 4. To stop capturing, press the Shutter button. • Controlling your GoPro with your voiceYou can control your HERO5 Session with your voice using a set of specific commands (see list below).
Note: Voice Control performance may be impacted by distance, wind, and noisy conditions. Keep the product clean and clear of debris.
Using voice controlVoice Control works best in close proximity to your GoPro.
Note: When you first turn on your camera, your GoPro allows you to select a voice control language. You can change your voice control language later through the Capture app.
1. Press the Menu button to turn on the status screen. 2. Press the Menu button repeatedly to move to Voice Control,
then press the Shutter button [
3. Turn on Voice Control: a. Press the Shutter button to select On. b. Press the Menu button to move to the check mark. c. Press the Shutter button to confirm the selection. 4. Say a command from List of Voice Commands 5. Turn off Voice Control: a. Press the Shutter button to select Off. b. Press the Menu button to move to the check mark. c. Press the Shutter button to confirm the selection.
TIP: To extend the voice control of your camera in windy and noisy environments, use Remo (Waterproof Voice Activated Remote). • List of voice commandsTwo types of commands are available with Voice Control:
• Action commands let you immediately capture video or photos. For example, if you just stopped recording video, you can say the command to take a photo or begin capturing time lapse—without having to first change the mode.
• Mode commands are useful if you want to quickly select a mode and then use the Shutter button to capture.
Your camera does not need to be in a specific mode to capture video or photos. You can use the action commands from any mode. Your camera captures video or photos based on the settings you previously selected.
• Action Command - Description
• GoPro start recording - Starts capturing video • GoPro HiLight - Adds a HiLight Tag to video during recording • That was sick - Adds a HiLight Tag to video during recording • GoPro stop recording - Stops capturing video • GoPro take a photo - Captures a single photo • GoPro shoot burst - Captures burst photos • GoPro start time lapse - Starts capturing time lapse • GoPro stop time lapse - Stops capturing time lapse • GoPro turn off - Powers off the camera
• GoPro Video mode - Changes the camera mode to Video (does not capture video) • GoPro Photo mode - Changes the camera mode to Photo mode (does not capture photos) • GoPro Burst mode - Changes the camera mode to Burst mode (does not capture burst photos) • GoPro Time Lapse mode - Changes the camera mode to Time Lapse (does not capture time lapse photos)
For the most updated list of commands, visit gopro.com/help.
TIP: If you are recording video or time lapse, you must stop recording before issuing a new command. • Playing back your contentPlaying back content on a computerTo play back your video and photos on a computer, you must first offload these files to a computer.
1. Download and install Quik for desktop from gopro.com/apps. 2. Transfer your files to your computer. For more information, see Offloading Your Content 3. Use the app to play back the files. Playing back content on a mobile device1. Connect your camera to Capture. For more information, see Accessing All Modes and Settings. 2. Use the controls on the app to play back your footage on your smartphone/tablet.
TIP: While playing back your video on a computer or mobile device, you can add HiLight Tags to mark the best moments. In Capture or Quik for desktop, tap the HiLight Tag icon. • Offloading Your ContentOffloading your content to a computerTo view your video and photos on a computer, you must first transfer these files to a computer. Transferring also frees up space on your microSD card for new content.
1. Download and install Quik for desktop from gopro.com/apps 2. Connect the camera to your computer using the included USB cable. 3. Press the Shutter button [
4. Follow the on-screen instructions in Quik.
TIP: To offload files to a computer using a card reader (sold separately) and your computer’s file explorer, connect the card reader to the computer, then insert the microSD card. You can then transfer files to your computer or delete selected files on your card.
Uploading your content to the cloudWith a subscription to GoPro Plus, you can upload your content to the cloud and then view, edit, and share it from any of your devices. From your mobile device, use the Quik™ app to edit content from the cloud and share it with your friends.
Note: When you upload your content to the cloud, your original files remain on your camera.
1. Subscribe to GoPro Plus: a. Download the Capture app to your mobile device from the Apple® App Store© or Google Play™. b. Follow the app’s on-screen instructions to connect your camera. c. If this is the first time you are connecting to the app, follow
the on-screen instructions to subscribe to GoPro Plus. Otherwise, tap [
2. Connect your camera to a power outlet. When the battery is charged, automatic upload to the cloud begins.
Note: Once you set up Auto Upload, you do not need to connect your camera to the Capture app to use this feature.
The files in the cloud are optimized for the web, so might not be full resolution. To offload files in their full resolution, connect your camera to the Quik app for desktop and offload the files to your computer.
3. To access content in the cloud from your mobile device, connect to
the Capture app and tap [
4. Download the desired content to your phone, then use the Quik app to edit and share.
TIP: After you subscribe to GoPro Plus, you can use Quik for desktop to offload your files to your computer. Quik then uploads the files to your GoPro Plus account. • Accessing All Modes and SettingsTo access all modes and settings, connect your camera to a GoPro remote (sold separately) or the Capture app. Settings are saved after you disconnect the camera.
Connecting to the Capture APPCapture lets you change all modes and camera settings using a smartphone or tablet. Features include full camera control, live preview, playback and sharing of content, and camera software updates. To learn more, visit gopro.com/apps.
Note: When your camera is connected to the app or remote, it remains on in standby mode after capturing video or photos.
1. Download Capture to your mobile device from the Apple© App Store© or Google Play™. 2. Follow the app’s on-screen instructions to connect your camera. Pairing with the remoteThe Smart Remote lets you change capture modes and settings, power your GoPro on/off, start/stop recording, and add HiLight Tags.
Note: HERO5 Session is compatible with the Smart Remote and the Wi-Fi Remote.
1. On the camera, press the Menu button to turn on the status screen. 2. Press the Menu button repeatedly to move to Connection Settings,
then press the Shutter button [
3. Press the Menu button to move to Connect New Device, then press the Shutter button to select it. 4. Press the Shutter button to display GoPro RC. 5. Press the Menu button to move to the check mark, then press the Shutter button to confirm the selection. The camera automatically begins pairing. 6. Put the remote into pairing mode. For more information, see the user manual for your remote at gopro.com/help. Connecting after pairingAfter connecting your camera to the app or remote for the first time, you can connect in the future through the Connection Settings menu. On the camera, press the Menu button to turn on the status screen.
1. Press the Menu button repeatedly to get to Connection Settings,
then press the Shutter button [
2. Press the Shutter button to select Turn On Connection. The
Wireless icon [
Turning off wireless from the cameraWhen you turn off your camera with the Capture app or a GoPro remote, wireless remains on so that you can quickly reconnect. To save battery power, turn off wireless when you are finished using it.
1. Press the Menu button to turn on the status screen. 2. Press the Menu button repeatedly to get to Connection Settings,
then press the Shutter button [
3. Press the Shutter button to select Turn Off Connection. The
Wireless icon [
• Video mode: Capture modesVideo mode contains three capture modes: Video, Video + Photo, and Looping. Each capture mode has its own settings.
VideoThis capture mode is for traditional video capture. The default settings are 1080p30 Wide, with Video Stabilization turned on. For more information, see these topics:
Video + PhotoVideo + Photo captures photos at set intervals while you record video. The default settings are 1080p30 Wide, with the interval set at 5 photos per second. Photos are captured at 10MP with a 4:3 aspect ratio. For more information, see these topics:
Looping VideoUse Looping to you continuously record video, but save only the moments that you want. For example, if you select a 5-minute interval, only the previous 5 minutes are saved when you press the Shutter button to stop recording. If you record for 5 minutes and do not press the Shutter button to stop recording and save, the camera records a new 5-minute interval by recording over your previous 5 minutes of footage.
This capture mode is useful when you are recording events that contain long periods of inactivity that you don’t want to save, such as fishing or recording from a car dashboard.
The default settings for Looping are 1080p30 Wide, with the interval set at 5 minutes. Looping is not available in 4K, 2.7K, 2.7K 4:3, and 1440p. For more information, see these topics:
• Video mode: Settings• Video ResolutionVideo resolution (RES) refers to the number of horizontal lines in the video. For example, 720p means that the video has 720 horizontal lines, each with a width of 1280 pixels. Higher numbers of lines and pixels result in greater detail and clarity. So, a video with resolution of 4K is considered higher quality than 720p because it consists of 3840 lines, each with a width of 2160 pixels.
Use this table to help you determine the best resolution for your activity. Also consider the capabilities of your computer or TV to be sure your hardware can support the selected resolution.
• 4K - Stunning high-resolution video with professional low-light performance. 8MP stills available from video. Recommended for tripod or fixed position shots.
• 2.7K - 16:9 resolution video downscales to provide stunning, cinema-quality results for professional productions.
• 2.7K 4:3 - Recommended for body-mounted, ski-mounted or surfboard-mounted shots. Provides large viewing area.
• 1440p - Recommended for body-mounted shots. Aspect ratio of 4:3 captures a larger vertical viewing area, compared to 1080p. High frame rate yield the smoothest, most immersive results for highaction capture. Great for sharing to social media.
• 1080p - Great for all shots and for sharing to social media. High resolution and frame rate yield stunning results. This resolution is available in all FOVs and its high FPS option (90fps) enables slow motion during editing.
• 960p - Use for body-mounted shots and when slow motion is desired. Aspect ratio of 4:3 provides large viewing area and smooth results for high action capture.
• 720p - Good for handheld shots and when slow motion is desired. • Frames Per Second (FPS)Frames per second (FPS) refers to the number of video frames that are captured in each second.
When selecting a resolution and FPS, consider the activity that you want to capture. Higher resolutions result in greater detail and clarity, but are generally available at lower fps values. Lower resolutions result in less detail and clarity, but support higher FPS values, which are important for capturing motion. Higher FPS values can also be used to create slowmotion videos. Aspect ratioGoPro video resolutions use two aspect ratios: either 16:9 or 4:3. Standard televisions and editing programs use 16:9. Footage shot in 4:3 is 33% taller, but must be cropped to 16:9 for playback on a TV. (If footage is not cropped, it appears with black bars on the sides of the image.) • Field Of View (FOV)The field of view (FOV) refers to how much of the scene (measured in degrees) can be captured through the camera lens. Wide FOV captures the largest amount of the scene, while Narrow FOV captures the least.
The FOV options that appear are based on the selected resolution and fps.
• SuperView - SuperView delivers the world’s most immersive field of view. Good for body-or gear-mounted shots. More vertical 4:3 content is automatically stretched to full-screen 16:9 for stunning widescreen playback on your computer or TV.
• Wide - Large field of view that is good for action shots where you want to capture as much as possible within the frame. This FOV results in a fisheye look, especially around the edge of the scene. (You can crop that out during editing, if needed.)
• Medium - Mid-range field of view that has the effect of zooming in on the center of the shot.
• Linear - Mid-range field of view that removes the fisheye effect found in the Wide FOV. Good for capturing aerial footage or any other shot where you want to remove the distortion.
• Narrow - Smallest field of view. Good for capturing content at a distance. Its most significant effect is that it zooms in on the center of the shot. • HERO5 Session Video Resolutions |
| Video Resolution (RES) | FPS (NTSC/ PAL)* | FOV | Screen Resolution | Aspect Ratio |
| 4K | 30/25 | Wide | 3840x2160 | 16:9 |
| 2.7K | 48/48 | Medium | 2704x1520 | 16:9 |
| 2.7K | 30/25 24/24 |
SuperView, Wide, Medium, Linear |
2704x1520 | 16:9 |
| 2.7K 4:3 | 30/25 | Wide | 2704x2028 | 4:3 |
| 1440p | 60/50 48/48 30/25 24/24 |
Wide | 1920x1440 | 4:3 |
| 1080p | 90/90 | Wide | 1920x1080 | 16:9 |
| 1080p | 60/50 | SuperView, Wide, Linear |
1920x1080 | 16:9 |
| 1080p | 30/25 24/24 |
SuperView, Wide, Medium, Linear, Narrow |
1920x1080 | 16:9 |
| 960p | 100/100 60/50 30/25 |
Wide | 1280x960 | 4:3 |
| 720p | 120/120 | Wide | 1280x720 | 16:9 |
| 720p | 60/50 30/25 |
SuperView, Wide, Medium |
1280x720 | 16:9 |
| * NTSC and PAL refer to the video format, which depends on your region.
For more information, see Video Format.
For more information about resolution, FPS, or FOV, see these topics:
When capturing video at high resolutions or high frame rates in warm ambient temperatures, the camera may become warm and use more power.
In addition, lack of airflow around the camera and using the camera with the Capture app further increase camera temperature and power consumption, and decrease camera recording time.
If the camera gets too hot, a message appears on the screen indicating that the camera is shutting down. For details, see Important Messages.
When recording in high-performance video modes, capture shorter video clips when in stationary use, and/or limit your use of features that increase power consumption, such as the GoPro Capture app. To control your camera remotely at higher temperatures, use a GoPro remote or Remo (Waterproof Voice Activated Remote) (both sold separately) instead of Capture. • Video stabilization
Video Stabilization is not available for 4K or frame rates higher than 60 fps. For Wide FOV, the image is cropped 10%. This setting is not available for Video + Photo or Looping video.
TIP: The more narrow the FOV, the greater the effect of Video Stabilization. • Interval (Video)
Video + Photo Intervals Available photo intervals for Video + Photo range are 5 (default), 10, 30, and 60 seconds. The quality of the photo depends on the selected video resolution and FOV.
Looping Video Intervals Available intervals for Looping are 5 (default), 20, 60, and 120 minutes. You can also select Max as the interval. With this option, the camera records until the memory card is full, then overwrites the content.
• Auto Low Light
Auto Low Light is available for frame rates higher than 30fps.
When Auto Low Light and Video Stabilization are both on and Auto Low Light activates because of dark lighting conditions, Video Stabilization is temporarily turned off to deliver optimal image quality in the dark scene. Protune
TIP: Easily create GoPro-style videos using GoPro Studio (included in Quik for desktop). Learn more and download this free software to your computer at gopro.com/apps. • Photo Mode: Capture ModesPhoto mode contains three capture modes: Photo, Night, and Burst. All photos are captured at 10MP. Each capture mode has its own settings. PhotoPhoto captures either single or continuous photos. For continuous photos, hold down the Shutter button to capture 5 photos/second, up to 30 photos.
The default FOV for Photo is Wide, with all advanced settings turned off. For more information, see this topics:
NightNight captures photos in dim to dark light. The shutter remains open longer to let in more light in dark environments, so Night photo is not recommended for handheld shots or mounted shots where the camera might move during exposure.
The default settings for Night are Wide FOV, with the Shutter set to Auto. For more information, see these topics:
BurstBurst captures up to 30 photos in 1 second, so it is perfect for capturing fast-moving activities. The default FOV for Burst is Linear, with the Rate set to 30 photos in 1 second. For more information, see these topics:
• Photo mode: Settings• Field Of View (FOV) (Photos)
• Wide - Largest field of view. Good for action shots to capture as much as possible within the frame. This FOV results in a fisheye look, especially around the edge of the scene. (You can crop that out during editing, if needed.)
• Linear - Mid-range field of view that removes the fisheye distortion. Good for capturing aerial footage or any other shot where you want a more traditional perspective.
• Rate
• 30 photos in 1, 2, 3, or 6 seconds • Shutter (Night photo)
• Auto - Sunrise, sunset, dawn, dusk, twilight, night • 2 seconds, 5 seconds - Dawn, dusk, twilight, traffic at night, Ferris wheel, fireworks, light painting.
TIP: To reduce the amount of blur when using Night photo, mount your camera on a tripod or other surface that is stable and cannot move. Protune
• Time Lapse mode: Capture modesTime Lapse mode contains three capture modes: Time Lapse Video, Time Lapse Photo, and Night Lapse Photo. Each capture mode has its own settings. Time Lapse VideoTime Lapse Video creates video from frames captured at specific intervals. This option lets you capture a time lapse event and immediately share it as a video. Time Lapse Video is available only in 4K, 2.7K 4:3, and 1080p resolutions and is captured without audio.
The default resolution for Time Lapse Video is 4K, with the default interval set at 0.5 second. For more information, see these topics:
Time Lapse PhotoTime Lapse Photo captures a series of photos at specified intervals. Use this mode to capture photos of any activity, then choose the best ones later. You can also capture photos over a long time frame, then convert them into a video using GoPro Studio (included with Quik for desktop).
The default for Time Lapse Photo is Wide, with the default interval set at 0.5 second. For more information, see these topics:
Night Lapse PhotoNight Lapse Photo captures a series of photos at set intervals when there is minimal light. The shutter remains open longer to let in more light in dark environments.
The default settings for Night Lapse Photo are Wide FOV, with the Interval set at Continuous and Shutter set to 2 seconds. For more information, see these topics:
• Time Lapse mode: SettingTime Lapse Video Resolution and FOVIn Time Lapse mode, resolution and FOV apply only to Time Lapse Video.
Video resolution refers to the number of horizontal lines in the video. Higher resolutions result in greater detail and clarity. So, a video with resolution of 2.7K is considered higher quality than 1080p because it consists of 2704 lines, each with a width of 1520 pixels.
The field of view (FOV) refers to how much of the scene (measured in degrees) can be captured through the camera lens. Wide FOV captures the largest amount of the scene.
Available resolutions for Time Lapse Video are 4K, 2.7K 4:3, and 1080p.
• Field of View (FOV) for Time Lapse
• Wide - Largest field of view. Good for action shots to capture as much as possible within the frame. This FOV results in a fisheye look, especially around the edge of the scene. (You can crop that out during editing, if needed.)
• Medium - Mid-range field of view. Has the effect of zooming in on the center of the shot.
• Linear - Mid-range field of view that removes the fisheye distortion. Good for capturing aerial footage or any other shot where you want a more traditional perspective.
• Narrow - Smallest field of view with reduced fisheye distortion. Good for capturing content at a distance. Its most significant effect is that it zooms in on the center of the shot.
• Interval (Time Lapse)
Time Lapse Photo and Time Lapse Video Intervals Available intervals for Time Lapse Video are 0.5 (default), 1, 2, 5, 10, 30, and 60 seconds.
• 0.5-2 seconds - Surfing, biking or other sport • 2 seconds - Busy street corner • 5-10 seconds - Clouds or outdoor scenes with long durations • 10-60 seconds - Lengthy activities, such as construction or artwork
Night Lapse Photo Interval Interval determines the rate at which photos are captured. Night Lapse intervals are Continuous, 5, 10, 15, 20, and 30 seconds, and 1, 2, 5, 30, and 60 minutes. Intervals of 4 and 5 seconds are available only when Shutter is set to 2 seconds.
Continuous (default) causes the Interval to match the Shutter setting. For example, if Shutter is set to 10 seconds and Interval is set to Auto, your camera captures a photo every 10 seconds. Photos are captured at 10MP.
• Continuous - Great for all exposures. Captures as quickly as possible, depending on the Shutter setting. • 4-5 seconds - Evening city scene, street lighting, or scenes with movement • 10-15 seconds - Dim lighting with slow scene changes, like night clouds with a bright moon • 20-30 seconds - Very low light or very slow scene changes, like stars with minimal ambient or street light • Shutter (Time Lapse)
The options for this setting are 2 seconds and 5 seconds.
TIP: To reduce the amount of blur when using Night Lapse Photo, mount your camera on a tripod or other surface that is stable and cannot move. Protune
• ProtuneProtune™ BenefitsProtune unlocks the camera’s full potential, yielding stunning image quality and cinema-caliber video and photos optimized for professional productions. Protune gives content creators more flexibility and workflow efficiency than ever before.
Protune is compatible with professional color correction tools, GoPro Studio (included with the Quik desktop app) and other video and photo editing software).
Protune enables manual control of color, white balance, shutter speed, and more for advanced control and customization of your video footage and photos.
Protune is available as an advanced setting for supported capture modes. The options for this setting are Off (default) and On. When Protune is on, PT appears on the camera status screen. Protune is not available for Video + Photo, Looping, or Time Lapse Video.
Changes that you make to Protune settings in one capture mode apply only to that capture mode. For example, changing the White Balance for Night Photo does not affect that setting for Burst photos.
Color allows you to adjust the color profile of your video footage.
• GoPro Color (default) - Provides GoPro color-corrected profile (same great color as when Protune is turned off).
• Flat - Provides neutral color profile that can be colorcorrected to better match footage captured with other equipment, offering more flexibility in postproduction. Due to its long curve, Flat captures more details in shadows and highlights.
White Balance lets you adjust the color temperature of videos and photos to optimize for cool or warm lighting conditions. Options for this setting are Auto (default), 3000K, 4000K, 4800K, 5500K, 6000K, 6500K, and Native. Lower values result in warmer tones.
You can also select Native to create a minimally color-corrected file from the image sensor that allows for more precise adjustments in post-production.
ISO applies only to the Video capture mode. This setting determines the camera’s sensitivity to light in low-light environments, and creates a tradeoff between brightness and resulting image noise. Image noise refers to the degree of graininess in the image.
In low light, higher ISO values result in brighter images, but with greater image noise. Lower values result in lower image noise, but darker images.
The way that ISO Limit is applied depends on the Shutter setting:
• Shutter set to Auto: The ISO Limit that you select is used as the maximum ISO value. The ISO value that is applied might be lower, depending on the lighting conditions. Available ISO modes are 1600, 800, and 400.
• Shutter not set to Auto: The ISO Limit that you select is either used as the maximum ISO value (if you select Max as the ISO Mode) or is locked at that value (if you select Lock as the ISO Mode). Available ISO modes are 1600, 800, and 400.
The Shutter setting in Protune applies only to Video and determines the amount of time that the shutter is open. The options available for this setting depend on the FPS setting. The default setting is Auto.
TIP: For best results when using the Shutter setting, mount your camera on a tripod or other stable surface to reduce the amount of blur in your video or photos.
Sharpness controls the quality of details captured in your video footage or photos. Options for this setting are High (default), Medium, and Low.
TIP: If you plan to increase sharpness during editing, turn this setting off.
Exposure Value Compensation affects the brightness of your video or photo. Adjusting this setting can improve image quality when shooting in environments with contrasting lighting conditions. This setting is available only if Shutter is set to Auto.
Options for this setting range from -2.0 to +2.0. Higher values result in brighter images. The default setting is 0.
TIP: Exposure Value Compensation adjusts brightness within the existing ISO setting. If brightness has already reached the ISO setting in a low-light environment, increasing the Exposure Value Compensation does not have any effect. To continue increasing the brightness, select a higher ISO value.
Reset Protune This option resets all Protune settings to their default values.
• Customizing Your Camera
|
| • GF-07 • A9 • SQ11 Wi-Fi • SQ11 • TK905 • XD • Mini A8 • Q7 • GF-09 • SQ10 • SQ8 • GF-21 • 70mai • MD81S-6 • MD80 • T189 • SQ16 • 70mai Pro • SQ13 • A10 • SQ23 • iMiniCam • TK921 • U21 • HERO6 • HERO5 • |
|
|
| | EN | NL | NO | RU | |
| hero5 session |
|---|
| © «Org-Info.Mobi» |