|
|
SJ7 STAR |
| | Home | User manual | SJ7 | |
 Native 4K Resolution up to 30FpsThe SJ7 Star is SJCAM’s first native 4K action camera. The SJ7 supports many different video resolutions at different frames per second. Record up to 4K@30fps and capture the best times of your life. You do not have to be a Star to enjoy the SJCAM Star.
A12S Sports and Flying Camera Processor The Ambarella A12S Sports and Flying Camera Processor is a system-on-chip solution that integrates an advanced image sensor pipeline (ISP), an H.264 encoder, and a powerfulARM Cortex™ CPU for advanced analytics, Wifi streaming and user applications. Targeting the next generation of connected sports, 360 (VR) and flying cameras, the A12S delivers up to 4K-video recording at 30fps or equivalent performance while streaming a second, live, mobile-resolution video over a WiFi network for preview or sharing. A unique architecture and 28-nm process technology.
SJ7 STAR Specifications: • Model: SJ7 Star
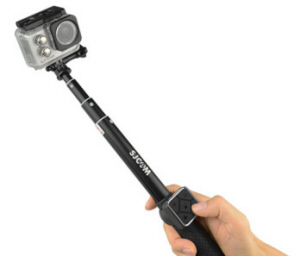
SJ SMART Remote (Optional) To pair your remote to your LEGEND: Swipe down from the top > Select Remote Control choose “Remote Control Pairing”. A picture instruction will appear. Press the Video and the Photo buons on the Remote simultaneously. “Pairing Completion ID” will show.
Once your Remote is paired, you will never need to pair it again. Every time the SJ7 STAR is turned on, your SJ Remote can control your camera. The Remote is tested to work at a maximum distance of 30 feet, or 10 meters, Line-Of Sight. The battery on your Remote will last you a long time as it only uses power when you press any of the buttons. The remote is powered with a Lithium CR2032 button-cell battery.
Removing the SJ7 from the Waterproof Case. Remove your battery by pressing the button and sliding the lock at the boom of the camera to release the compartment door. Once free, swing the back door open, then pull the camera out from the waterproof case.
Charging your camera using the Mini USB cable. Plug the Mini USB cable to the slot on the side of the camera, and the other end to a USB wall charger with an output of 5V 1A, or plug it to a computer.
Removing the battery. Remove your battery by pressing the button and sliding the lock at the
boom of the camera to release the compartment door.
Powering ON/OFF your SJ7 Press and hold the Power/Mode button to turn your camera on.
Inserting / Removing Memory Cards Insert a Micro SD card, with the label facing the touchscreen LCD, until it clicks into place. To remove, just push it in gently and the card will eject.
NOTE: To make sure you do not lose any data, only remove or insert your card while the camera is turned completely off.
PHOTO MODE - Page 1
PHOTO SIZE › Changes the size of still photos that will be recorded. Of course, the bigger the size the more detailed your pictures are, at the expense of file size.
PHOTO QUALITY › Refers to how much compression the output image will have. The higher the setting the bigger the file is, and will contain more detail.
LONG EXPOSURE › Sets how long the sensor collects light through the lens.
PHOTO STAMP › When enabled, will display the time and date on your photos.
SELF TIMER: Sets a delay timer to trigger the shutter at the set number of seconds.
PHOTO-BURST: Fast multiple succession of snapshots, choose the number of photos desired (Max: 10 consecutive shots).
TIME LAPSE PHOTO: Sets the interval between a long sequence of shots.
SHARPNESS › Changing the sharpness setting will make your images either crisper or smoother, adjust according to your preference.
AWB (AUTO WHITE BALANCE) › Adjusts the color temperature of the snapshot/recording to compensate for ambient lighting.
PHOTO MODE - Page 2
EV › Exposure Value - Changing EV compensates for the amount of light that is allowed in. You can change this value to a lower setting if the scene is too bright, to compensate. Or higher, if it is too dark, but still depends on your desired outcome. A higher EV will take longer for a photo to be taken, and will add blur to photos as they take longer to expose.
ISO › Sets he image sensor's sensitivity to light. Choose “Auto” on your camera if you are not familiar with this setting. Depending on the lighting conditions, use the lowest ISO whenever possible, as higher settings will introduce more noise while pixel sensitivity also goes up. Adjust depending on your preference.
METERING › Prioritizes the brightness level of specific parts of the scene depending on the Metering Mode that is used: Center Weighted, Multi, or Spot.
VIDEO RECORD - Page 1
VIDEO RESOLUTIONS: A higher resolution will have more detail in your video at the expense of file size. A lower resolution has a smaller filesize but will have less details in your video. Conversely, a higher resolution will contain more detail. Note: FPS (Frames Per Second) is part of the options in video resolution: The higher the FPS, the more images will be displayed per second, and the smoother the movement in the video is, at the expense of filesize.
VIDEO QUALITY: Sets how much detail is recorded in the video. Available in 3 presets: Super Fine, Fine, and Normal.
FOV: Field Of View. The wider the setting, the more parts of the scene are included in the recording. NOTE: When using the gyro, 1080p in 30 or 60fps will not have FOV options as they conflict with stabilization.
AUTO LOW LIGHT: When on, the image sensor will compensate for low light, at the expense of framecount. Turning the feature off will lock the framecount to the selected framerate (FPS) regardless of lighting conditions.
SLOW MOTION: Sets the frame rate to run at the set speed. When recording in higher FPS, video will appear slow.
GYRO SENSOR: Sets the gyro sensor to stabilize the movement seen in the frame.
DETECTION: Sets the camera to record every time a movement is detected.
DUAL FILES: Will save 2 versions of the recorded video, one in the selected resolution and another in low resolution (768 x 432 pixels) for use in editing.
VIDEO STAMP: When enabled, will display the date and time of your recording.
TIME LAPSE VIDEO: Sets the time interval between shots; recorded files will have a single video output (MP4) instead of multiple image files.
● TIP: For a more stable video or photo, turn on the Gyro Sensor. You will know if it’s active when you see a blinking hand on the upper right hand of the Display. [ Works in certain resolutions only, FOV off ].
VIDEO RECORD - Page 2
LOOP RECORD › Auto-saves your video in small sections, depending on selected length. It will record over your oldest video once there is no more space on your memory card.)
CAR DVR: Enabled powering on the camera and auto-record when the engine is started. Requires that the camera is plugged in to a car power adaptor.
MICROPHONE VOLUME: Sets the sensitivity of the microphone.
SHARPNESS › Changing the sharpness setting will make your images either crisper or smoother, adjust according to your preference.
AWB (AUTO WHITE BALANCE) › Adjust the color temperature of the snapshot/recording to compensate for ambient lighting.
EV › Exposure Value - Changing EV compensates for the amount of light that is allowed in. You can change this value to a lower setting if the scene is too bright, to compensate. Or higher, if it is too dark, but still depends on your desired effect. A higher EV will take longer for a photo to be taken, and may add blur to videos as each frame takes longer to expose.
ISO › Sets he image sensor's sensitivity to light. Choose “Auto” on your camera if you are not familiar with this setting. Depending on the lighting conditions, use the lowest ISO whenever possible, as higher settings will introduce more noise while pixel sensitivity also goes up. Adjust depending on your preference.
METERING › Prioritizes the brightness level of specific parts of the scene depending on the Metering Mode that is used: Center Weighted, Multi, or Spot.
● TIP: When using your camera as a dashcam, use a car charger cable and remove the internal battery to make sure it does not die out while you travel, and to avoid overcharging / overheating the battery. ● WARNING: Operating your camera while driving a vehicle is potentially dangerous. It is strongly advised to set up your camera before your trip.
GENERAL SETTINGS - Page 1
QUICK CAPTURE: Enables automatic recording when the camera is turned on.
DELAY OFF: In dash cam mode, the camera will power down 10 seconds later after the engine is turned off.
TV MODE › Options are NTSC or PAL. The color encoding and Framerate for video recording. Users in the US and Asia use NTSC (60Hz), most other countries use PAL (50Hz) and is the camera's default. Please check what you use in your country.
LIGHT FREQUENCY: For adjusting the frame rate frequency (50Hz or 60Hz). Also used to counter flicker-effects of fluorescent lamps or jello-effect of fast moving objects.
AUTO SHUTDOWN: Time settings to turn off camera when there is no activity.
SCREEN OFF: Sets LCD screen timeout or disables it.
STATUS LED: Enables or disables the LED status indicators.
WIFI LED: Enables or disables the LED status indicator for WiFi.
TV OUT: Enabled output via HDMI
BEEP: Enabled camera sounds like power on chime, shutter sounds, etc.
DATE SETUP: For adjusting the camera date.
TIME SETUP: For adjusting the camera time.
DATE FORMAT: Sets the preferred date format (Y/M/D; D/M/Y; M/D/Y)
LANGUAGE: Sets the camera language.
GENERAL SETTINGS - Page 2
WIFI: Options to turn the WiFi on or off
WIFI SSID: Change from default WiFi name to anything you want.
WIFI PASSWORD: For changing the default password when connecting to a mobile device.
FORMAT: Resets the memory card to factory settings, deletes all files.
DEFAULT SETTING: Resets the camera to factory settings.
SJ7 STAR (VERSION): Shows the current firmware version number that is installed.
FILE MANAGEMENT
You can transfer files from your camera by using any of these 4 methods.
1. Via USB cable connected from your camera's miniUSB slot to a Windows or Mac computer: a› Connect the USB cable, choose «Mass Storage Device» on your camera. b› Your device will show as a drive on your File Manager (Explorer on Windows; Finder in OS X)
2. Via WIFI through the SJCAM Zone App: a› Connect your camera to your phone: Device Settings > Wifi >
Choose your camera
3. By using a microSD card adaptor: a› Power off your camera and remove the microSD card.
4. By transferring the microSD card to your smartphone with removable
storage:
Optional: Format the microSD card on your camera to remove files added by your mobile device. |
| • GF-07 • A9 • SQ11 WIFI • SQ11 • TK905 • XD • Mini A8 • Q7 • GF-09 • SQ10 • SQ8 • GF-21 • 70mai • MD81S-6 • MD80 • T189 • SQ16 • 70mai Pro • SQ13 • A10 • SQ23 • iMiniCam • TK921 • U21 • HERO6 • HERO5 • A10 • SQ9 • SQ12 • X009 • GT300 • Mi 4k • R3 • Mini DV • SJ7 • |
|
|
| | EN | DE | PT | ES | FR | IT | NL | PL | RU | |
| sj7 star |
|---|
| © «Org-Info.Mobi» |