T189 mini DV

| Home | User manual | T189 |
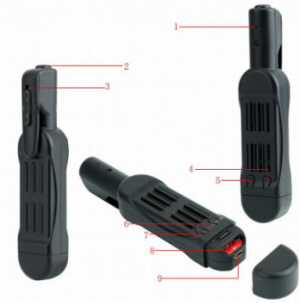
T189 mini Camera.

User manual.

I. Product Overview

1. Microphone
2. Power button
3. Camera lens
4. F button
5. R (Reset) button
6. Yellow indication light
7. Blue indication light
8. Micro SD card slot
9. Mini USB port

II. Inside the box

1 x Conference Recorder Camera
1 x USB / AV cable
1 x DC 5 V Charge Adapter

III. Operation

>> Please make sure the camera is fully charged before use.

>> Please check the micro SD card (4GB - max 64GB, please initialize the card memory before using for the first time). If it is not securely attached to the SD card slot of the camera, the camera will not operate. SDHC class 10 micro SD card is recommended.

[Caution]: If for some reason the micro SD card is not attached to the camera or the SD card can not be read, the blue and yellow indication light flashes four times and then goes out. The camera automatically stops.

3.1. Turning the power On/Off
3.1.1. Press the power button for 2 seconds to turn on the camera. After the blue and yellow indication lights are lit for 5 seconds, the yellow light turns off, the blue light stays on and the camera automatically enters standby mode.
3.1.2. If the camera is in recording or standby mode, press the power button for 7 seconds to turn off the camera.

[Caution]: If you are in standby mode, if you do not operate anything for one minute, the camera automatically stops.

3.2. 720P recording
3.2.1. Press the power button for 2 seconds to turn on the camera. Blue and yellow indication light will light for 5 seconds. Then the yellow light goes off, the blue light stays on, indicating that the camera automatically entered the standby.
3.1.2. Press the power button once to record in 1280 x 720P resolution mode. The blue indication light flashes 3 times and then goes out.
3.1.3. Press the power button again to stop recording. The blue indicator light will remain lit indicating that the camera has returned to standby mode.

[Caution]:
1). Video files are automatically generated and saved every 5 minutes.
2). Camera can continuously record for 5.5 hours in case of full charge.
3). Video Resolution: 1280 × 720 P

3.3. 1080P recording
3.3.1. Pressing the power button for 2 seconds turns on the camera. Blue and yellow indication light will light for 5 seconds. Then the yellow light goes out and the blue light stays on, indicating that the camera automatically entered standby mode.
3.3.2. Press the power button for 3 seconds to record at 1920 × 1080 P resolution. The yellow indicator light blinks 3 times and then turns off.
3.3.3. Press the power button again to stop recording. The blue indicator light will remain lit indicating that the camera has returned to standby mode.

3.4. Steel photography
3.4.1. Press the power button for 2 seconds to turn on the camera. After the blue and yellow indicator lights are lit for 5 seconds, the yellow light turns off and the blue light stays on, indicating that the camera automatically entered standby mode.
3.4.2. Press the camera button once to take a still picture. At the same time, the yellow indication lamp flashes once, it disappears, the blue light stays on and the camera enters standby → It means that it has returned to standby mode.

3.5. Initialization of micro SD card
3.5.1. Pressing the power button for 2 seconds turns on the camera. After the blue and yellow indication lights are lit for 5 seconds, the yellow light turns off, the blue light stays on, indicating that the camera automatically entered the standby.
3.5.2. When you press the camera button for 3 seconds, the blue and yellow indication light will blink 4 times at the beginning and light up for 5 seconds at the same time. The yellow indicator light turns off to indicate that the initialization of the SD card is completed.
3.5.3. The blue light stays on, indicating that the camera has entered standby.

IV. Upload video / image file

4.1. Turn off the camera, remove the micro SD card, and insert it into the SD card reader.
4.2. Insert the card reader in the PC computer.
4.3. Micro SD card is recognized as removable disk drive.
4.4. All image files are accessible in «DCIM» folder.

V. Setting the time / date stamp

5.1. Power off the camera and connect it to the PC computer.
5.2. The removable disk drive folder is displayed.
5.3. Click on the drive in the root directory and in the root directory,
Create a file named "TIMERESET.TXT".
5.4. Write the current date and time in the "TIMERESET.TXT" file in the correct format.
Year, month, day, hour, minute, second Y (ex: 20160412142432 Y). Save this file.
If you do not need the timestamp of the video file, change "Y" in "TIMERSET.TXT" file to "N".
5.5. When the camera is restarted, the system will automatically update the program.

VI. Charging only

6.1. Remove the micro SD card from the camera.
6.2. Connect the camera directly to the output of the AC power socket using the supplied USB cable and DC 5 V charge adapter.
6.3. It takes 3 hours to fully charge.
6.4. During charging, the blue indicator light will continue to light up.
6.5. When the camera is fully charged, the blue and yellow indicator lights will remain lit.

VII. Recording at the same time as charging

7.1. Insert the micro SD card in the camera.
7.2. Connect the camera to the AC power socket using the included USB cable and DC5 V 1A charging adapter.
7.3. The blue indicator flashes three times, then goes off, indicating that the camera is recording video at 1280 x 720 P resolution.
7.4. Press the power button once to stop video recording. The blue light stays on, indicating that the camera has automatically entered standby mode.

[Caution]: While charging, you can experience other functions of the camera.

VIII. Reconfiguration

If the camera does not respond for some reason or does not function properly, the Quick Reset restores to normal operation.

Operation: Press the R (reset) button once to reset the camera. The blue and yellow indicator light turns off and the camera automatically stops.

IX. Live video output

9.1. Connect the included AV cable to the TV or monitor.
9.2. Please select camera video signal input jack of TV and monitor.
9.3. Turn on the camera and start recording (see 3.2 or 3.3). Then, you can watch the live video of the camera on a TV or monitor during video recording.
9.4. You can experience other functions of this camera in live view mode.

Specifications:

- HD high quality images FULL HD1080P DV DC
- Support filling side recording function
- Imported high-definition
- High speed transmission of USB 2.0 interface
- Cabinet design, portable handheld DV DC
- The biggest can support 32 g b T - flash CARDS
- Video format: 1280X720P
- Support TV OUT TV monitor video connection
- Video format: 1920X1080P
- Built-in lithium battery for sustainable continuous
- Picture mode: 12M(4032X3024) camera 330 minutes (5.5 hours)

GF-07 A9 Wi-Fi SQ11 Wi-Fi SQ11 TK905 XD Wi-Fi Mini A8 Q7 GF-09 SQ10 SQ8 GF-21 70mai MD81S-6 Wi-Fi MD80 A10 T189

| EN | JA | NL | DE | FR | RO | IT | DA | VI | SV | ES | CS | PT | PL | FI | EL | HI | LT | HU | KO | BG | TR | TH | CN | MS | PH | SL | SK | UK | NO | ID | HR | RU |

t189 mini camera
© «Org-Info.Mobi»