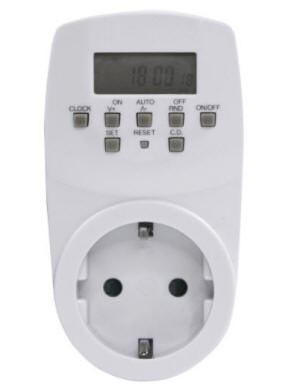
 A socket with an electronic timer is used to turn on and off household electrical appliances in the absence of people. The modes are set using the buttons. INSTRUMENT DIAGRAM [ CLOCK ] 12 / 2D format switch
[ + ] Increase button / program selection
[ - ] Decrease / program selection button
[ RND ] Random time
[ ON / OFF ] On / Auto / Off / Program reset
[ SET ] Clock, setting / toggle settings
[ RESET ] Reset all settings
[ C.D. ] Countdown / System switch to daylight saving time SPECIFICATIONS Timer type: ...... weekly, electronic
Power supply: ................... 230 V
Frequency: ............ .................. 50 Hz
Maximum load: ...... 16 A, 3500 W
Timer step: ............. ........ 1 minute
Operating temperature: ............. Q ... + 40 ° С
Accuracy: .............. .. ± 1 minute per month
Degree of protection: ....................... IP20
Battery operating time: ..... 100 hours SAFETY REGULATIONS • Before starting to use, inspect the device, make sure there is no mechanical damage. Do not use the outlet if it is damaged.
• Do not connect the electrical appliance to the mains if the load is more than 16 A.
• Make sure that the plug of the electrical appliance is firmly connected to the outlet of the socket.
• Do not expose the outlet to water or other liquids.
• The device may only be used indoors.
• Do not leave heating appliances unattended when plugged into an outlet. It is not recommended to use the socket with such electrical appliances.
• The device must be repaired and serviced by a qualified service technician or the appropriate service department.
• This appliance is not intended for use by persons (including Children) with physical, nervous or mental disabilities or lack of experience and knowledge, unless such individuals are supervised or instructed to use this appliance by a person in charge of for their safety. OPERATION PROCEDURE 1. Once you have installed the programs you want, plug in the timer socket.
2. Connect the lamp or electrical appliance to be controlled by the outlet.
3. Switch on the appliance. SETTING THE CLOCK 1. Press the [ RESET ] button to turn on the power, or press the [ CLOCK ] button to enter 24-hour operation.
2. Press the [ SET ] button, « WEEK » flashes on the screen . Press the [ + ] or [ - ] button to select the days of the week from Monday to Sunday (MO-TU-WE-TH-FR-SA-SU).
3. Press the [ SET ] button, « HOUR » flashes on the screen . Press the [ + ] or [ - ] button to set the hour 0-12 or 0-23.
4. Press the [ SET ] button, « MINUTE ». Press the [ + ] or [ - ] button to set the minutes 0-59.
5. During adjustment, hold down the [ + ] or [ - ] button for 3 seconds to set the time quickly. INSTALLING THE PROGRAMS 1. In clock mode, press the [ + ] or [ - ] button to enter the programming menu. The display will show 20 programs in which you can set the on / off [ on ] or [ off ], to do this, hold down the [ + ] or [ - ] button for 3 seconds.
2. Switch the programming menu to [ on ]. The display shows: -: -. Press the [ SET ] button, « WEEK » flashes on the screen . Press the [ + ] or [ - ] button to select the days from Monday to Sunday (MO-TU-WE-TH-FR-SA-SU).
3. Press the [ SET], « HOUR » flashes on the screen . Press the [ + ] or [ - ] button to set the hour 0-12 or 0-23.
4. Press the [ SET ] button, « MINUTE » flashes on the screen. Press the [ + ] or [ - ] button to set the minutes 0-59.
5. Press the [ SET ] button to complete the settings. To reset all settings, hold down the [ ON / OFF ] button.
6. A maximum of 20 programs are available for customization.
7. Press the [ CLOCK ] button to return to clock mode. AUTOMATIC ON / OFF 1. Press the [ SET ] button, wait until « ON / OFF » flashes . Press the [ + ] or [ - ] button to set ON / OFF.
2. Press the [ SET ] button, « HOUR » will flash on the screen. Press the [ + ] or [ - ] button to set the hour 0-12 or 0-23.
3. Press the [ SET ] button, « MINUTE » flashes on the screen. Press the [ + ] or [ - ] button to set the minutes 0-59.
4. Press [ SET ] button, « SECOND ». Press the [ + ] or [ - ] button to set the seconds from 0-59.
5. Press the [ SET ] button to complete the settings.
6. Press the [ C.D. ] button to start timing. RANDOM TIME FUNCTION The random time function helps to save energy at night.
In [ CLOCK ] mode, press the [ ON / OFF ] button to switch to ON-OFF-AUTO mode.
Press the [ RND ] button, the display will show « R » - random time mode.
The most effective way to use the function is from 18:00 (PM6: 00) to 6:00.
The device can work in 2 modes:
• The mode is [ ON ] - the device works from 15 to 30 minutes.
• The mode is [ OFF ] - the device works from 45 to 60 minutes. FORMAT 12/24 HOURS To switch the clock format on the display from 12 to 24 and vice versa, hold down the [ CLOCK ] button for 3 seconds. The display will show the AM / PM time mode or the watch will change to 24 hour mode. SUMMER TIME To set the clock to summer time, press simultaneously 2 buttons: [ ON / OFF ] and [ CD ]. The display will show « S » - the clock has been moved 1 hour forward. CLEANING AND MAINTENANCE • Unplug the device from the mains before cleaning.
• Use a soft dry cloth or tissue for cleaning. Do not use chemically active or aggressive cleaning agents for cleaning. STORAGE AND TRANSPORTATION Storage is carried out in the manufacturer's packaging in rooms with natural ventilation at a temperature of 0 ... + 40 ° C.
Transportation is allowed in the manufacturer's packaging by any type of covered transport that protects the goods from mechanical damage, dirt and moisture. |