| Site preparation and requirements. • The spa can be installed indoor or outdoor. For household use only.
• Make sure the area is water resistant, level, flat and free of sharp objects under or around the spa.
• Provide a properly located grounded electrical outlet with a protection grade of IPX4 or higher to connect the spa and allow easy access for periodic testing of the cord mounted RCD.
• Make sure there is enough clearance around the spa for full access to the spa equipment for maintenance and/or service.
• The area shall facilitate draining purposes during long term spa storage. Check local and national regulations regarding spa water disposal requirements.
• To reduce noise disturbance, do not install the spa in the immediate vicinity of vertical walls.
• The area shall be within reach of fresh water supply in compliance with local water regulations, and whose parameters shall be adjusted according to the spa water chemistry and balance section of the manual before first use of the spa.
• Check your local laws and regulations regarding indoor and/or outdoor spa installation. Additional requirements for indoor installation. • Make sure the floor can support the full weight of the filled spa with the maximum number of occupants. Check with a qualified contractor or a structural engineer to verify this requirement.
• Make sure the floor is water resistant and non-slip surface. Do not install the spa on carpet or other materials that will be damaged by moisture, condensation.
• Do not install the spa indoors on a second floor above finished living space due to the possibility of water and humidity damage.
• Humidity is a natural side effect of indoor spa installation. The room shall be properly ventilated to allow moisture to escape. Install a ventilating system to prevent excess condensation, moisture in the room. Additional requirements for outdoor installation. • Spa owners may need to comply with local or states laws relating to childproof fencing, safety barriers, lighting, and other safety requirements. Contact your local building code enforcement office for further details.
• Make sure the surface is level, flat, smooth and strong enough to support the full weight of the filled spa.
• Do not setup the spa on grass or dirt, as this increases the amount of debris entering the spa, and damage the spa floor.
• Do not expose the spa to direct sunlight for extended period of time. Provide protection from the sun such as sunshade, tent, awning or gazebo.
• It is possible to install and leave the spa outside at a temperature not lower than 4°C (39°F) provided the water temperature inside the spa is higher than 4°C (39°F) and the water inside the circulation system, pump, pipe are not frozen. Put a "temp barrier mat" between the spa floor and the ground to prevent heat loss from the bottom of the spa and to provide better heat retention. Do not use the spa if the ambient or water temperature is 4°C (39°F) or lower. Setup the spa with at least 2 persons. 1. Move the entire package to the selected site. Do not drag the spa tub across the ground as this can cause damage and leakage.
Open the carton carefully as this carton can be used to store the spa during long term storage or when not in use.
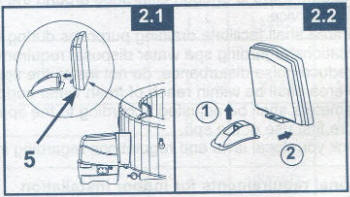
2. Lay out all the parts on the ground and make sure all the parts are accounted for. For missing or damaged parts contact the appropriate Intex Service Center listed in the separate "Authorized service Centers" sheet. Spa Control Panel Charging and Installation. 1. Make sure the back of the control panel (5) and the control base recessed channel surface are clean and dry.
2. Make sure the control base is plugged in and the RCD tested. Place the control panel (5) on the control base recessed channel to charge the built-in battery (see drawing 1). See "Spa Control Panel operation section for more details.
3. Once the control panel battery is fully charged, you may place the control panel on top of the spa tub wall (see drawing 2.1). To remove the control panel from the spa tub, lift the latch while pulling the control panel away from the support stand (see drawing 2.2). 
Dotional equipotential bonding system. Depending on local building codes and regulations, have a qualified electrician to connect the spa equipotential terminal with a conductor (wire) having a nominal cross-sectional area of 2.5 mm to 6mm to the household equipotential terminal. (Wire not included) 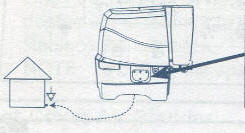

Inflation
Inflate the Spa Tub Wall 1. Take out the ground cloth (19) and spread it over the cleared area. Then spread out the spa liner over the ground cloth and point the drain valve towards a suitable draining area.
NOTE: Spread the ground cloth with the bubbles facing down over the cleared area where you intend to setup your spa.
2. Flip up the control base side cover (4) to reveal the air blower inflation outlet. Pull out the latch to open the cover, insert the hose adaptor (24) with hose and reattach the latch to the hose adaptor to secure it in place (see drawing 3). 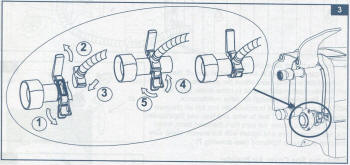
3. Unscrew the air valve cap on the spa tub to reveal the stem in the up position for inflation. Insert the other end of the inflation hose (7) into the valve and turn to the right to lock it in position (see drawing 4). 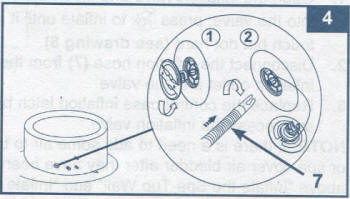
4. Press the  button to turn on the control panel. Press the button to turn on the control panel. Press the  button to inflate the spa tub wall for 8 to 10 minutes until it is firm to the touch but not hard (see drawings 5 & 6). button to inflate the spa tub wall for 8 to 10 minutes until it is firm to the touch but not hard (see drawings 5 & 6).
IMPORTANT: Do not over inflate or use high pressure air compressor to inflate.
5. Press the button again to turn it off. 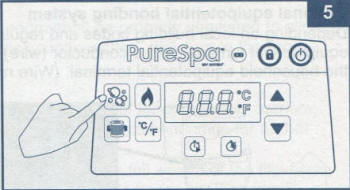
IMPORTANT: To prevent damage to the air blower motor never block the air blower outlet opening during inflation. 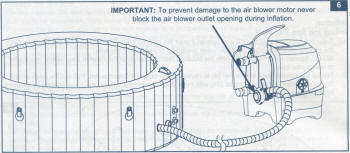
6. Replace the air valve cap back.
The cap is designed to be screwed on and off. Never exert force as this could cause the complete internal inflation system of the valve to come loose. See "Spa Tub Air Valve Fastening" for valve maintenance.
NOTE: If there is a need to replace the spa tub air pressure release valve core (23) due to wear and tear, use the included wrench (22) to unscrew the core from the valve base. Insert the replacement core and tighten with the wrench. Make sure the core is securely tightened (see drawing 7). 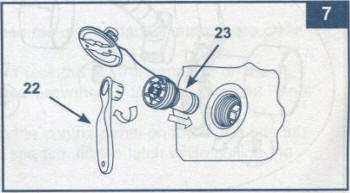
Inflate the Spa Cover Air Bladder. 1. Open the inflation valve and insert the inflation hose (7) into the valve; press to inflate until it is firm to the touch but not hard (see drawing 8).
2. Disconnect the inflation hose (7) from the air blower inflation outlet and the valve.
3. Replace the control base inflation latch back; close and recess the inflation valve.
NOTE: If there is a need to add some air to the spa tub wall or spa cover air bladder after they have been setup, refer to above "Inflate the Spa Tub Wall" and "Inflate the Spa Cover Air Bladder" sections. The cover air bladder is preinstalled inside the spa cover. If it needs to be reinstalled, place the uninflated air bladder inside the spa cover lip before inflating the bladder. 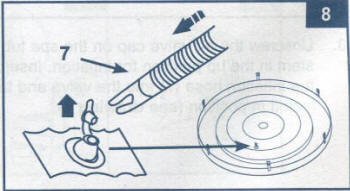
Deflation
For Spa Tub Wall: 1. Unscrew the cap to reveal the stem, push the stem in and turn 90 degree right to secure it in the down position (see drawing 9).
2. Once the deflation is completed, push the stem in and turn 90 degree left to return it to the inflation position.
3. Replace the cap back.
NOTE: To deflate the spa tub for storage, see "STORAGE" section. 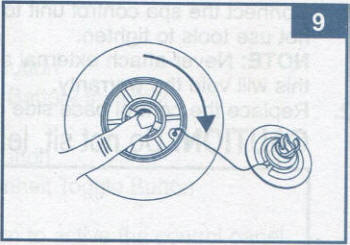
For Cover Air Bladder: 1. Pull valve cap out and squeeze the valve at its base until deflated.
2. Close and recess the valve back.  IMPORTANT IMPORTANT
The spa tub inflation/deflation valve incorporates an "air pressure release" function that automatically releases excess air when the spa tub internal pressure is between 1.5 - 2.5 psi (0.103 - 0.172 bar). 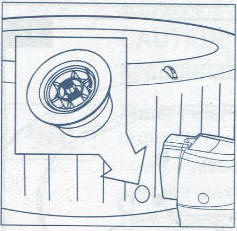
Air pressure release valve. 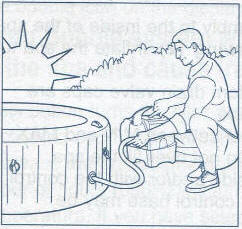
Inflation of spa in the morning. 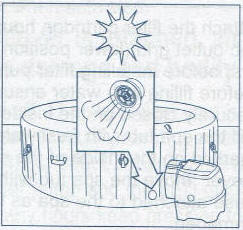
Air expands in the midday heat. Air pressure release valve kicks in and releases excess air. 
Colder temperatures at night cause the spa to seem less inflated. 
Air expands in the midday heat and correct air pressure is restored. Spa Control Unit Installation. 1. Connect the spa control unit to the spa tub (see drawing 10). Hand-tighten the connectors securely. Do not use tools to tighten.
NOTE: Never attach external accessories not supplied with the kit to the spa tub or control base unit, as this will void the warranty.
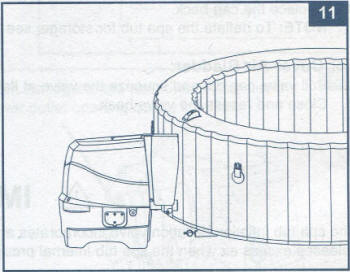
2. Replace the control base side covers (4) (see drawing 11). CAUTION: Do not sit, lean, cover or place any objects over the spa control unit. 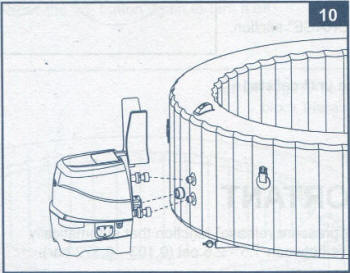
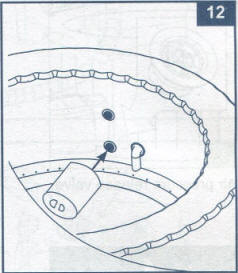
3. Attach the filter cartridge housing assembly to the inside of the spa tub outlet grid (lower position) (see drawing 12). Inflate the spa tub first before installing filter pump fittings.
4. Before filling with water ensure the bottom drain valve caps are securely closed on the inside and outside.
5. Fill the spa tub with freshwater to a level between MIN and MAX marked on the inside of the spa wall. Do not over fill the spa. Never move the spa tub with water inside and/or with the control base attached to the spa as the spa or control base may be damaged. WARNING: Never pour water with a temperature higher than 40°C (104F into the spa directly. It is recommended to fill the spa tub with lukewarm water for quick heating and energy saving. 6. Place the spa cover and spa air bladder (pre-installed in spa cover) over the spa tub, and make sure the spa cover buckles are locked using the key provided after pulling the buckled straps tight. IMPORTANT: Inspect the spa cover regularly for leak, premature wear and tear or deterioration. Never use a damaged spa cover. 7. Ensure that the spa base is plugged into a properly located and sized electrical outlet and press the button to turn on the control panel. Press the  button on the control panel to activate the heater, see "Spa Control Panel" operation section. button on the control panel to activate the heater, see "Spa Control Panel" operation section. Spa Cover The attachment buckles of the cover are locking buckles. Two keys are provided in the plastic bag with the manual and other accessories. Each buckle is marked with "locked" and "unlocked" symbols for easy operation: put the key into the slot on the buckle and turn it to the appropriate position to lock or unlock the buckle respectively.
To assure safety from unauthorized access, always put the cover on when spa is not in use and lock all buckles. Always keep the keys out of reach of children. In case you misplace the keys, you can use any similar size flat screwdriver to lock or unlock the buckles.
When the spa is being used, the cover should be placed in a clean, dry area, otherwise it can pick up dirt and bacteria. Covers should not be put on wooden tables or wooden decking because of the risk of bleaching the wood. A cover lifter, dedicated support or similar device, is recommended for ensuring that the cover, mostly its side facing the water, does not come into contact with the ground or any other dirty surfaces.  ● ● 
| 
