 The GreenWorks GD40BV cordless blower is a semi-professional model for removing debris from lawns, garden areas, backyards, patios, etc. This model is equipped with a brushless motor with DigiPro. The DigiPro engine is more efficient and more reliable than a conventional brush engine, comparable in power to an internal combustion engine. At the same time, it is absolutely environmentally friendly, does not require additional maintenance, is easy to operate and has a reduced level of vibration and noise. Unlike gasoline models, the electric blower can be used indoors as it does not generate harmful emissions. The device has a comfortable rubberized grip, as well as an adjustable air flow rate. The model is equipped with a standard seat for an additional "vacuum cleaner" pipe. By replacing the standard nozzle with a collection bag, you can use the blower as a vacuum cleaner. Collect pre-harvested leaves, small debris, etc. in a bag. In addition, the blower has a mulching function. This model is instantly ready for use at the push of a button. Powered by a 40V battery, the blower ensures long autonomous operation. This battery is compatible with other devices in the G-MAX 40V range. The blower is equipped with an ON button for safe operation. The advantages of the model:
- Work from a 40V battery compatible with other devices from the G-MAX 40V line;
- Brushless motor with DigiPro technology;
- Does not require time to prepare for work, turning on by pressing one button;
- Adjustment of the air flow rate;
- Maximum air flow speed 280 km/h;
- Vacuum cleaner function;
- Mulching;
- Rubberized handle;
- Battery life up to 60 minutes (from 4 Ah battery at low speed, not included). User ManualType: 24227
Motor: 40 Volt DC
Air Velocity: 280 km/h (Max)
Weight (Battery Pack not included): 4 kg
Battery Pack: 29717/29727
Charger: 29417 / 29447
Measured sound pressure level: LpA: 90dB(A) KpA:2 dB(A)
Measured sound power level: LWA: 104dB(A)
Vibration: Ah: 3.5m/s2, k:1.5m/s2 DESCRIPTION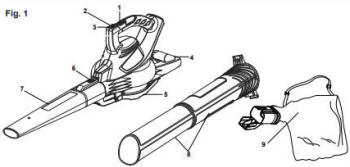
1. Variable switch
2. Low/high button
3. ON/OFF button
4. Auxiliary handle
5. Mulch/vacuum gate
6. Lock button
7. Blower tube
8. Mulcher tube
9. Bag
10. 40V lithium-ion battery
11. Notched area
12. Air outlet
13. Slot
14. Tab
15. Strap ASSEMBLYUNPACKING ■ Carefully remove the product and any accessories from the box.
■ Inspect the product carefully to make sure no breakage or damage occurred during shipping.
■ Do not discard the packing material until you have carefully inspected and satisfactorily operated the product.
■ If any parts are damaged or missing, please call your Greenworks Tools service centre for assistance. The blower vac is supplied with some components not assembled. To assemble these, proceed as follows: ASSEMBLE AS A MULCHER See Figure 2. 
■ Slide the front and rear mulcher tubes together until locked. (See fig 2)
■ Pull the lock button forward to disengage the gate.
■ Hold the gate open. (See fig 2.1)
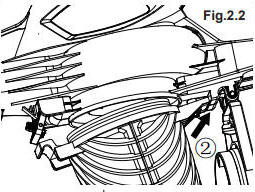
■ Insert the "wedged" end clip of the mulcher tube into the rear clip. (See fig 2.2).
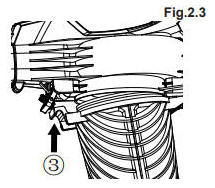
Push the "hooked" end clip of the mulcher tube into the front clip. (See fig 2.3).
Press the lock button back to engage the mulcher tube. (See fig 2.4) 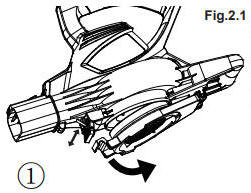
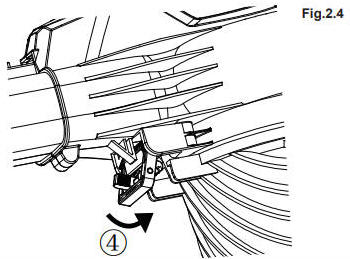
■ To remove mulcher tubes, follow the steps(3) (2) (1).
■ Insert the bag adaptor into the blower outlet Lock the bag adaptor with the lock button. To remove the bag, simply press lock button and remove bag. (see Fig.4). NOTE: It may be necessary to remove the blower tube or mulcher tubes to clear a blocked tube or impeller  WARNING WARNING
To prevent serious personal injury, make sure the switch is in the OFF position, it is unplugged, and the impellers have stopped before attaching or removing tubes.
ASSEMBLE AS A BLOWER See Figure 3. 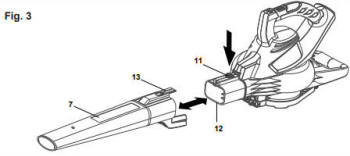
■ Slide blower tube forward until the notched areas on the blower housing click into the slots on the tube. INSTALLING BAG WITH SHOULDER HARNESS See Figure 4. 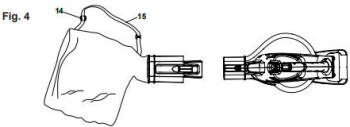
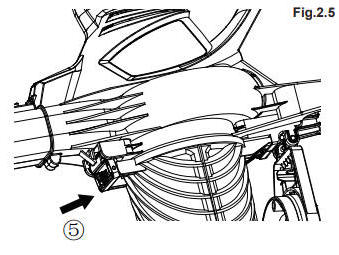
■ While standing in the operating position adjust the length to fit the operator's size. Pull the tab lengthen, pull the strap to shoten. For complete charging instructions, refer to the Operator’s Manuals for your battery pack and charger models. NOTE: To avoid serious personal injury, always remove the battery pack and keep hands clear of the variable speed trigger when carrying or transporting the tool. TO INSTALL BATTERY PACK See Figure 5. 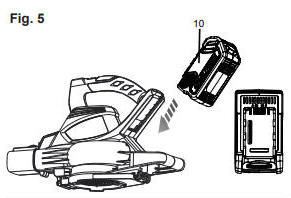
■ Place the battery pack in the blower. Align raised rib on battery pack with grooves in the blower's battery port.
■ Make sure the latch on bottom of the battery pack snaps in place and that battery pack is secured in the blower before beginning operation. CAUTION
When placing battery pack in the blower, be sure the raised ribs on the battery pack align with the grooves in the top of the blower. Make sure the battery is fully seated, and it latches into place properly. Improper installation of the battery pack can cause damage to internal components. TO REMOVE BATTERY PACK See Figure 5. ■ Release the variable speed trigger to stop the blower.
■ Press and hold the button at the bottom of the battery pack.
■ Remove battery pack from the blower. STARTING / STOPPING THE BLOWER / MULCHER See Figures 6. 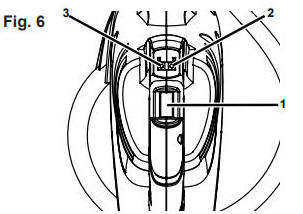
1. Press the On/Off (  ) Switch and you will hear beeping sounds, and the blower will turn on in low speed. ) Switch and you will hear beeping sounds, and the blower will turn on in low speed.
2. Roll the variable speed dial forward to increase speed from 110km/h to 210km/h
3. Press the low/high switch (  ) to increase the speed options from 130km/h to 280km/h. ) to increase the speed options from 130km/h to 280km/h.
4. To Turn off, press the on/off switch ( ) IMPORTANT: TURBO-MULCH by pressing the LOW HIGH button, with the variable speed dial set to high speed. HOLDING THE BLOWER / MULCHER See Figures 7. 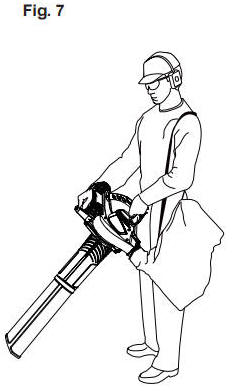
Before operating the unit, stand in the operating position. Check for the following: ■ Operator is wearing proper clothing, such as boots, safety glasses or goggles, ear/hearing protection, gloves, long pants and a long sleeve shirt. WARNING
To avoid serious personal injury, wear goggles or safety glasses at all times when operating this unit. Wear a face mask or dust mask in dusty locations. WARNING
To prevent serious personal injury or damage to the unit, make sure the blower tube or the mulcher tubes and the bag are in place before operating the unit. OPERATING TIPS See Figure 8. 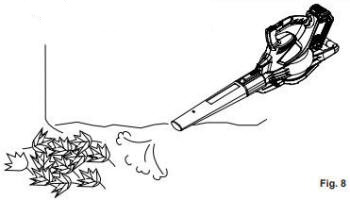
■ The bag is installed and zipped closed (when used as a mulcher).
■ Be sure the bag is zipped closed before operating the unit.
■ Assure the unit is not directed at anybody or any loose debris before starting the unit.
■ Verify that the unit is in good working condition. Make sure the tubes and guards are in place and secure.
■ Always hold the unit with both hands when operating.
■ Keep a firm grip on both the front and rear handle or grips.
■ To reduce the risk of hearing loss associated with sound level(s), hearing protection is required.
■ Use the shoulder strap when using unit as a mulcher.
■ Operate power equipment only at reasonable hours not early in the morning or late at night when people might be disturbed. Comply with times listed in local ordinances. Usual recommendations are 9:00 am to 5:00 pm, Monday through Saturday.
■ To reduce noise levels, limit the number of pieces of equipment used at any one time.
■ To reduce noise levels, operate power blowers at the lowest possible speed to do the job.
■ Use rakes and brooms to loosen debris before blowing.
■ In dusty conditions, slightly dampen surfaces.
■ Conserve water by using power blowers instead of hoses for many lawn and garden applications, including areas such as gutters, screens, patios, grills, porches, and gardens. NOTE: Please ensure that the Mulch/Vacuum Gate is completely closed and locked. AIR VENTS Never cover air vents. Keep them free from obstructions and debris. They must always remain clear for proper motor cooling. WARNING
To avoid serious personal injury, do not wear loose fitting clothing or articles such as scarves, strings, chains, ties, etc., that could get drawn into the air vents. To make sure long hair does not get drawn into the air vents, tie back long hair. OPERATING AS A BLOWER Hold the blower firmly. Sweep from side to side with the nozzle several inches above the ground or floor. Slowly advance the unit, keeping the accumulated pile of debris in front of you. Most dry blowing operations are better suited to low speeds, rather than high. High speed blowing is a better way to move heavier items like large debris or gravel. OPERATING AS A MULCHER Hold the vac firmly, tilting the mulcher tubes (2-4 in. or 5-10 cm), and use a sweeping action to collect light debris. The debris will flow into the bag. Items such as small leaves and twigs will be mulched as they pass through the fan housing. For longer bag life and increased performance, empty the bag often. CLEANING THE COLLECTION BAG ■ Empty the collection bag after each use to avoid deterioration and obstruction of the air flow which will reduce the performance of the unit.
■ Clean the collection bag as needed. With eye protection on, turn the dust bag inside out after initial emptying and vigorously shake out the dust and debris. CLEARING A BLOCKED TUBE / IMPELLER WARNING
To avoid serious personal injury, be sure the unit is OFF and unplugged before clearing the impeller.. WARNING
To avoid serious personal injury, always wear gloves to protect yourself from the impeller blades or other sharp objects. 1. Press the on/off ( ) button and wait for the unit to come to a complete stop.
2. Remove the battery pack.
3. Remove the blower tube or mulcher tubes and the bag.
4. Carefully remove material blocking the tube or impeller. Inspect the blades to ensure no damage has occurred. Rotate the impeller blades by hand to ensure the blockage is completely cleared.
5. Reinstall the blower tube or mulcher tubes and the bag.
6. Insert the battery pack into the unit. MAINTENANCE WARNING
When servicing use only identical replacement parts. Use of any other parts may create a hazard or cause product damage. Avoid using solvents when cleaning plastic parts. Most plastics are susceptible to damage from various types of commercial solvents and may be damaged by their use. Use clean cloths to remove dirt, dust, oil, grease, etc. WARNING
Do not at any time let brake fluids, gasoline, petroleum based products, penetrating oils, etc. come in contact with plastic parts. They contain chemicals that can damage, weaken or destroy plastic. WARNING
Do not attempt to modify this tool or create accessories not recommended for use with this tool. Any such alteration or modification is misuse and could result in a hazardous condition leading to possible serious personal injury. WARNING
To avoid serious personal injury, always remove the battery pack from the tool when cleaning or performing any maintenance. STORING THE BLOWER Clean the blower thoroughly before storing. Store the blower in a dry, well-ventilated place that is inaccessible to children. Keep away from corrosive agents such as garden chemicals and de-icing salts. ■ Store and charge your batteries in a cool area. Temperatures above or below normal room temperature will shorten battery pack life.
■ Never store batteries in a discharged condition. Wait for battery pack to cool and fully charge immediately.
■ All batteries gradually lose their charge. The higher the temperature, the quicker they lose their charge. If you store your unit for long periods of time without using it, recharge the batteries every month or two. This practice will prolong battery pack life. Diagnostics with LED indicatorsStatus / LED / SolutionHall fault protection
Green light off red light on; flash 7 times; each time keep 1hz interval: 3s; keep 60s buzzer alarm
● Off the trigger and restart it Low-voltage protection
Green light off red light on; flash 5 times; each time keep 1hz interval: 3s; keep 60s buzzer alarm
● Off the trigger and restart it or Charging the battery Over load protection
Green light off red light on; flash 4 times; each time keep 1hz interval: 3s; keep 60s buzzer alarm
● Off the trigger and restart it Battery jam protection
Green/Red light off; Unit stop running
● Resetting the blower vac by removing the battery for 5 seconds Abnormal battery temp
Led off
● When the temp. of the battery low down, the blower can run well TroubleshootingProblem / Possible cause / SolutionUnit will not blow or mulcher. 1. Bag full
● Empty the bag. 2. Blocked tube
● Clear the blockage. 3. Blocked impeller
● Clear the blockage 4. Torn bag
● Replace the bag. 5. Bag unzipped
● Zip up the bag. 6. Battery is not secure.
● To secure the battery pack, make sure the latches on the top of the battery pack snap into place. 7. Battery is not charged.
● Charge the battery pack according to the instructions included with your model. Unit will not start. 1. Battery is not secure.
● To secure the battery pack, make sure the latches on the top of the battery pack snap into place. 2. Battery is not charged.
● Charge the battery pack according to the instructions included with your model. 3. Power/speed switch is in the OFF position.
● Press the on/off switch. 4. Defective power switch.
● Call toll free helpline: +004922129242919. 5. Vac tubes are not correctly installed.
● Check vac tubes to ensure that they are allowing the switch to be engaged when correctly installed. 6. Intake gate/cover is not closed.
● Ensure that gate/cover is fully closed and locked. |