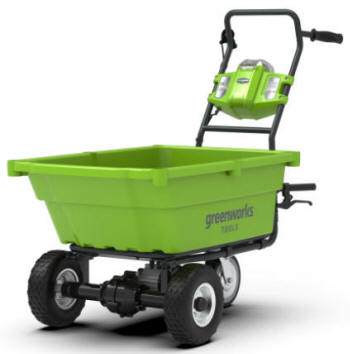
 Greenworks’ three wheeled and self-propelled Garden Cart is convenient for transportation during heavy work in and around your garden. It has a max load of 100 kg and easy dumping with a spring assisted lift handle, making gardening easier and more enjoyable together with family and friends. Thanks to its variable speed and reverse function it is suited for regular walking pace. For extra safety there is a security starter key. This item is a bare tool
You will need to buy the batteries and chargers separately, or use any existing batteries and chargers you have from your other Greenworks 40V Tools So much better than petrol!
Using a cordless trolley is so much easier than a manual machine. There is no pushing needed, and unlike petrol machines they start first time, every time. They make heavy objects light to move, it’s easy to tip, quiet in operation, and has no fumes or odours, all round they are much nicer and easier to use, and you get the benefit of being able to buy other tools to fit the battery, at much cheaper prices. 100kg (220lb) Loading capacity
106lt Volume Parking brake
2 speed settings (3-5 mph) & Reverse drive
Hydraulic assist tipping
Robust Steel Frame
Heavy duty Transmission
20 degree climbing capability with 90kg
Internal Dimensions:
Bottom of tub: 47x67cm
Top of Tub: 55×86 Height: 28cm User ManualYour garden cart has been engineered and manufactured to greenworks tools’s high standard for dependability, ease of operation, and operator safety. When properly cared for, it will give you years of rugged, trouble-free performance. Rules for safe operation WARNING WARNING
Read all safety warnings and all instructions. Failure to follow the warnings and instructions may result in electric shock, fire and/or serious injury.
INTENDED USE This garden cart is a garden tool, intended for carrying soil, grass, etc. in domestic use. GARDEN CART SAFETY WARNINGS WARNING
When using electric gardening appliances, basic safety precautions should always be followed to reduce the risk of fire, electric shock, and personal injury, including the following. ■ Read, understand, and follow all instructions on your garden cart’s label and in this guide. Be thoroughly familiar with the controls and the proper use of your garden cart before starting.
■ Only allow responsible individuals who have a thorough understanding of these instructions to operate your garden cart. Never allow children to operate your garden cart.
■ Use extra care when approaching blind corners, shrubs, trees, or other objects that may obscure your vision.
■ Wear shoes with non-slip treads. If you have safety shoes, wear them. Do not use your garden cart while barefoot or wearing open sandals.
■ If you are ever unsure about an action you are about to take, please don’t do it.
■ Thoroughly inspect the area where your garden cart is to be used, and remove all stones, sticks, wire, pet supplies or lawn toys, and any other foreign objects that you could run over. Also note the location of holes, ruts, bumps, stumps, and other possible hazards.
■ Use your garden cart only in daylight or in an area well lit by artificial light.
■ Keep a firm hold on the handle, and walk — never run.
■ Do not put your hands or feet near or under the rotating wheels.
■ Never operate your garden cart in the rain or in tall wet grass. Remember, this is an electric garden cart.
■ Do not move in reverse unless absolutely necessary. When maneuvering in reverse, use extreme caution. Always look down and behind you before moving backwards.
■ Do not operate your garden cart if it does not start or stop normally.
■ Stay alert and watch what you are doing.
■ Always be sure of your footing.
■ Do not operate your garden cart when you are tired or under the influence of drugs or alcohol.
■ Do not use your garden cart for any job other than those for which it is intended.
■ Use only manufacturer-recommended replacement parts and accessories.
■ Do not modify your garden cart in any way. Modifications void your warranty.
■ When operating over uneven terrain and slopes, use extreme caution to ensure solid and firm footing.
■ Do not pull your garden cart backwards while running in forward gear. This can damage the motor and ruin the gears.
■ Prevent damage to the motor and gears – do not tow anything behind your garden cart or overload it.
■ Evenly disperse the load in your garden cart’s bucket.
■ Use caution when travelling on slopes. WARNING
Do not operate the garden cart on the road. ■ Do not operate across steep slopes; always travel up and down slopes.
■ Do not use on slopes over 15 degrees.
■ Park on level surfaces for stability when loading or unloading.
■ Weight limit: 220 lbs (100kg) on level cement surfaces — overloading may cause injury and could permanently damage unit.
■ Only load with as much weight as you can control when machine is moving.
■ Never carry passengers.
■ Use only Greenworks batteries.
■ Do not use if forward/backward button or power switch or safety button is not working properly.
■ Use caution when operating in wet conditions.
■ Do not operate in explosive atmospheres such as in the presence of flammable liquids, gasses or flammable dust. If in doubt, wait for dust to settle before using.
■ Be sure the area is clear of other people before moving. Do not allow children, bystanders, or pets in your work area when your garden cart is being moved.
■ Do not charge appliance in rain, or in wet locations.
■ Do not use battery-operated appliance in rain.
■ Remove or disconnect battery before servicing, cleaning or removing material from the gardening appliance.
■ Use only the following type and size battery(ies): 29717/40V 2Ah Lithium-ion battery, 29727/40V 4Ah Lithium-ion battery.
■ Do not dispose of the battery(ies) in a fire. The cell may explode. Check with local codes for possible special disposal instructions.
■ Do not open or mutilate the battery(ies). Released electrolyte is corrosive and may cause damage to the eyes or skin. It may be toxic if swallowed.
■ Exercise care in handling batteries in order not to short the battery with conducting materials such as rings, bracelets, and keys. The battery or conductor may overheat and cause burns.
■ Dress Properly - Do not wear loose clothing or jewelry. They can be caught in moving parts. Use of rubber gloves and substantial footwear is recommended when working outdoors. Wear protective hair covering to contain long hair.
■ Use Safety Glasses - Always use face or dust mask if operation is dusty.
■ Don't Force Appliance - It will do the job better and with less likelihood of a risk of injury at the rate for which it was designed.
■ Store Idle Appliance Indoors - When not in use, appliances should be stored indoors in dry, and high or locked-up place - out of reach of children.
■ Check Damaged Parts - Before further use of the appliance, a guard or other part that is damaged should be carefully checked to determine that it will operate properly and perform its intended function. Check for alignment of moving parts, binding of moving parts, breakage of parts, mounting, and any other condition that may affect its operation. A guard or other part that is damaged should be properly repaired or replaced by an authorized service center unless indicated elsewhere in this manual.
■ Use personal protective equipment. Always wear eye protection. Protective equipment such as a dust mask, non-skid safety shoes, hard hat or hearing protection used for appropriate conditions will reduce personal injuries.
■ Do not overreach. Keep proper footing and balance at all times. This enables better control of the power tool in unexpected situations.
■ Do not let familiarity gained from frequent use of tools allow you to become complacent and ignore tool safety principles. A careless action can cause severe injury within a fraction of a second.
■ Keep handles and grasping surfaces dry, clean and free from oil and grease. Slippery handles and grasping surfaces do not allow for safe handling and control of the tool in unexpected situations. WARNING
Never stand in the bucket to activate the garden cart. MOVING ON SLOPES WARNING
Slopes are a major factor related to slip-and-fall accidents, which can result in severe injury. All slopes require caution. If you feel uneasy on a slope, do not drive on it. ■ Use caution on slopes. Whenever possible, move up and down the slope at an angle.
■ Exercise caution when changing directions on slopes.
■ Remove obstacles such as rocks, tree limbs, or any other potential object that your garden cart could hit.
■ Watch for holes, ruts, or bumps. Be careful on uneven terrain to avoid overturning your garden cart. Tall grass can hide obstacles.
■ When moving down slopes, always keep your garden cart in low gear and moving. The friction of the motor helps you keep better control of your garden cart.
■ Use caution when carrying heavy loads up slopes. If your garden cart is overloaded, the safety fuse may trip and allow the garden cart to rollback toward you, which may cause severe injury.
■ Do not turn on slopes unless necessary, and then, turn slowly and gradually.
■ Do not move near drop-offs, ditches, or embankments. The garden cart could suddenly turnover if a wheel is over the edge of a cliff or ditch or if an edge caves in.
■ Do not park your garden cart on hills or steep slopes. CHILDREN WARNING
This is not a toy. Children under 14 years of age are not allowed to operate it. ■ Tragic accidents can occur if the operator is not aware of the presence of children. Keep children out of the work area and under the watchful care of a responsible adult. Stay alert, and turn the garden cart off if a child enters the work area. Look behind and down for small children before and while driving backwards. Use extreme care when approaching blind corners, doorways, shrubs, trees, or other objects that may obscure your view of a child who may run into the work area.
■ Do not allow children under the age of 14 to operate this garden cart. Children who are 14 years of age and older must read and understand the operating instructions and safety rules in this manual, and must be trained and supervised by a parent. BATTERY TOOL USE AND CARE ■ Ensure the switch is in the off position before inserting battery pack. Inserting the battery pack into power tools that have the switch on invites accidents.
■ Recharge only with the charger specified by the manufacturer. A charger that is suitable for one type of battery pack may create a risk of fire when used with another battery pack.
■ Use power tools only with specifically designated battery packs. Use of any other battery packs may create a risk of injury and fire.
■ When battery pack is not in use, keep it away from other metal objects like paper clips, coins, keys, nails, screws, or other small metal objects that can make a connection from one terminal to another. Shorting the battery terminals together may cause burns or fire.
■ Under abusive conditions, liquid may be ejected from the battery; avoid contact. If contact accidentally occurs, flush with plenty of soap and water. If liquid contacts eyes, immediately seek medical help. Liquid ejected from the battery may cause irritation or burns. SERVICE WARNING
Altering the electrical system could cause a fire resulting in serious injury. Don’t do it. ■ Using components other than those supplied could cause overheating, fire, or explosion.
■ Never make adjustments or repairs with the motor running.
■ Keep all nuts and bolts tight, and keep the equipment in good condition.
■ Keep your garden cart’s wheels free of grass, leaves, or other debris build-up.
■ Keep your garden cart clean and dry. Use a damp cloth or sponge with a mild soap or detergent when cleaning your garden cart. Never use gasoline, solvents, or other petroleumbased or solvent-based products when cleaning.
■ When not in use, store your garden cart indoors in a dry place.
■ Servicing requires extreme care and knowledge and should be performed only by a qualified service technician. For service we suggest you return the product to your nearest AUTHORIZED SERVICE CENTER for repair. When servicing, use only identical replacement parts. SAVE THESE INSTRUCTIONS. REFER TO THEM FREQUENTLY AND USE THEM TO INSTRUCT OTHERS WHO MAY USE THIS UNIT. IF YOU LOAN SOMEONE THIS UNIT, LOAN THEM THESE INSTRUCTIONS ALSO. SYMBOLSSome of the following symbols may be used on this tool. Please study them and learn their meaning. Proper interpretation of these symbols will allow you to operate the tool better and safer. V - Voltage
A - Current
W - Power
min - Time
 - Type of current - Type of current
 - Type or a characteristic of current - Type or a characteristic of current
 - To reduce the risk of injury user must read and understand operator’s manual before using this product. - To reduce the risk of injury user must read and understand operator’s manual before using this product.
 - Precautions that involve your safety - Precautions that involve your safety
 - Do not operate on inclines greater than 15°. - Do not operate on inclines greater than 15°.
 - Do not expose machine to rain or wet conditions. - Do not expose machine to rain or wet conditions.
 - Pay attention that bystanders are not injured through foreign objects thrown from the garden cart. - Pay attention that bystanders are not injured through foreign objects thrown from the garden cart.
 - Wear eye and hearing protection. - Wear eye and hearing protection. The following signal words and meanings are intended to explain the levels of risk associated with this product. - Indicates an imminently hazardous situation, which, if not avoided, will result in death or serious injury.
- Indicates a potentially hazardous situation, which, if not avoided, could result in death or serious injury.
- Indicates a potentially hazardous situation, which, if not avoided, may result in minor or moderate injury.
 - (Without Safety Alert Symbol) Indicates a situation that may result in property damage. - (Without Safety Alert Symbol) Indicates a situation that may result in property damage. SPECIFICATIONSModel: 7400007
Rating: 40V 300W
Loading capacity: 220 lbs (100kg) on level cement surfaces
Inflation pressure: 30PSI Maximum
Weight (tool only): 73.5 lbs
Capacity (Volume): 106L / 3.74CUFT
Length: 52.6” (133.6cm)
Width: 26.4” (67cm)
Height: 43.7” (111cm) Speed:
High: 4.2 Km/h (±0.5Km/h)/2.60 mph (±0.31 mph)
Low: 3.0 Km/h (±0.5Km/h)/1.86 mph (±0.31 mph)
Reverse: 2.4Km/h (±0.5Km/h)1.49 mph (±0.31 mph) Front Tire: 12x5.0-6” Pneumatic wheel
Rear Tire: 8” Solid caster wheel Battery (29727/29717): 40V 4Ah Lithium-ion / 40V 2Ah Lithium-ion Charge time (with 4Ah battery): 120min
Charge time (with 2Ah battery): 60min
Run times (with 4Ah battery): 45min
Run times (with 2Ah battery): 20min Oil type: Automatic Transmission Fluid
Oil capacity: 150ML
Vibration: ≤2,5 m/s2
Uncertainty: 1,5m/s2 DESCRIPTIONSee figure 1 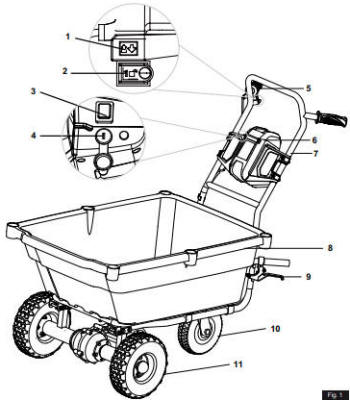
1. Forward/Reverse button
2. Safety button
3. High/Low speed button
4. Power switch
5. Throttle
6. Battery cover
7. Upper handle
8. Bucket
9. Bucket release lever
10. Caster wheel
11. Front wheel
12. Brake
13. Release lever ASSEMBLYUNPACKING ■ Carefully remove the product and any accessories from the box. Make sure that all items listed in the packing list are included.
■ Inspect the product carefully to make sure no breakage or damage occurred during shipping.
■ Do not discard the packing material until you have carefully inspected and satisfactorily operated the product. WARNING
Do not use this product if any parts on the packing list are already assembled to your product when you unpack it. Parts on this list are not assembled to the product by the manufacturer and require customer installation. Use of a product that may have been improperly assembled could result in serious personal injury. PACKING LIST 1. Self propelled garden cart
2. Handle assembly
3. Knobs and U-bolts
4. Manual WARNING
If any parts are damaged or missing, do not operate this product until the parts are replaced. Using a product with damaged or missing parts could result in serious personal injury. WARNING
Do not attempt to modify this product or create accessories not recommended for use with this product. Any such alteration or modification is misuse and could result in a hazardous condition leading to possible serious personal injury. ATTACH THE UPPER HANDLE See figure 2 
■ Slide the upper handle over the lower handle tubes on the bucket assembly. Make sure the bolt holes align.
■ Insert a U-bolt from the outside of the handle, passing through the bolt hole where the upper and lower handles attach.
■ Once the U-bolt is completely through the handle assembly, tighten the knob securely
■ Attach the other side of the handle the same way. WARNING
Never operate the garden cart without the proper safety devices in place and working. Never operate the garden cart with damaged safety devices. Operation of this product with damaged or missing parts could result in serious personal injury. OPERATION WARNING
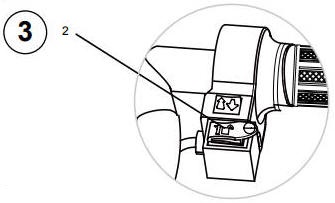
You are responsible for controlling and steering the garden cart once it is moving. Grasp the handle securely before moving. Make sure you are ready to move with the garden cart before pressing the on-off button and safety button. Keep a firm grip on the handle once you are moving. LOADING YOUR GARDEN CART Load your garden cart carefully; disperse the load evenly across the bucket. The bucket can take up to 220 pounds (100 kilograms). When moving up and down hills, limit your load to no more than 220 pounds (100 kilograms). If you think you are carrying too much, remove some material from your garden cart. INSTALL BATTERY PACK See figure 3 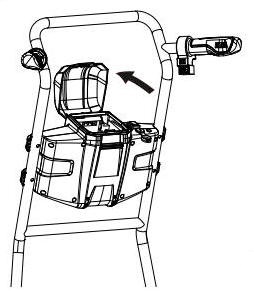
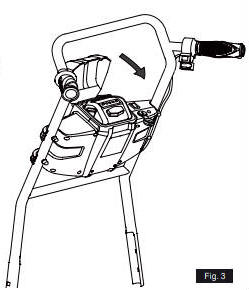
■ Open the battery cover.
■ Align the raised rib inside the panel with the groove on the battery pack.
■ Ensure the battery pack is secured in place in the battery compartment.
■ Close the battery cover. REMOVE BATTERY PACK ■ Depress the latch on the back of the battery pack to release the battery.
■ Remove the battery pack. WARNING
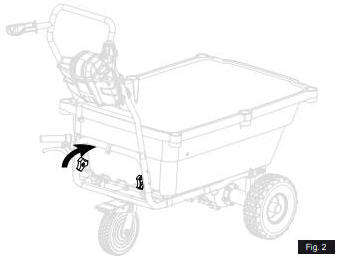
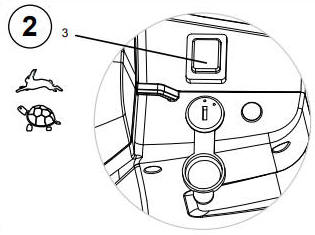
When placing battery pack in the tool, be sure raised rib on battery pack aligns with the groove inside the tool and latches into place properly. Improper installation of the battery pack can cause damage to internal components. LOCK / UNLOCK THE BRAKE See figure 4 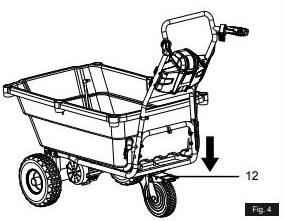
■ Step on the brake (12), the brake will be locked, and the garden cart will stop.
■ Step on the brake again, the brake will be unlocked. STARTING See figure 5 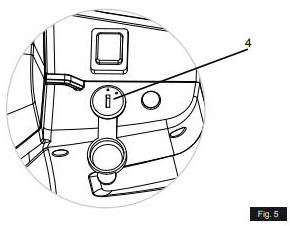
■ To utilize your garden cart set the power switch to the blue dot position. WARNING
If you do not engage the throttle in 4 seconds after pressing the safety button, you have to press the safety button again. MOVING FORWARD / REVERSE See figure 6 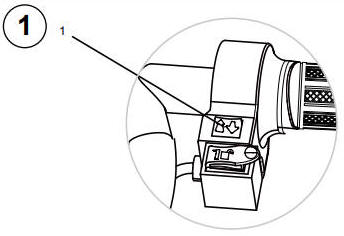
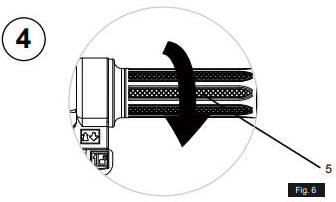
■ Select forward/reverse.
■ Select high/low speed.
■ Push safety button. (There is a 4-seconds lead time to engage step 4.) If the throttle is not engaged within 4 seconds, the unit will not start and safety button needs to be engaged again.
■ Engage the throttle to start the garden cart. Move in reverse only for short distances. If you have a long distance to travel, turn your garden cart around and go forward. WARNING
When moving in reverse, be ready for the garden cart to lurch towards you and get immediately up to speed. Be careful; step back and be prepared to walk backwards. Consider standing to the side of the garden cart until you get used to moving backwards. STOPPING See figure 7 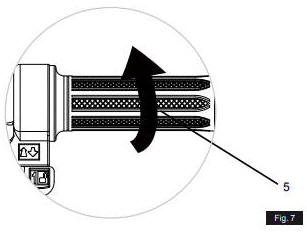
■ Release the throttle.
■ Set the power switch to the red dot position. Remove the battery and store in a safe place to prohibit unauthorized use of the garden cart. NOTE: The self-propelled garden cart does not have a braking system. Instead, to stop your garden cart, you simply release the throttle. Because of its momentum, your garden cart might continue to move a bit after you release the throttle. Don’t let go of the handle until your garden cart stops completely. Park your garden cart in a level area so it doesn’t roll away. UNLOADING YOUR WHEELB ARROW See figure 8 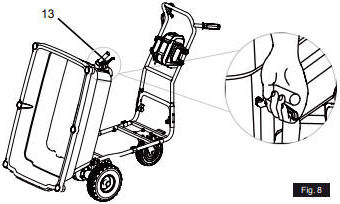
■ Stop the garden cart
■ Squeeze the release lever (13) on the bucket to release the bucket.
■ Grasp the handles on the bucket to raise and unload the bucket. MAINTENANCE AND REPAIRLike any machine, maintaining your garden cart ensures its best performance and extends its life. Follow these procedures to keep your garden cart working at peak efficiency. ■ Check all screws and nuts regularly; tighten them as needed. Regularly check the plastic parts for cracks or broken pieces.
■ Periodically check the tire pressure on all three tires. Keep the tire pressure between 28 and 30 pounds per square inch (psi). The garden cart’s tire valves work like those on bicycle tires. To add air, remove the cap and push the air hose or pump fitting onto the end of the valve stem. To remove air, depress the pin in the center of the valve stem. WARNING
Never over inflate the tires. If you over inflate the tires, you could cause them to explode resulting in severe injury. ■ Try not to use your garden cart when it’s wet or snowy. And do not spray the electrical areas of your garden cart with a hose. Water and moisture in the motors and electrical switches can cause them to corrode, which then causes them to fail. Remember, this is an electrical machine!
■ That said; you can still hose off your garden cart. Just be careful not to spray water directly on the Control Panel or through the battery cover.
■ Wash your garden cart using a mild automotive type detergent and water with a soft brush or rag. Do not use any alkaline-based soaps or pressure wash your garden cart. STORING YOUR GARDEN CART WARNING
When you store your garden cart, follow these important guidelines to help ensure your garden cart’s best performance when you use it again. ■ Store your garden cart inside or under a protective cover.
■ Charge the battery before storing your garden cart. In temperatures lower then 40° F (5° C), the battery maintains a charge for about 60 days. If you store your garden cart for extended periods of time, periodically recharge the battery. Once a month is a good rule of thumb.
■ Always store your garden cart in an environment where the temperature is between –10° F (–23° C) and +85° F (+23° C). Make sure the storage temperatures will never be outside these limits.
■ Store your garden cart in a dry environment. Water will damage your garden cart and the battery.
■ Do not store your garden cart near chemicals (such as fertilizers), or organic or other solvents. These products are often highly corrosive and may cause permanent damage to your garden cart.
■ Do not store your garden cart close to a source of heat, sparks, or open flames. DRAINING THE OIL See figure 9 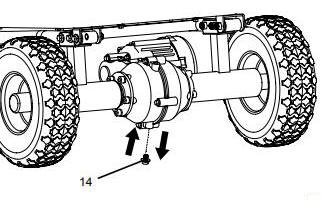
■ Remove the drain plug (14) with a wrench to drain the oil.
■ After the oil is drained, screw the drain plug back in again. REFILLING THE OIL See figure 10 
■ Remove the oil plug (15) with a wrench.
■ Refill the oil from the oil hole. The oil capacilty is about 150 ml.
■ Screw the oil plug back in again. DISPOSALSeparate collection. This product must not be disposed of with normal household waste. Should you find one day that your Greenworks tools product needs replacement, or if it is no further use to you, do not dispose of it with household waste. Make this product available for separate collection. Separate collection of used products and packaging allows materials to be recycled and used again. Re-use of recycled materials helps prevent environmental pollution and reduces the demand for raw materials. At the end of their useful life, discard batteries with due care for our environment. The battery contains material which is hazardous to you and the environment. It must be removed and disposed of separately at a facility that accepts lithium-ion batteries. TroubleshootingProblem / Possible cause / Solution The garden cart does not run.
1. Battery is not secure.
To secure the battery pack, make sure the latch on bottom of the battery pack snaps into place. 2. Battery is not charged.
Charger the battery pack according to the instructions included with you model. 3. The wire is loose.
Check all the connectors and to see if any part is loose or not. 4. The controller is damaged.
Replace the damaged one with specific controller by strictly following up the instructions. The garden cart runs sluggishly.
1. Battery volume is low.
See the battery indicator to check the volume. Charger the battery pack according to the instructions included with you model. 2. The battery is old and does not accept full charge.
Replace the battery with a new 40 Volt GreenWorks battery. 3. The conditions are too stressful for your garden cart.
The garden cart is intended for residential use. If slopes are too steep or the terrain too bumpy, your garden cart might experience a noticeable decrease in performance. Sometimes the garden cart runs, but other times it does not
1. The electrical switches might be damaged or corroded because they were exposed to water or moisture, or they simply wore down from extensive use.
Contact Service Agent. Loud clunking or grinding noise from the gearbox.
1. The motor’s gears are broken.
Contact Service Agent. |