Navigating your GoPro |
| | Home | User Manual | HERO6 | |
MODESHERO6 Black contains three camera modes: Video, Photo, and Time Lapse.
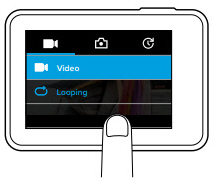
Video Video mode contains two capture modes: Video and Looping. For descriptions of each capture mode, see Video Mode: Capture Modes (page 13).
Photo Photo mode contains three capture modes: Photo, Burst, and Night. For descriptions of each capture mode, see Photo Mode: Capture Modes (page 16).
Time Lapse Time Lapse mode contains three capture modes: Time Lapse Video, Time Lapse Photo, and Night Lapse Photo. For descriptions of each capture mode, see Time Lapse Mode: Capture Modes (page 19).
For a visual map of your GoPro's modes and settings, see Map of Modes and Settings (page 4).
NAVIGATING WITH THE TOUCH DISPLAY1. From the main screen, tap the icon in the lower left corner.
4. On the main screen, tap the setting that you want to change.
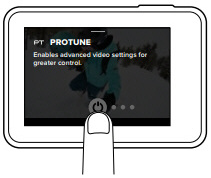
If you select a video resolution (RES) that does not support the frames per second (FPS) setting that is selected, a message appears that tells you how to select a new FPS setting. A similar message appears if you select an FPS that is not supported by the selected resolution. 6. To change an advanced setting, swipe left. Note: Not all capture modes have advanced settings.
8. To return to the main screen, swipe down.
CHANGING MODES WITH THE MODE BUTTONThe Mode button lets you quickly cycle through the capture modes that you set. For example, if you previously selected Video in Video mode, Night Photo in Photo mode, and Time Lapse Video in Time Lapse mode, pressing the Mode button cycles through those capture modes. Note that Burst photo always appears in this cycle.
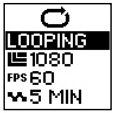
NAVIGATING WITH THE BUTTONSIf you use the camera under water, use the buttons and the camera status screen to change modes and settings.
Note: The Connections and Preferences menus are not available when navigating with the buttons
1. With the camera powered on, hold down the Mode button [ 2. Use the Mode button [
3. Press the Shutter button [
4. To exit, select one of these options: • Press and hold the Shutter button [
|
| • GPS GF-07 • A9 Wi-Fi mini DV • SQ11 Wi-Fi mini DV • SQ11 mini DV • GPS TK905 • XD Wi-Fi mini DV • GPS Mini A8 • Q7 Wi-Fi mini DV • GPS GF-09 • HERO6 • |
| hero6 black |
|---|
| © «Org-Info.Mobi» |