 Wi-Fi Smart CameraQuick Operation Guide1. Downloads and install the APP ● Method 1: Scan the QR code below to quickly download and install it; 
● Method 2: Search for «lРСЗ60 Home» and download the installation in the mobile APP store. 2. Opens the device a) first installs the memory card into the camera card slot (the memory card does not support hot plug, please plug the memory card if the device is powered off) b) Then the power cord is then connected to the power adapter and power on for the device to start Note: Before downloading and installing, it is recommended to connect to the wireless network (the camera supports 802.11 b/g/a protocol does not support 5 6 Wi-Fi,. Please make sure that the phone and the router is connected through 2.4G Wi-Fi) 3. Account registration and log in ● Open the «lРСЗ60 Home» APP (Figure 1) ● Click the «registration» button at the lower left, enter the mobile phone number or mailbox to obtain the verification code, and then fill in the verification code, password and confirmation password accordingly. Click to «User Agreement and Privacy Policy» to complete registration (Figure 1,2) ● After the registration, fill in the «user name, password» on the home page of the APP to log in.  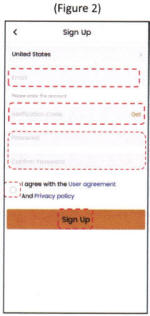
4. Add the device ● After successful landing, click the « + » button in the top right corner to add the device (Figure 3).
● Align at the QR code on the body to scan and add " (Figure 4).
● Connection according to the APP interface step boot, prompted. 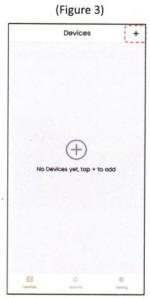 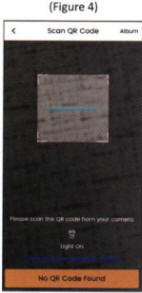
Note:
1. Before adding a device, connect your phone to the Wi-Fi network that you need to configure.
2. After the camera is turned on, the red indicator light will turn on and flash. After a few seconds, the next step (If not prompted for a long time, please press Reset for about 6 seconds, and the camera will enter and resume the factory settings). ● When the connection process prompts that WLAN is at Risk, click Trust (Figure 5).
● When having the Wi-Fi list popup, please select the Wi-Fi name that you need to connect and fill in the password, click OK (Figure 6).
● When you hear the Internet connection, the connection is complete. Note:
1. If you do not find your Wi-Fi name in the list, you can find it again through the refresh below.
2. connection process is distributed as close as possible to the router.  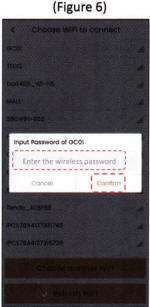
5. Device attachment ● After the addition is successful, the interface prompts for the device name (you can also choose the default) (Figure 7).
● After the device name is set, click OK (Figure 7).
● After a successful connection, the device appears in the APP device list interface, which means that the device has been successfully connected (Figure 8). 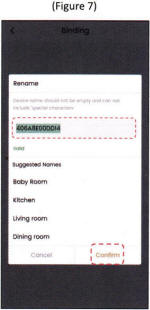 
6. Opens the video ● Click the «play icon» in the list of devices to enter the monitoring interface (Figure 9).
● Click the playback icon (position in the top left corner of the red box) to enter the monitoring screen and can operate the relevant functions (Figures 9,10). 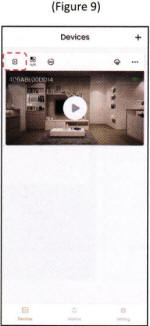 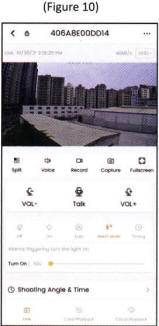
7. Device sharing ● In the device settings list, click Share (Figure 11, 12)
● Enter your friend's account in the Add box, and click OK to complete the device sharing (Figure 13) 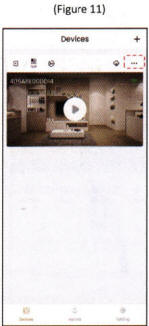 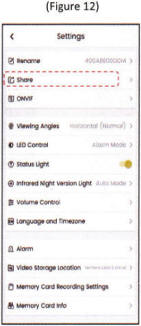 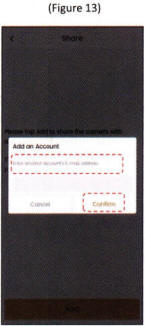
8. Cloud storage ● Click «Cloud Storage» in the device list (Figure 14).
● At the cloud storage service interface, please choose to buy a cloud storage package according to your needs to experience the cloud storage services (Figure 15). 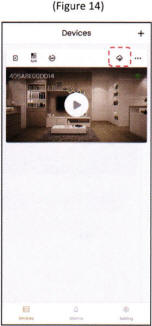 
9. Video playback ● Find the «TF card playback» and «cloud playback» at the bottom of the live broadcast interface and click to enter the playback interface (you can choose the playback location according to the video route) (Figure 16).
● In the playback interface, you can drag the video playback bar, and you can choose to view the video date (Figure 17). 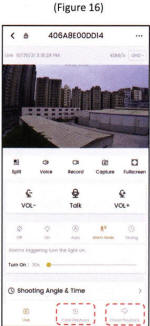 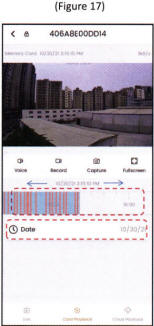
10. Install the video camera ● You can install the camera on a shelf or other plane, or on a wall.
● Install the camera in an unobstructed view and within the wireless network coverage.
● Screw fixing: please drill according to the distance of the base, use the drilling tool, it is recommended to use a pencil on the wall before drilling. Attach the expansion nut into the wall and secure the bracket to the expansion nut with a screwdriver. 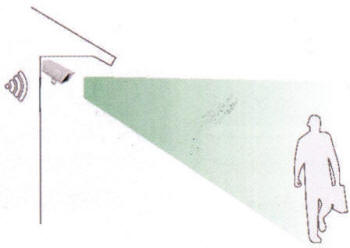
FAQHow to handle the poor camera connection?
1. Check that the Wi-Fi that you are connected to has a normal network or that the installation location is beyond Wi-Fi coverage. (It is recommended that the camera is now configured and reinstalled).
2. Check that the Wi-Fi you are connected to is 5G Wi-Fi (device only 2.4G Wi-Fi). Please switch to 2.4G Wi-Fi to connect again.
3. Check that the router has wireless hiding on and turn off for reconnection. Is the wired connection supported?
1.This device supports wired and wireless functions beyond the wireless signal coverage. How to check it using offline for a period of time?
1. Check that the power adapter is working properly and that the work indicator is on.
2. Is it too far away from the router? Or is the signal disturbed by other objects? What if the camera cannot recognize the memory card or fail the video recording?
1. Format the memory card and insert the slot (insert the card after the camera is off).
2. Recommends using branded or good quality cards and banning inferior and fake memory cards to avoid device damage.  Notice Notice
● The memory card does not support hot plug card with power off.
● It is recommended to use brand or good quality cards and use inferior fake memory cards so as to avoid equipment damage.
● Do not install the equipment in a wet, dusty, and easily accessible to children.
● When there is no professional, do not open or damage the equipment without permission, otherwise the warranty is not allowed.
Special statement
● The product shall be subject to it in kind, and the instructions are for reference only.
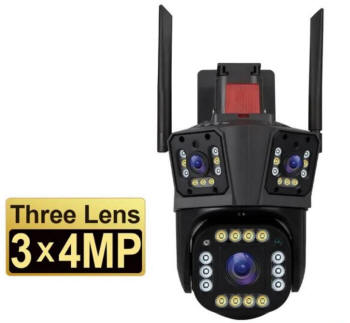
● The instructions may contain technically inaccurate places, or places inconsistent with the function of the product or misprinted, whichever is the Company's final interpretation of the product. ● HISEECAM. Outdoor IP camera with three lenses. » |