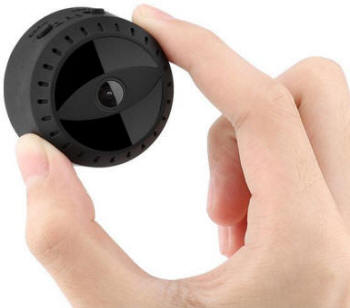
 The camera A10 is the upgraded model. It’s quite small, but comes with all useful features youneed for a Wi-Fi Mini camera. Perfect as surveillance camera in: Office, Home, Car, etc. Just download the special App on your iPhone or Android phone and have it configured withrouter Wi-Fi (Only 2.4GHz). Then you are ready to view live video on the App remotely fromanywhere in the world. Keep an eye on your home or office as a nanny camera. With the internal magnet, the hidden camera can be adsorbed on any iron surfaces. All in one mini camera, it provides main features as follow: 150° Wide Angle, Built-in Magnet, 1080P Live Video, Motion Activated Push Alerts, No-Glow IR Night Vision, Recording whileCharging, Playback/Snapshot/Record Remotely, iOS and Android Compatible, Live Streamfrom Anywhere, SD Card Recording, Free App, One App Multiple Camera, One Camera, Multiple Users and More. Product Overview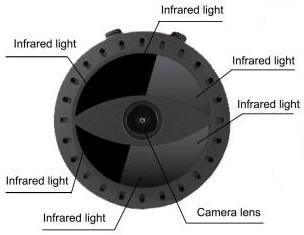
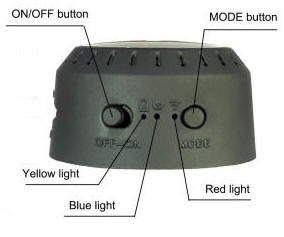
LED indicator:AP mode: The blue lights up and the red flashes slowly.
Wi-Fi mode: The red and blue light up together.
Network cannot be found: The blue lights up and the red is off (Now reset device).
Charging: The yellow lights up. Button Operations:ON/OFF: The "ON" button means that the power is turned on and the "OFF" button means that the power is turned off.
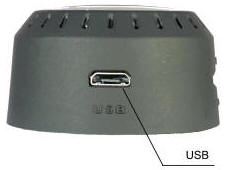
MODE: Press for 3 seconds to reset device. Reset successfully when red and blue are both off. Interfaces:USB: Charging interface. No data can be read from this interface.
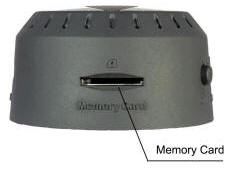
Memory Card: Micro SD card (not included) interface. Application Methods1. Download and install APP
Way 1:
Android Device by Searching "HIDVCAM" in Google App market to download and install App;
IOS Device by Searching "HIDVCAM" in App Store to download and install App;
Way 2:
Scan the QR code to download "HIDVCAM". 
2. Registry and Login:
1. Open the App “HIDVCAM”,
2. Register your membership via WeChat \ Facebook \ Twitter \ Line \ Email. 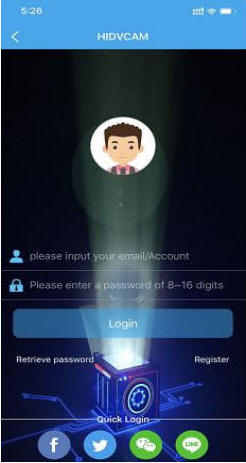
3. ConnectionAP mode Connection (Nearby viewing) 1) Turn on camera: Press “ON” button to turn on the camera, in 10 seconds, and the blue light lights up, the red light flashes slowly.
2) Go to the Wi-Fi setting page, then connect the Wi-Fi named “ IPC-XXXXX”.
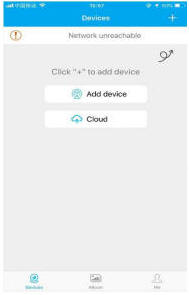
3) Open "HIDVCAM", refresh the device list on the App, you can view connected camera.
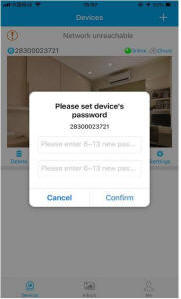
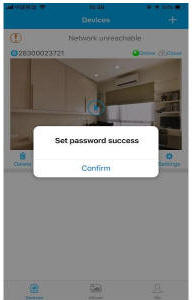
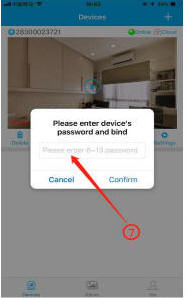
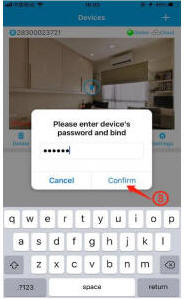
4) Click device, set a password to the device on the first use, then you can view camera on App. 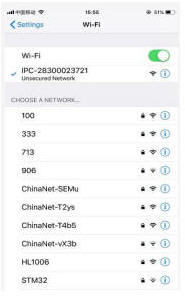

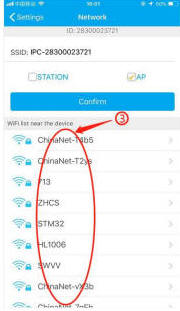
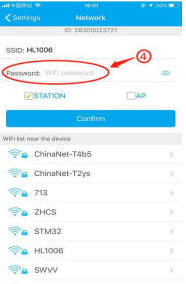
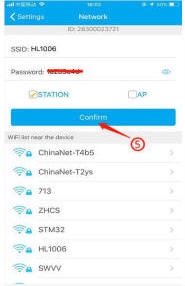
Router mode Connection (Remote viewing)1. Open App, go to device list, click [Settings] --- [Network] --- Choose an available Wi-Fi frombelow options and input corresponding password --- click Confirm
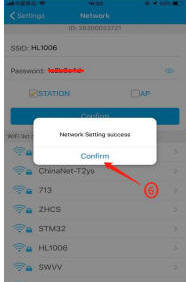
2. After camera connect to router, refresh the page, waiting for about 30 seconds and the camera status will become online --- then click play button --- enter the password and confirm, you can view remote camera. 
APP IntroductionFunction Introduction 1) Device ID
2) Online: Device status
3) Cloud: Cloud storage
4) Delete: Delete the camera
5) Alarm: One click to turn ON/OFF alarm
6) Msg: Alarm message
7) Rec/Play: Playback video in TF card or Cloud
8) Settings Key Name / Function 2830000xxxx : Device ID
Online : Device status
Cloud : Cloud Storage
Delete : Delete the camera
Alarm : Turn On/Off Device alarm
Msg : Alarm message
Rec/Play : Playback video in TF card or Cloud
Settings : Settings of the device
Devices : Device view page
Album : Where to save the camera screenshot
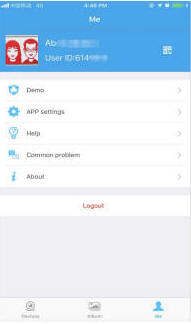
Me : App account information 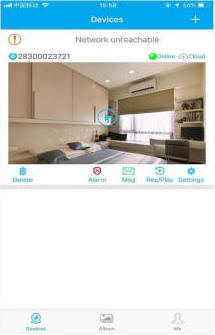
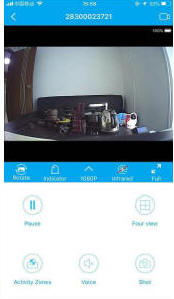
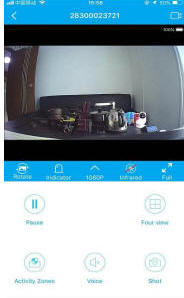
Interface IntroductionRotate : Flip video
Indicator : Turn On/Off the Indicator of camera
1080p : 720p/1080p Resolution selection
Infrared : Turn ON/OFF the IR of camera (night vision)
Full : Full screen view video
Pause : Pause the video
Four view : 1/4 screen view video
Activity Zones : Set the motion detection area
Voice : monitor voice
Shot : Video screenshot
 : Start/Stop Real-time recording : Start/Stop Real-time recording 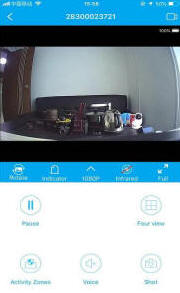
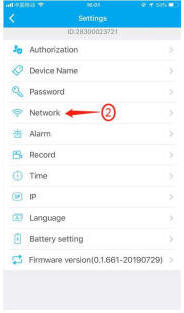
Settings1) Device Authorization: Input different users ID and shares the device to others.
2) Device Name: You could name the device up to yourself, such as college, farm, etc.
3) Password setting: You can modify the password if required.
4) Network setting: Set up the device to connect to the Internet.
5) Alarm setting: Motion detection and alarm sound setting.
6) Recording settings: Set the resolution and the mode of records (Motion detection record/Regular record mode).
7) Time setting: Synchronize the time between App and Phone.
8) Static IP setting: You can set the IP address of the device.
9) Battery and infrared light setting: Automatic shutdown when low power and open infrared light at certain time.
10) Firmware version: Check whether the firmware is in latest version. 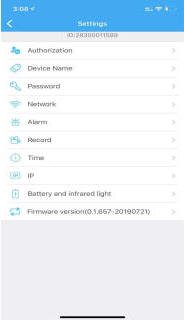
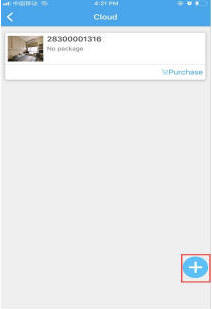
Cloud Storage1) Click “Cloud” to enter the cloud storage page.
2) Subscribe the service your required.
3) Redeem your subscribed service, the device starts cloud storage recording.
4) Enable/Disable: Start or stop cloud recording.
5) Expand service: Renew your subscribes.
6) Cloud recording: Watch the video in your cloud.
7) Subscribe / unsubscribe cloud: Purchase / cancel cloud service. 
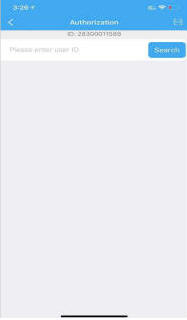
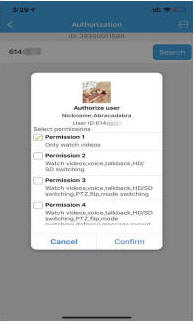
Device ShareYou could share your camera to others, such as relatives, friends, colleagues, and set the user permissions of shared camera.
1) Click “Settings” to enter the setting interface.
2) Click on "Authorization Settings".
3) Get the ID of the user who needs to share. Share users must download "HIDVCAM" and loginafter installation, click the "Me" button.
4) After getting a user ID, input the ID on the authorization interface and click “Search”.
5) Pop up the authorization confirmation interface, select the permission to be shared, and click “Confirm”. Device sharing is finished successfully When authorized user information is displayedin the user list. 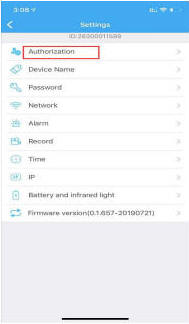
SpecificationsVideo resolution: 720P:1280*720, 1080P:1920*1080 @ 25fps
Video compression: H264
Wireless view: AP, Wi-Fi
Visual angle: 150° wide angle
Motion detection: Support, three levels of sensitivity
Night vision: Support, 6 infrared lights switch manually
Alarm mode: Motion detection alarm and record
Backlight compensation: Auto
Memory support: 8~128GB TF card
Continuous video: Loop recording (support overlay)
Support system: IOS Android Windows Mac
Power supply: Built-in 3.7V 480mA polymer lithium battery
Charging voltage: DC 5V/1A
Charging time: 1 hour
Working time: 1.5 hours
Install method: Built-in magnetic absorption
Weight: 29g
Volume: Thickness: 25mm, Max diameter: 44mm Notes 1. Use occasion: Please strictly abide by the relevant national laws and regulations. Do not use it for any illegal use, otherwise it may take consequences.
2. Abort the battery: If long time do not use, please charge before using, and charge it at least once a month.
3. Work normally when charging. It can support all-day monitoring if charging continuously.
4. It works under 2.4GHz Wi-Fi, but not 5GHz Wi-Fi.
5. Working temperature: 0~40°C. Storage temperature: -20~80°C.
6. Working humidity: 20%~80%.
7. Please format the SD card when you first use.
8. This item is precision electronic products, do not make it subjected to strong impact, vibration, do not use in the strong magnetic or strong electric field. |