iMini Wi-Fi Camera |
| | Home | User Manual | iMini | |
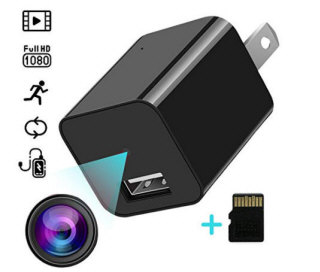 iMiniCam 1080p Wireless Spy Camera.• Remotely viewing the live footage through the APP. This Charger hidden camera work with an APP which can help you remotely view the live footage. So this is a perfect way for you to monitor your home security when you are away, easily to keep your eye on your elder parent if they in nursing home or watch your kids to see if they are doing to with the nanny. Seriously, the uses for this charger spy camera are limitless. • Motion Detection Alert & Push Notification to Your Cellphone. If there is any movement happen in the capture range of this charger hidden camera, it will immediately send you a motion detection alert to your cellphone and automatically record the video at that moment and save in the SD card. So you will be fully informed and get the evidence if anything bad happen in your house. • Built-in battery (80 mAh) to save the last video from sudden disconnection from outlet. It can record continuously or motion activated with crystal-clear video and without too much heat or damage your SD card. User and Installation GuideDownload the iMiniCam App Option 1: Search « iMiniCam » on the App Store or Google Play and download.
Option 2: Scan the QR code below through any QR scanning app. You will be navigated to the following page. Select a means of downloading that is suitable for your device.
Setting up your iMiniCam Add a new online camera via the iMiniCam app and Wi-Fi 1. Plug the iMiniCam device into a functioning electrical outlet. 2. Reset the device by taking the included pin tool and push and hold the button for about 5 seconds. Wait another 30 seconds for the reset to complete. The indicator light should flash and when complete, will stop flashing and turn off entirely.
3. Open your phone’s Wi-Fi settings and search for the iMiniCam’s Wi-Fi signal. The Wi-Fi address will be a long series of letters and numbers and also acts as the device’s unique UID. This UID can also be found on a sticker on the side of the iMiniCam device. This sticker also has a QR code you can scan to easily copy the UID. 4. Once found, connect your phone to this Wi-Fi. If after 3 minutes the iMiniCam’s Wi-Fi does not appear, reset the device and try again. 5. Open the iMiniCam app on your phone and click the (+) button in the top right corner to add the new camera. 6. Click « Add new online camera » and the device’s Wi-Fi address should appear in the following page titled « Search (LAN) ». Select it to add it as a new device. If the device does not appear, check that your phone is connected to the iMiniCam’s Wi-Fi with the UID. 7. When prompted for a password, the default password is 8888. 8. Navigate back to the home screen «Live Video» and the newly added camera should appear online. It will display its UID, which will also match its Wi-Fi code. Adding a New Camera Manually 1. Once a camera has already been previously set up, you have the option to later connect the camera manually using the camera’s UID. 2. In the iMiniCam app, click the (+) button in the top right corner and select the option to «Add new camera manually». 3. You can rename your camera to something like “Living Room” or “Office.” 4. Retrieve the device’s UID (either on the outside surface of the iMiniCam or from it’s Wi-Fi address) and manually input it into the UID space. Tip: Use a QR scanner to scan the sticker code to easily copy and paste the UID into the app. 5. You can also update the device’s password. The default password is 8888. If you choose not to update the password, you will later be prompted to change it for added security. You can choose to Skip that step or Change your password. 6. Press «OK» to set up the new device. 7. Navigate back to the home screen «Live Video» and the newly added camera should appear online. Live Feed When your camera or cameras are online, they will appear in the Live Video feed on the app’s home page and will display their individual UIDs. To view a single live feed, click on the camera. If you have not updated your password, you will be prompted to either change your password or skip that step. In Live Video viewing mode, there are helpful buttons to enhance your surveillance experience. Live Video Feed: Color Correcting: click to adjust color of video
Night Vision Mode Record Snapshots Camera Settings Device Settings
Specific Device Settings:1. Alarm Configuration Motion Detection Sensitivity: adjust your camera’s motion detection sensitivity on a scale of 1-7 or disable it altogether. 2. Wi-Fi Configuration Remote Viewing Set Up 3. SD Card Record Configuration 4. Time Settings 5. Miscellaneous Settings 6. Change Password 7. Device Reboot Once you configure the device settings to your specifications, your iMiniCamera system is now ready for use.
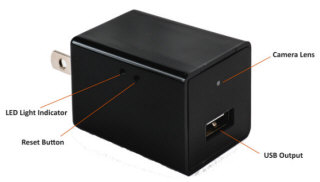
Additional Information LED Light Flash Key: Product Features Product Specifications |
| • GPS GF-07 • A9 Wi-Fi mini DV • SQ11 Wi-Fi mini DV • SQ11 mini DV • XD Wi-Fi mini DV • F9 mini DV • GPS TK905 • GPS Mini A8 • GPS GF-09 • GPS GF-21 • iMiniCam Wi-Fi mini DV • A10 Wi-Fi mini DV • Q7 Wi-Fi mini DV • |
| | EN | DE | FR | IT | NL | PL | CS | JA | TH | SV | DA | FI | NO | UK | ES | PT | CN | RO | SK | BG | EL | HU | ID | KO | LT | MS | SL | SQ | RU | |
| imini wi-fi camera |
|---|
| © «Org-Info.Mobi» |