MD81S-6 Wi-Fi mini DV |
| | Home | User manual | MD81S-6 WiFi | |
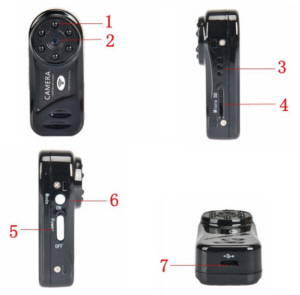 Product Overview1. IR LEDs 2. Cameras Lens 3. Blue/Red Indicator Lights 4. Micro SD Card Slot 5. Power Switch 6. Reset Button 7. USB Port
Get Camera Ready• Please make sure the camera is fully charged and the Micro SD card has been formatted already and is securely fitted into the camera’s SD card slot, or it will not work. We recommend that you use a SDHC Class 10 Micro SD card. • Slide the Power Switch to the ON position. When the red indicator light goes out and the blue one remains solid, it means the camera’s Wi-Fi signal is ready. • If you need the camera to work 7/24 hours, connect it to an outlet AC power supply using the USB cable and DC 5V power adapter included. Once the camera is connected to outlet AC power supply, the blue or red indicator light will come on and remain solid whether the Power Switch lies at the ON position or not.
Network SetupInstall Plug & Play or P2PCamViewer APP on Smartphone or Tablet PC
1. Go to your App store or Google Play, search for «9527» and then install «Plug & Play» on your Android phone or tablet PC, or «P2PCamViewer» on your iPhone or iPad. 2. Enter the URL www.scc21.net into the download interface. Download the appropriate video software according to phone system and install it. 3. QR code
LAN Mode or P2P Setup • Go to the Wi-Fi or WLAN setting page on your phone or mobile device, connect to the camera’s Wi-Fi signal named «MD81S-6». The Wi-Fi signal password is «12345678». Wait for the Wi-Fi to be connected.
[Note]: If the camera’s Wi-Fi signal cannot be found or the camera cannot be enrolled to your phone after a long time, please recharge the camera or reset it.
• For Android users, launch the «Plug & Play» APP. For IOS users, run the «P2PCamViewer» APP. • Tap «LAN» or «Local Cameras» at the bottom of the screen. The camera will pop up in a few seconds. If the camera shows «Online», it means the P2P (LAN) setup is successful and you can check or record video in P2P (LAN) mode.
[Note]: In this P2P (LAN) mode, you can only view video locally within 10 meters (33 feet) open range.
• Click the camera icon to get into the live video screen. On the live video screen, gently put your index finger and thumb on the screen, sliding in and outward directions on a specific area to zoom in and out.
WAN Mode or Remote View Setup >> Please make sure the camera is successfully added to the APP in P2P (LAN) mode and it's online before you start.
For Android: Step 1: Launch the «Plug & Play» APP. Tap the arrow icon Step 2: Turn on «Use wifi» on the «Wi-Fi» page. Step 3: Tap Step 4: Tap «OK» to complete the remote view setup and the camera will reboot automatically. Step 5: Exit the «Plug & Play» APP
For IOS: Step 1: Launch the «P2PCamViewer» APP. Tap the gear icon Step 2: Turn on «Wi-Fi» function. Tap the exclamation mark Step 3: Tap «Done» to complete the remote view setup and the camera will reboot automatically. Step 4: Exit the «P2PCamViewer» APP. Check if the WAN mode or remote view setup works!• Back to the Wi-Fi or WLAN setting page on your phone or mobile device, exit your phone or mobile device from the current Wi-Fi network, enroll your phone or mobile device in another Wi-Fi hotspot, or you can turn off the Wi-Fi or WLAN function, enable your mobile network data instead. • Launch the «Plug & Play» or «P2PCamviewer» APP again. • Tap «WAN» or «My Cameras» at the bottom of the screen. Tap the code icon to scan the QR code at the back of the camera directly. For Android devices, the camera will pop up in a few seconds. For IOS devices, the camera UID and password will fill in the blanks automatically and then tap «Login» to log in the camera. If the camera shows «Online», the blue indicator light will turn off while the red one will remain solid, it means the remote view setup is complete and the camera has entered into WAN mode. You can go ahead to view live or recorded video remotely.
Recording Video to Smartphone or Tablet PC>> Please make sure the camera is successfully added to the APP and it's online before you start.
• Launch the «Plug & Play» or «P2PCamviewer» APP. • Tap the camera icon to enter the live streaming screen. Click the Remote Video Recording Button • Go back to the «WAN» or «LAN» page and tap «File» icon at the bottom of the screen to check out the video files or screenshots.
Recording to Local Micro SD Card Continuously>> Please make sure the camera is successfully added to the APP and it's online before you start.
• Follow the steps below to set up SD card recording.
For Android: Step 1: Launch the «Plug & Play» APP. Step 2: On the «WAN» or «LAN» page, tap the arrow icon Step 3: Enable «Start automatic recording» and «Voice recording», then set the file size for each video clip. At last, click «OK» to confirm the SD card setting.
For IOS: Step 1: Launch the «P2PCamViewer» APP. Step 2: On the «Local cameras» or «my cameras» page, tap the arrow icon Step 3: Enable «Start automatic recording» and «Voice recording», choose the file size for each video clip. At last, click «Done» to confirm the SD card setting.
• The video files will be saved in the Micro SD card on your camera. Power off the camera, remove the Micro SD card and use the card reader provided to access the video footage. You are recommended to copy all video files to your PC computer before playing them back.
[Note]: • Video Resolution: 640x480. Video Format: AVI • If «Format Micro SD card» appears on the «SD-Card setting» page, it means the Micro SD card has been read successfully.
Changing WAN Login Password>> Make sure that the camera is added successfully to the APP in WAN mode and it’s online before you start.
• On the «WAN» or «My cameras» page, tap the plus icon or «Options» and then select «Update login password» or «Change login Password». • Enter the new password and confirm it. At last, click «OK» or «Done» to confirm the change.
Resetting to Factory Default SettingsIf for any reason, the camera stops working or isn’t working properly, a quick reset will restore it back to factory default settings.
Operation: When the camera is powered on, press the Reset Button for 3 seconds to reset the camera to factory default settings. Both red and blue indicator lights will be illuminated for about 3 seconds, then the red one will turn off while the blue one will be illuminated. The camera will restart automatically with factory default settings.
Charging• Connect the camera to an outlet AC power supply using the power adapter and USB cable included. • It will take 1 hour to obtain a full charge. • The camera can record video up to 50 minutes on a single charge.
Frequently Asked Questions• Why Camera Wi-Fi signal is not appearing on my Wi-Fi page? There are 4 solutions to this question: 1. Reset the camera 2. Keep your phone or mobile device within the camera’s Wi-Fi hotspot range, refreshing the Wi-Fi signal page. It may take up to 2 minutes for the hotspot to become recognizable on your phone or mobile device's Wi-Fi setting page. 3. Shut off your phone or mobile device’s Wi-Fi function for a while, then turn it on to search again. 4. The camera is in low battery, connect it to an outlet AC power supply using the USB cable and power adapter included.
• Why does the camera show offline right after I login it on the «WAN» or «My cameras» page? The remote view setup or WAN mode takes 1-3 minutes to complete. Please wait a while. If the camera still shows offline, check if the camera has been enrolled in a good Wi-Fi network successfully. Plus, the Wi-Fi network the camera is configured with can’t be the same with one you connect your phone to.
• How do I share my camera with family members? First, please make sure your camera is in WAN mode already and your family members have installed the «Plug & Play» or «P2PCamViewer» on their phones or mobile devices. Second, input the camera UID (a unique combination of 6 numbers and 2 letters specific to your camera) or the QR code that sticks on the body of the DV camera. Finally, tap «Login» to add the camera to the APP.
• How many cameras can I add to the existing application? No limit.
• The camera did not record any video? Make sure the Micro SD card has been fitted well in your camera. If not, you need to take out the SD card, format it on your PC computer and try it again.
• Why the video footage shows a fuzzy screen during playback on my computer? Please copy the video footage to your computer before playing them back. |
| Enter the URL www.scc21.net into the download interface. Download the appropriate video software according to phone system and install it. | ||
 | QR code |  |
| Android | iPhone | |
| • GF-07 • A9 Wi-Fi mini DV • SQ11 Wi-Fi mini DV • SQ11 • TK905 • XD Wi-Fi mini DV • Mini A8 • Q7 • GF-09 • SQ10 • SQ8 • GF-21 • 70mai • A10 Wi-Fi mini DV • MD81S-6 Wi-Fi mini DV • |
| | EN | DE | FR | IT | ES | JA | SV | BG | PH | PT | PL | MS | CN | CS | DA | TR | UK | TH | NO | RU | |
| md81s-6 wi-fi mini dv |
|---|
| © «Org-Info.Mobi» |