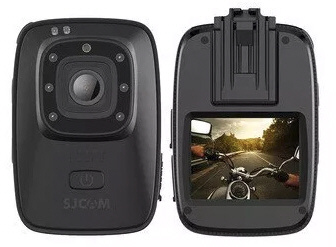
 NIGHT VISION - A10 features infrared Lights for low-light and night-time enviroment. It allows user to take photos in Night Vision mode automatically.
* Infrared light has manual or automatic mode available. IP65 WATERPROOF - Complete protection from dust, rain water or water projected by a nozzle against enclosure from any direction.It can be pretected from the damage caused by working enviroment. LAW ENFORCEMENT READY - The A10 BodyCam is designed with law-enforcement people in mind. It is another layer of defense, and a deterrent for offenders which give officers of the law a better handle of situations. MULTIFUNCTIONAL - A10 wearable camera can be used as car DVR as well, it can cover 3 lanes by its 140°lens to capture all situations, and protect your car under parking by its funtion of motion detection.
- SECURITY.
- SOCIAL SHARING.
- MOTION DETECTION Laser positioning - With infrared laser light, it can fix poisitioning accurately and easily, reducing the redundant operation of installing camera and focusing. HIGH CAPACITY BATTERY - A10 has good performance of long battery life due to 2650mAh Li-ion battery and low power consumption feature. DUAL-MICROPHONE NOISE REDUCTION - One main microphone for picking up target voice, and another is the background sound pickup microphone, which installed at the side of camera. These two signals are input microphone processor, and the internal software will reduce the noise, making the voice to be clear. User ManualButtons: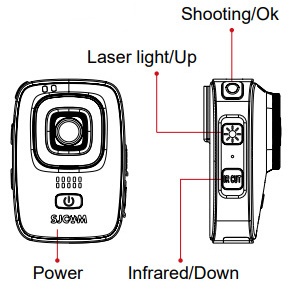
Function keys overview:Power button
 | Single press | 1. Standby status, single press to call out the mode menu. | | 2. Menu settings, single press to re. | | 3. REC mode, single press to playback. | | 4. While recording, single press this button to lock the video. | | Long press | Long press for 2s to power on/off. | Shooting button
 | Single press | 1. Recoring mode, single press to start/stop recording. | | 2. Photo mode, single press to take photo. | | 3. Menu settings, single press to confirm. | | Long press | Menu settings, long press to start one-key recording. | Laser light button
 | Single press | 1. Tandby or recording mode, single press to turn on/off laser light. | | 2. Menu setting, single press to go up. | In frared button
 | Single press | 1. Manual infrared mode, to turn on/off infrared mode. | | 2. Menu setting, single press to go down. | USB
 | Connection | Data transmission, charging port. |
Touching gestures: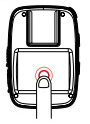
Click. Standby, Show/hide the status bar. Menu state, Open/select the corresponding settings. 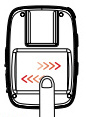
Slide left&right. Standby state, Switch the shooting mode. Playback, Page turning. 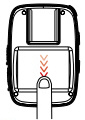
Slide down. Standby state, Turn on WiFi / Remote / Lock screen / Power off / Shortcut / Menu state. Sliding options box 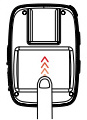
Slide up. Standby state, Turn on mode menu. Menu state, Sliding options box. Basic operation:Power on/off (FIGURE 1)
Long press the power button for 2s to boot into the standby interface.
Long press power button to turn off. 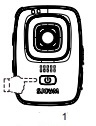  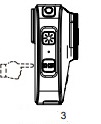 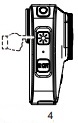
Mode switch (FIGURE 2)
Standby state, slide up or click the "  " icon to call out the mode menu, then slide up/down to browse the options. " icon to call out the mode menu, then slide up/down to browse the options.
Select the shooting mode icon, click and get into this mode Infrared night vision light (FIGURE 3)
Turn on to meet the demand of shooting in darkness,select the IR CUT to choose the automatic/manual infrared night vision light state.
Auto mode, equipment will automatically turn on/off the infrared night vision light by ligh & dark conditions.
Manual setting, single press the button to turn on/off infrared mode. Laser light (FIGURE 4)
Standby state or recording state, single press to turn on/off the laser light. Video lock
While recording, single press the power button and there will be a "  " icon on screen,it means this video been locked and cannot be deleted with this device,only to format the card or connect computer to delete it. " icon on screen,it means this video been locked and cannot be deleted with this device,only to format the card or connect computer to delete it. Shooting mode: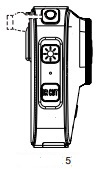 Recording Recording 
Switch to recording mode, single press the shooting button (FIGURE 5), while see red dots flashing on screen then camera recording well. Re-click the shooting button to stop recording.
Photo 
Switch to photo mode, single press the shooting button (FIGURE 5), there is a "click" voice that is taking pictures and save the photo. Burst mode 
Switch to burst mode, single press the shooting button (FIGURE 5), there is several "click" voices and continuous taking photos. Voice recording 
Switch to Voice recording mode, single press the shooting button, the microphone icon on screen will becomes red then voice recording runs well, re-click the shooting button to stop voice recording. Playback 
Select the Playback in Menu settings to enter the play back interface of photos and videos.
View photo/video: Use buttons/touching gestures to view the selected file at Playback interface.
View the voice recording: Single press power button (Voice recording mode) to enter Playback, use buttons/touching gestures to play the selected file. Video Lapse 
Switch to Video Lapse, single press the shooting button, red dot flashing on screen then videorecording well, reclick to stop recording. Car Mode 
Switch to car mode, turn on it before power off, device will automatically power on & recording while connect to charger. Menu settings:Click the " "icon or sliding upwards at standby state to call out mode menu, slide it and select "  " icon then enter the menu interface. " icon then enter the menu interface.
(Also can set the model parameters by entering the Settings menu in different shooting mode)
Sliding to select the parameter options which need to be modified, click and choose the appropriate parameters.
Click Return key to back to standby interface after setting over. 1. Video Resolution
Video resolution include four options - "1080P 30fps, 720P 30fps, WVGA 30fps, VGA 640* 480".
The larger the value, the larger the resolution, and the larger the file size, recording time will be shorter with the same size of storage and electricity; smaller number will get opposite result. 2. Photo Size
Photo size include five options: "12M, 10M, 8M, 5M, 3M", respectively representing 12 Megapixels to 3 Megapixels. The larger the value, the larger the resolution, and the larger the file size; smaller number will get opposite result. 3. Voice recording time
Voice recording time include three options -- "3mins,5mins and 10mins", different option to different voice recording time. 4. Burst Mode
Burst mode include two options -- "3 photos and 5 photos", single press the shooting button to get multiple photos. 5. Video Lapse
Video lapse include six options -- "1s, 2s, 5s, 10s, 30s, 1min", choose different time interval to creat video. 6. Loop Recording
Loop Recording include four options -- " Off, 3mins, 5mins, 10mins", select this option, the device will continuously record video segmentally until the memory card is full, and then cover the contents of the previous record. 7. Motion Detection
Motion detection include two options: "Off, On". While the device been placed stationary, power on and start video recording, the device will be recording standby state if there is no moving objects in front of lens. Device will automatically start recording with moving objects and stop recording&save the file once the object stop moving. 8. Date
To turn on/off the shooting time watermark. 9. WDR
To turn on/off the WDR. 10. Photo Lapse
Photo lapse include five options: "Off, 3s, 5s, 10s, 20s". Turn on and press shooting button, device will automatically taking photos with certain interval time at photo mode, repress the shooting button then it will be stopped. 11. Image quality
Image quality include three options: " Fine, Standard, Economy". 12. ISO
ISO, also been called sensitivity,include seven options: "Auto, 100, 200, 400, 800, 1600, 3200". 13. Language
To set the language of device. 14. Date/Time
To set the time,device will update the date/time automartically while it connect to WiFi and APP. 15. Format
It will clear up all of your storage files,we suggest that you can export the file in advance. 16. Fast Record.
Turn on this function,camera will start recording automatically while switching to Record mode from any status(Include power on). 17. Auto Power Off
Auto Power Off include four options: "Off, 3mins, 5mins,10mins". It means that device will power off automatically if no operation after power on. 18. Keypad Tone
To choose the sound volume of camera button output, the menu can be set to "On, Off". 19. Screensaver
Screensaver has five options: "30s, 1min, 3mins, 5mins, Off". Screensaver means that device will be screen off automatically and enter sleep mode after no operation after power on. 20. Frequency
To choose "50Hz , 60Hz" depends on the region and requirement. 21. LOGO
To turn on/off logo watermark. 22. Device ID
To change the device ID. 23. WIFI
To change the WiFi SSID and password. 24. Default
Select this option to set all the settings to default. 25. Firmware version
To check the current version information of device. Micro SD CardTo take video/photo, you need to use microSD card, please choose the card which can meet the demand of requirments.
While recording, if the storage of card been used out, then camera will stop recording and it will shows that the memory card is full on screen.
Attention: Please be careful while taking the memory card. Please avoid liquid, dust and fractionlet. To be on the safe side,please power off the camera before insert/take out the card.Please check the memory card manufacturer's instructions for use it within the proper temperature range. Insert microSD car:
Slide to open the battery cover. (FIGURE 6)
The label side of microSD card towards to battery direction, (FIGURE 7) insert it and close the battery cover.
Attention: To take out the card, please press the card with your finger nail then it will popup. Reformat the microSD card. 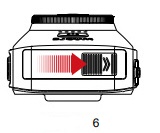 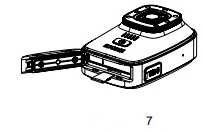
In order to get optimum performance, please format the card before first using. To keep the card intact,please reformat the card regularly.
Attention: Reformat the card will clear up all of the storage files,please export the photo&videos in advance.
To reformat the card, please slide upwards and click "Settings"->"Format"->"Ok". PRODUCT SPECIFICATIONS AND OTHER DETAILSProduct:SJCAM Portable Camera
Model:A10
Chipset :Novatek 96658
Sensor:Sony IMX323
View angle:140°
Aperture:F2.5
Lens:6G
Screen Size:2.0"
Input Voltage:3.8V
Input Current:1.3A
Wi-Fi Standard:Wi-Fi 802.11b/g/n 2.4GHz
Operating System:Support Android 4.1 and newer or iOS8.0 above smart phone or tablet with WiFi Function. |