SQ12 mini DV |
| | Home | User manual | SQ12 | |
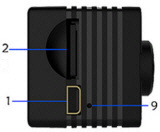
1. Mini USB Port
Product Features ● High-quality and high-definition image FULL HD 1080P DV DC
Use guide
Charge:
Note: 3. If there is no working mode after power on, will be powered off automatically in 1 min.
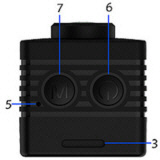
One cable with 3 uses: USB cable and TV cable are combined into one cable with following three functions:
Recording 720P: Press the ON/OFF button to turn on the power, after power on, the blue light is long on in the standby mode, press the power button for 1 time and the blue light is off after flashing for 3 times then get into the 720P recording mode, during the process of recording the light will not prompt and the recording files will be saved every 5 mins, press the power button again when you want to stop recording, and the camera will be back to the standby mode mean while the blue light will be on.
Recording 1080P: Press the ON/OFF button to turn on the power, after power on, the blue light is long on during the standby mode, press for 1 time the mode button, the camera turns into 1080P mode and the blue light and red light are long on, after that, press the power button again, the blue light and red light flash for 3 times then are turning into the 1080P recording mode, during the process of recording light will not prompt, the recording files will be saved every 5 mins, press the power button again when you want to stop recording and the camera will be back to the standby mode and the blue light will be on.
Photo shooting 12 million pixels: Press twice the mode button in the standby mode, the red light is on and the blue light is off, then press the power button again, the red light flash for 1 time, the camera will take one picture and the pictures of 12 million pixels will be saved automatically.
The infrared light turns On/Off: Turn on: during every mode of standby, press the ON/OFF power button for 2 seconds, the red light flashes, IR light is on and you can start the night recording.
Motion detection recording mode (720P -1080P): Motion detection recording mode 720P: in the standby mode of blue light, press the mode button for 3 seconds, the blue light is long on and the red light is off when the motion detection recording mode turns on, after detecting the movement of the object, the red light and the blue light are flashing at the same time for the motion detection recording 720P, the recording files will be saved every 5 mins until there is no motion or no battery or the card is full. (press any button can exit the motion detection recording mode)
Motion detection recording mode1080P: in the 1080P recording mode and the red light and blue light are long on, press the mode button for 3 seconds, the red light flashes for 3 times, the blue light is long no and the red light is flashing for 3 times when the camera is turning into the motion detection recording mode1080P, after detecting the movement of the object, the red light and the blue light are flashing at the same time for the motion detection recording 1080P, the recording files will be saved every 5 mins until there is no motion or no battery or the card is full. (press any button can exit the motion detection recording mode)
Charging and recording at the same time: The camera will get into the 720P recording mode directly when inserting the TF card, plug the USB-TV cable, external 5V USB power or charger (mobile power) if there is no manual stop, the camera will keep recording until the card is full or without battery, you can also stop recording manually and turn it into any mode.
TV OUT mode: Connect the USB-TV cable, if turn on the camera with the connection of TV display, you can watch the pictures through the TV display, at the same time, you can switch to photo taking mode, recording mode and motion detection recording mode.
Reset: When the camera crashes, the button is invalid, or cannot be used normally, you can press the button with a sharp object to reset the insertion point, after resetting, the camera can be used normally again.
Power off: After stopping the any function mode, the camera need to be powered off. Press the ON/OFF button for 6 seconds, when all lights are off, the camera is powered off. In standby mode without any function for 1 minute, the camera will be automatically powered off.
Time modification setting: The camera will automatically boot in the TF card root directory to create an TXT text document, power off the camera and use the USB cable to connect the computer. After opening TIMEREST.txt text document in Removable Disk, you can Edit the time that you want, for example: format (year, month, day, minute, second) 20160804174726 Y and save the text document, and then you can turn on the camera to record video, the video files will show the edited time. The setting without time watermark is the same, just need to remark the tail letters Y and N. The reference format is as follows: 1: 20150608192526 Y (with time watermark)
Note:
Connect to the computer: In power on, standby and off state, can be directly connected to the computer as U disk using, You can freely copy, cut and paste, delete the files and format U disk.
Note 1. After the product is connected to the computer, if the computer cannot recognize it, or if the removable disk is not ejected after 30 seconds, please reset it again.
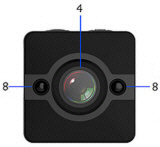
Relevant parameters Camera angle: 155-degree wide-angle lens
Note: After using up the battery, it needs 2 to 3 hours to fill the battery, when the indicator light is on, need to be charged for 30 mins more to make sure that the battery is completely full.
Precautions: Use occasions: Please strictly abide by the use of the relevant laws of the country, shall not be used for any illegal use of this product, or it will be at your own risk. |
| • GF-07 • A9 • SQ11 WIFI • SQ11 • TK905 • XD • Mini A8 • Q7 • GF-09 • SQ10 • SQ8 • GF-21 • 70mai • MD81S-6 • MD80 • T189 • SQ16 • 70mai Pro • SQ13 • A10 • SQ23 • iMiniCam • TK921 • U21 • HERO6 • HERO5 • A10 • SQ9 • SQ12 • |
| | EN | DE | FR | NL | JA | IT | ES | PT | HU | PL | FI | RO | EL | SK | SL | BG | RU | |
| sq12 mini camera |
|---|
| © «Org-Info.Mobi» |