GT300 Car Data Recorder

| Home | User manual | GT300 DVR |


GT300 DVR

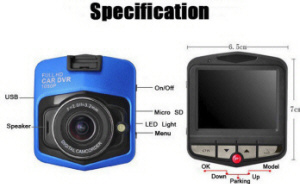
GT300 Car DVR Camera with 2.4 Inches 1080P


Main Features:


• GT300 1080P 2.4 inch 110 degree view car night vision CMOS DVR dashcam
• 1080P full HD resolution car dashcam recorder
• Adopting Generalplus 1248 chipset
• 1/2.7 inch CMOS image sensor
• 110 degree wide view angle
• 2.4 inch TFT display screen
• Support night vision, G-sensor, loop recording, anti-shake and motion detection
• Built-in microphone
• Video resolution: 1080P (1920 x 1080), 1080P (1440 x 1080), 720P (1280 x 720), WVGA (848 x 480), VGA (640 x 480)
• Support AV out and HDMI out
• Built-in 180mAh battery
• Support maximum 32G TF card (not included)
• Equipped with special car fixed suction cup mount, easy to fix and use


Besides the functions of common car data recorder, this device boasts four additional characteristics:
1. HD high resolution, HD night-vision, HDMI output
2. Quickly locking or unlocking video file
3. Parking monitoring function: after enabling parking mode function, the device can identify the surrounding environment and automatically turn on for recording and automatically saving the files even under the Off state.
4. Built-in G-Sensor, it can record the gravity sensing information and identify the up and down, left and right, front and rear displacement of the car, and will automatically lock the current video since it will identify the abnormality of driving.

In order to maximize the functions of car data recorder, please carefully read the User's Manual before using it (the design and specification of this device and accessories are subject to change without prior notice).


User's Manual GT300

«Power» button:

Function 1: Turn «On/Off» the deice
Under the Off state, press the «Power» button to boot the device and enter into the standby state.
Under the On state, hold down the «Power» button to automatically save the video file or turn off the device after parameters setting.


Function 2: Turn «On/Off» night viewer
Under the Standby, Video and Photo mode, press the «Power» button to turn «On/Off» night viewer


«Confirm» button:

Function 1: Turn «On/Off» video function.
Under the Standby mode, press the «OK» button to start video. During video recording, press the «OK» button to stop recording.


Function 2: Picture taking function
Under the Photo mode, press the «OK» button to take picture.
 

Function 3: File playing function
Under the Play Back mode press the «OK» button to «Play/Pause» video file.
 

Function 4: Confirm function
In the «Video menu», «Setting menu», «Photo menu» and «Play Back menu», confirm and save the setting option.


«Menu» button:

Function 1: Menu button
• Under the Standby mode, press the «Menu» button to enter into the «Video» menu, press it once to enter into the «Setting» menu, in the «Setting» menu mode, press the «Menu» button to automatically exit to Video mode.
• Under the Photo mode, press the «Menu» button to enter into the «Photo» menu, press it once to enter into the «Setting» menu, in the «Setting» menu mode, press the «Menu» button to automatically exit to Photo mode.

• Under the Play Back mode, press the «Menu» button to enter into the File Operation menu, press it once to enter into the Setting menu, in the Setting menu mode, press the «Menu» button to automatically exit to Play Back mode.


«Up» button:

Function 1: press the «Up» button in any menu to select the function upwards.
Function 2: when playing video, reduce the volume of the video file, hold down it to fast rewind.
Function 3: under the Video mode, press the «Up» button to turn On/Off microphone.


«Down» button:

Function 1: press the «Down button» in any menu to select the function downwards.
Function 2: when playing video, increase the volume of the video file, hold down it to fast rewind. Fast forward.
Function 3: Under the Video mode, press the «Down button» to enter into the screensaver function.


«Parking Monitoring» button:

Function 1: before turning off the device, press the «Parking Monitoring button» once, then letter «P» will appear on the right part of the screen, and the device will enter into the parking mode. Under parking mode, after turning off the device, if the device or car is shocked by foreign object, the device will automatically turn on to record video for about 20s, and then turn off.
After enabling the parking mode, to disable this function, press the «Parking Monitoring button», letter «P» on the left upper corner of the screen will disappear, which means that the device won't execute parking mode function.


«Mode button/Lock» button:

Function 1: mode switch
• Under the Video mode, press the «[Mode button/Lock button» once to enter into the Photo mode.
• Under the Photo mode, press the «Mode button/Lock button» once to enter into the Play Back mode.
• Under the Play Back mode, press the «Mode button/Lock button» once to enter into the Video mode.


Motion Detection:

If this function is enabled, when the device has detected picture change, it will automatically record video and save 10 seconds of video, and then stop recording.


Preparation on Memory Card (TF)

Requirements on TF card: the TF card for the device shall have adequate capacity with speed over CLASS6.


Install and Remove the TF Card

1. Insert the TF card into the TF card holder at correct direction till the TF card is fixed in the card holder.
2. When taking out the TF card, please lightly press the TF card, and then take it out after it has ejected out.


Cautions:

1. Caution: Please do not operate the TF card when the device is working to avoid damage.
2. Please pay attention to the direction of inserting TF card, if it is reversed, then it may possibly damage the device and TF card
3. After inserting the TF card into the device, the device will set the TF card as the default storage device, and it is possible that the files in the original TF card can't be read
4. If the TF card is not compatible with the device, please insert it again or try with another TF card.
5. It supports at most 32G.


Adjust the Position of Lens

The front lens of the device can rotate at 360° with the support so as to match the position of fixing the car data recorder and get better recording effect.


Turn On/Off the Device

1. Manually turn On/Off: press the «Power button» once, the screen lights on, then hold down the «Power button» to turn the device off.
2. Automatically turn On/Off during driving: connect it with 5V power supply of the car, when the car is starting, the device will automatically turn on and record video after time delay.


Basic Operation of Car Data Recorder

Switch the Working Mode

This device has three working modes: Video, Picture Taking and Play Back mode. Press the «Lock button» to switch the working mode.


Setting Menu and System Setting

Under the Video or Picture Taking mode, press the «Menu button». Press the «Up/Down button» to select the desired item; press the «OK button» to confirm the setting, and then press the «Lock button» to exit the menu.


System Setting Option

1. Parking Mode: Off 2G 4G 8G
2. Time/Date:
3. Automatic Off: Off/1/3 minutes
4. Screensaver: Off/3/5/10 minutes
5. Key Tone: On/Off
6. Language Setting: English/ Traditional Chinese/ Simplified Chinese/ Japanese/ French/Germany/ Korean/ Italian/ Portuguese/ Russian/ Spanish/ Polish
8. Light Frequency: 50/60
9. Supplement Lamp: Off/On/Automatic
10. Format: Cancel/Confirm
11. Default Setting: Cancel/Confirm
12. Version: Version Number


Video

Enter into the Video mode, the video mark will appear at the left upper corner of the screen, press the «Confirm button» to record video, during recording, the mark at the left upper corner of the screen flashes, press the «Confirm button» to stop video, and the ● at the left upper corner of the screen disappears.


Video Mode Option

1. Resolution: 1080FHD, 1080P, 720P, WVGA, VGA;
2. Circulating Video: Off/1/2/3/5/10 minutes :
3. Video Audio: On/Off
4. Exposure Compensation: EV-2.0, EV-5/3, EV-4/3, EV-1.0, EV-2/3, EV-1/3, EV+0.0, EV+1/3, EV+2/3, EV+1.0, EV+4/3, EV+5/3, EV+2.0
5. Motion Detection: On/Off;
6. Date Label: On/Off
7. G- Sensor: Off/2G/4G/8G
8. Lane Shift: function switch: On/Off


Photo Mode and Setting

1. Press the «Power button» to enter into the Video mode, press the «Mode button» to enter into the Photo mode, the picture taking mark appears on the left upper corner of the screen, the device enters into the Photo mode.
2. Press the «Confirm button», the device makes "clicking" sound, picture preview waiting, about 1 second later, it finishes taking picture, when taking picture, please hold the camera stably for avoiding influencing the picture quality.
• Shooting Mode: single shot.
• Resolution: 12M, 10M, 8M, 5M, 3M, 2M, 1_3M, VGA
• Continuous Shots: On/Off
• Picture Quality: Quality, Standard, Economic
• Acutance: Intensive, Standard, Mild
• White Balance: Automatic, Daylight, Cloudy, Tungsten Lamp, Fluorescent Lamp
• ISO: Automatic, 100, 200, 400
• Exposure Compensation: EV-2.0, EV-5/3, EV-4/3, EV-1.0, EV-2/3, EV-1/3, EV+0.0, EV+1/3, EV+2/3, EV+1.0, EV+4/3, EV+5/3, EV+2.0
• Shake Reduction: On/Off
• Quick Preview: Off, 2 seconds, 5 seconds
• Date Label: Off, Date, Date/Time


Play Back Mode

1. Browse file:
After starting the car data recorder and entering into the Video mode, press the «Lock button» twice to enter into the Play Back mode, press the «Up button» or «Down button» to browse the picture and video. When play back, it browses according to the file type, when the file type is video, only the video file can be browsed when it is picture, only the picture can be browsed.
2. Delete and Protect
Under the Play Back mode, hold down the «Menu button» to display the Delete and Protect locked option, press the «Up/Down button» to enter into the "Delete Current"/"Delete All" option, press the «OK button» to enter into the option, press the «OK button» to confirm. It can also lock the file, and the file can't be deleted before unlock, thus protecting the important files.


Application of Shortcut Key during Video Recording:

• Press the Lock button: under emergency, manually press the «Lock button» to lock or unlock the current video file.
• Power button: During video recording, press the «Power button» to enable/disable night viewer.
• Press the «Up button» to disable microphone, press the «Up button» again to enable microphone.


Video Recording when Charging

Connect the USB port of the device with car charge, after staring, the device will enter into the mode of video recording when charging


Reading Video USB Function.

This device supports to directly read files through USB, when reading the video file of the device, the files in the TF card can be read with the card reader.


PC CAM Computer Camera

This device can be used as computer camera, connect the device with the computer via USB cable, the memorizer/camera option pops up in the computer, press the «Up/Down» to select Camera, then press the «Confirm button» to confirm, open My Computer, there's the icon, double click this icon to use the device as computer camera. When selecting memorizer by pressing «OK button», you may check the files in the TF card in the computer.


Play with TV Set

1. Connect this device with the TV set via TV cable/HDMI cable to play back the files in the TF card
Prompt: It doesn't need to install drive.


Product Characteristics

• Ultra big screen provides clear recording effect. Ultra wide angle lens is convenient to record video at different angles and high resolution under any condition
• Built-in 1/3" low noise and high resolution light sensitive assembly captures the ultra-clear picture in the dark environment
• Built-in lithium battery charging when recording video
• Built-in microphone/speaker
• Supporting high capacity MicroTF card
• Automatically recording video when the car engine starts
• With delayed start function to protect the device from pulse current when starting the car
• G- Sensor


Troubleshooting:


● Under normal operation condition, if the product has any problem, please refer to the following solutions:
 

• The product can't take picture or record video
Check if the TF card has adequate capacity or it is locked.


• The device automatically stops when recording video
Since the HD video is big, please adopt high speed TF card which is compatible with SDHC, the high speed TF card has the C6 mark.


• When playing back picture and video, it prompts with "File Error"
Error when saving files in TF card, and the file is incomplete, please format the TF card with the "Format" function in camera.


• The video/photo is unclear
Please check if there's dirt or fingerprint on the lens; wipe the lens with special tissue before recording/taking picture.


• Please press the Reset button to reboot the device if the system is crashed.


GF-07A9SQ11 WIFISQ11TK905XDMini A8Q7GF-09SQ10SQ8GF-2170maiMD81S-6MD80T189SQ1670mai ProSQ13A10SQ23iMiniCamTK921U21HERO6HERO5A10SQ9SQ12X009GT300


| EN | DE | FR | IT | TH | NO |


gt300
© «Org-Info.Mobi»