H180 WIFI FULL HD action camera |
| | Home | User manual | H180 | |
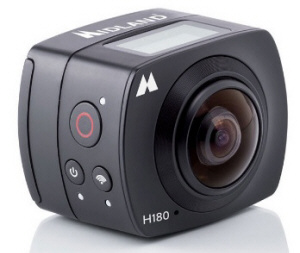
H180 is a FULL HD action camera equipped with a 220° wide angle lens; such an extremely wide lens allows to capture what is around you from an entirely and more complete viewing perspective! This software is also able to convert your shooting; then upload on Youtube or your favourite social! Download the software at midlandeurope.com H180 is equipped with all most advanced features that you may expect from an action camera such as Time camera, Lapse (photo sequence at pre-set time), Burst Photo (the camera takes a rapid sequence of photos) and the Loop Recording (cycle recording: H180 continuously records and when the micro SD card is full, the oldest videos will be overwritten except for the protected files).The LCD display in the upper side allows an easy setting of the functions. Technical parameters: Image sensor: 8 million pixels (CMOS) Functional mode: Video recording and photographing Lens: F2.0 f=1.1mm Video resolution: 1920x1440p@30 / 1920x1080p@30 Photo resolution: 3264x2448 / 2592x1944 / 2304x1728 File format: - Video H.264(MOV) - Picture JPG Storage medium: TF card (max. 32GB supported) USB interface: High-speed USB 2.0 interface Power source: External lithium battery 1000mAh User ManualCautions• Do not drop your camera. Starting stepsBefore using your H180: • Make sure that the battery is full Now you can proceed and set H180 upon your needs. How to use your Wifi camera?1. Insert a micro SD or micro SDHC card.SDHC Class 10 is recommended for use. Please turn off the camera when plug-in or pull-out the memory card. 2. Turn-on & Turn-off.• Turn-on: Press and hold the • Power saving mode: When the camera is not under operation for the selected time (system default 1 minute), it will turn off automatically. • Turn-off: Press and hold the 3. Charging the cameraThe camera has an external rechargeable lithium battery. Installation: • Open the cover of the battery (slide in arrow direction) • Insert the battery observing positive and negative poles • Close the cover of the battery The battery can be charged by the micro USB cable. The charging led will be blue while it is charging. The recharge shall take 4 hours. The blue light will be off when charging is completed. 4. Working mode selection.The camera has three modes: video recording, driving mode and photograph shooting. They can be switched by pressing the |
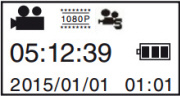
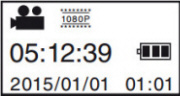 • Video recording (see the following picture): the LCD displays the available REC time (as in example image). • Video recording (see the following picture): the LCD displays the available REC time (as in example image).Press the start/stop REC button to start recording. The REC led (red) will be twinkling during the video recording process. LCD timer starts timing. Press the start/stop REC button again to stop video recording. |
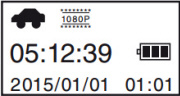 • Driving mode (see the following pictures): in driving mode, the camera will record splitting the video in 3 minutes file. • Driving mode (see the following pictures): in driving mode, the camera will record splitting the video in 3 minutes file.When the card is full, the file recorded earliest will be deleted automatically so that video recording can continue. Press REC button to start video recording. The REC led (red) will be twinkling during the video recording process. LCD timer starts timing. Press the REC button again to stop video recording. In this mode when the unit is power supplied it automatically turns ON and starts recording; when the power supply is switched off the unit turns OFF. |
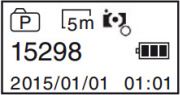
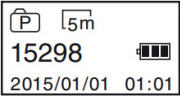 • Photo shooting: The LCD displays the available number of photos (as in example image). • Photo shooting: The LCD displays the available number of photos (as in example image).Short press the Shutter button to shoot photographs after it is switched to the photo-shooting mode. The buzzer will send out a “beep” sound. The counter will countdown the remaining photos. |
 • Slow Motion: this function is selectable in Option Mmenu while in video mode (read paragraph 5 to access the option menu). • Slow Motion: this function is selectable in Option Mmenu while in video mode (read paragraph 5 to access the option menu).When Slow Motion is active you see the icon on the LCD display (see image). With this function the unit records a video @30 FPS then creates the final video @10 FPS. So your video will last three more times, therefore it will be slowed to 1/3 (for example, if you record for 1 minute, the unit will create a 3 minutes file, so playing it you will see 1/3 slower video). |
| • Time Lapse: this function is selectable in Option menu. When Time Lapse is active you see the icon on the LCD display.
• In Video Mode - With this function the unit records 1 frame each “x” seconds (“x” is selectable in Option menu) then creates a @30 FPS video, so you will see a faster video (for example if you set Time Lapse to 3 seconds you will have 1 frame each 3 seconds that multiplied for 30 FPS it means that you will have 3x30=90 seconds compressed in 1 second video)
• In Photo shooting - With this function the unit takes 1 photo each “x” seconds (“x” is selectable in Option menu)
Time lapse in Video Mode
Time lapse in Photo mode |
5. Menu operation.A. Option Menu - Press the WIFI button for 2 seconds to enter the menu. Short press the WIFI button to move the cursor for selection; press the shutter button for confirmation; long press the WIFI button to cancel the setting or exit.
While in Video recording the option menu has these items: Movie Size. 1440p@30 / 1080p@30 - Select the video resolution Slow Motion. On / Off - Activate slow motion function White Balance. Auto / Daylight / Cloudy / Fluor H / Tungsten - Adjust the brightness of the video.
While in Photo Shooting the option menu has these items: Resolution. 3264x2448 / 2592x1944 / 2304x1728 - Select the photo resolution Timer. Off / 2s / 10s / Double – Select the timer before taking a photo. “Double” will take 2 photos: the first after 10 seconds and the other after 2 seconds. Photo Burst. Off / 3 photos / 5 photos / 10 photos / continue burst – Select the number of consecutive shots
B. Settings Menu - While in option menu, press the Short press the WIFI button to move the cursor for selection; press the shutter button for confirmation; long press the WIFI button to cancel the setting or exit.
Power Save. OFF / 1min / 3min / 5min - If the camera is inactive for the set time, the camera will enter power saving mode and turns off. Date & Time. System time setting Time Lapse. OFF / 3 sec / 5 sec / 10 sec / 30 sec / 1 min – Turn On/Off the time lapse function and set the time between shots Time Lapse Duration. Unlimited / 5 min / 10 min / 15 min / 20 min / 30 min / 60 min – Set a timer for time lapse function. After the timer is finished the unit stops recording or taking photos. System. Factory reset / System Info / Card Info – “Factory reset” reset the unit’s settings to factory default. “System Info” will display the firmware version. “Card Info” will display the memory card information (capacity and available space). Wi-Fi Password. Set the Wi-Fi password (10 characters). Default is “1234567890” Format. Yes / No - Format the memory card 6. Remote controller.A. Use of watch-type remote controller: With remote controller you can Power On/Off the unit, Record Video and Take Photo within a range of 30m. When any key is pressed, the two LEDs will turn on in red.
B. Turn On or Off the camera with remote controller: • Power on: hold • Power off: Press
C. Remote controller battery replacement When remote controller’s battery is low the battery needs to be replaced. Open the battery door with a coin carefully, and avoid to damage it. 7. Connecting the device to an HDTVConnect the video camera to a HDTV with a HDMI cable. After power is on, display signals in the video camera will be output to the HDTV automatically, and HD videos and photos can be browsed in the HD TV.
Note: Stop video recording or playing before connecting or pulling off the HDMI cable. APP (for Android and iOS)To view your videos you can download the APP "SYMAX360" available on Play Store (for Android users) or Apple Store (for iOS users). 1. After installing SYMAX360 APP, the icon
2. Insert a card and turn the camera on, press the Wi-Fi button to turn on Wi-Fi. On the LCD it will be displayed the SSID name (P1800_xxxxxx) and the password (1234567890) to connect to the Wi-Fi.
3. Turn on Wi-Fi on the mobile phone or tablet PC, search for APP with the signal name P1800_xxxxxx (the SSID you read on the LCD), then connect it till the connection is successful. When your device will be connected you will see the Wi-Fi icon on the LCD display
4. Launch the App. From App you will be able to: • see the real time preview When connected to the PC:The video camera has the plug and play function. When connected to a PC by the USB cable, it will automatically switch to the mobile HDD mode. LCD will display “MSDC”. The removable disc icon will appear on “My Computer”. Photos are stored in the “\jpg” folder of the removable disc. Videos are stored in the “\video” folder and video recorded in DVR are in “\CAR” folder
Notice: No need to install drivers to run its mobile HDD function if your operating system is windows 2000 or above. PC player (for Windows and MAC)With this software you can play the downloaded video file. During play it is possible to choose between different kind of view. You can even edit the video file rotating, trimming and converting it. PC converter (for Windows only)With this software is possible to convert video files recorded with your camera before uploading them on social media 360 channels (as YouTube or other), so it can be recognized as 180° video.
Note: immediately after the upload your video will not be played as 180° video, but you have to wait until your social media’s server process the video |
| • GF-07 • A9 • SQ11 WIFI • SQ11 • TK905 • XD • Mini A8 • Q7 • GF-09 • SQ10 • SQ8 • GF-21 • 70mai • MD81S-6 • MD80 • T189 • SQ16 • 70mai Pro • SQ13 • A10 • SQ23 • iMiniCam • TK921 • U21 • HERO6 • HERO5 • A10 • SQ9 • SQ12 • X009 • GT300 • Mi 4k • R3 • Mini DV • SJ7 • M10 • DV135S • U8 • BV01 • DV 600 • PC • X10 • H5 • H180 • |
| | EN | IT | DE | ES | |
| h180 wifi action camera 180° |
|---|
| © «Org-Info.Mobi» |