 INTRODUCTIONPurpose of use
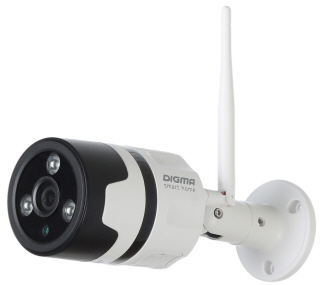
The Division 600 home IP camera is designed for a remote surveillance outside and inside the buildings. The device can be remotely controlled online via the DIGMA SmartLife mobile application. AVAILABLE FEATURESOnline control
With the DIGMA SmartLife mobile app you can remotely connect to the device, monitor the current situation, or view the recorded videos from anywhere in the world via the internet. Motion detector
Receive a notification on your mobile when movement is detected in the camera's field of vision, and activate video recording when motion detection is triggered. Shared access
Share your video camera access, let trusted persons view the image from the device. Night mode
In conditions of a low lighting, the camera will automatically switch to night mode by activating the infrared light. Recording to memory card
Enable continuous video recording or activate it during specific events, and view recorded segments via the mobile app. Script support
Set up automation scripts and various actions to perform automatically upon trigger events. Two-way voice communication
Activate the voice communication function by simply pressing a button in the mobile app. Android and iOS compatibility
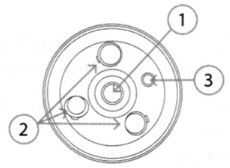
DIGMA SmartLife free application for smartphones and tablets is available for Android (version 5. and higher) and iOS (version 9 and higher) operating systems. PRODUCT DESCRIPTION1. Lens
2. Infrared lighting
3. Light sensor
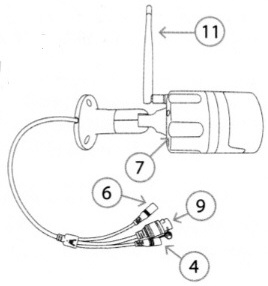
4. Control/reset button
5. Built-in speaker (under cover)
6. Power connector
7. Built-in microphone
8. Memory card slot (under cover)
9. RJ45 connector
10. Swivel mount
11. External removable antenna
12. SD card cover
13. Removable hood screw 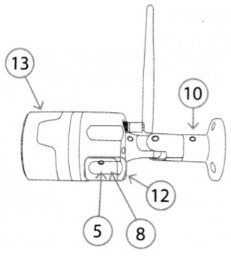
Device management
The device can be managed:
1. Remotely via the mobile app
2. In manual mode using the control/reset button Press the button quickly to turn on/off voice prompts. Press and hold (more than 5 s) the button to reset the parameters to factory settings and switch the device to the configuration/pairing mode. Attention!
When the device is switched to the configuration mode, the device settings, including the wireless network access settings, are reset to default values. To restore the device remote control you will need to re-configure it via the application. Attention!
On resetting, the device will stay linked to the account. To link the camera to another account you must first unregister from the current account. GETTING STARTEDAttention!
Before turning on the camera, make sure that the external WiFi antenna is securely fastened in the appropriate connector on the device. Turning on the camera without an antenna installed may cause damage to the device. An initial setup must be performed in order to manage the device via the mobile app. To do this
1. Connect your mobile device to a 2M GHz standard wireless network. Attention!
The wireless network settings must follow the mentioned below conditions for the device to work correctly:
• The Hide Network ID (SSID) feature is disabled
• It must be used encryption method WPA_PSK / WPA2_PSK
• Dynamic Host Configuration Protocol (DHCP) must be activated
• The access point name must contain Latin characters only 2. Download the DIGMA SmartLife app from the app store on your mobile device. 3. Launch the DIGMA SmartLife app. Register your account by following the tips on the screen (for new users), or log in using your existing credentials. 4. Go to "My devices" / "My group". Click the "+" icon in the upper right corner to add a device and select the device type "Smart Camera". In the window that opens, click the setup wizard selection button in the upper right corner and select one of the configuration methods supported by the camera: "QR code" (recommended) or "Quick setup" (if the recommended method did not work). 5. Put the device in the configuration mode by pressing and holding the on/off button (you will hear a confirmation sound, and then the voice messages "Reset to factory settings" and "Network connection required"). 6. Follow the instructions of the setup wizard on the mobile device screen: • Make sure your mobile device is connected to a Wi-Fi network compatible standard and enter the access password
• Click "Continue" / "Next Step" and follow the further instructions of the setup wizard.
• After you are connected to the network, give the device a suitable name and complete the setup. After the setup has been completed, the camera is ready for use and will appear in the list of connected devices on the main screen of the app in "My Devices" section. To view the image from the camera, click on the line with the camera name on the main screen. A viewing window will open. The following controls are available in this window: 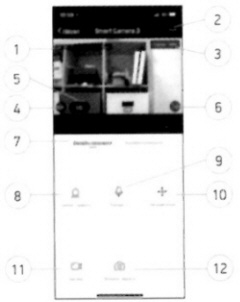
1. Date/Time display 2. Advanced settings menu button 3. WiFi signal indicator 4. Enabling the audio channel listening 5. Change the viewing quality 6. Switching to the full screen mode 7. Switching between the online and recorded video 8. Quick setup of the motion detector 9. Activating the two-way communication 10. Camera tilt and rotation control* 11. Video recording 12. Screenshot * For cameras with the rotary mechanism ADVANCED SETTINGS1. The device is equipped with the voice alerts for operation modes/states. Quickly press the control/reset button once to deactivate the voice alerts. After releasing the button you will hear a confirmation sound.
Quickly pressing the control/reset button again reactivates the voice alerts. 2. The user can set up/change the following parameters in the camera's advanced settings menu*:
• Change the device name
• View the list of trusted users that have access to the device
• View the basic device information
• Enable/disable the date/time display
• Configure the motion detector settings
• Configure the settings for recording to a memory card
• Check for firmware updates
• Cancel/remove the device link to the current account (required to link the camera to another account). 3. The user can access the following functions in the account settings menu (My Account)*:
• Account profile setup
• Message Centre access — view the events for which notifications have been received 4. In the "Scripts" section, the user can configure various scripts to run automatically upon trigger events, or run scripts manually. 5. Using a wired connection.
A wired connection to the local network is used as the primary or backup link to the Internet.
Wired connection becomes possible only after the initial device is fully configured and linked to an account. * The list of available functions may be changed during the system refinement process PRECAUTIONARY MEASURESThe device is assigned an IP63 protection class, which means that the device is reliably protected from dust penetration and vertically falling spray, including precipitation.
It is forbidden to immerse the device in water or expose to jets of liquid.
When mounting the device, always observe the orientation: the camera must be installed so that the protective cover of the SD card compartment faces vertically downwards.
When installing the card cover, make sure that the cover, sealing gasket and the cover seat are dry and clean, dust, moisture and foreign particles are missing. After installing the cover, always tighten the fixing screws tightly. TECHNICAL SPECIFICATIONSImage sensor
• Sensor type: 1/2.7" CMOS sensor
• Resolution: 1920 x 1080 px, FHD
Lens
• Lens type: All-glass
• Lens: 3.6 mm
• Viewing angle: 75°
• Day/Night mode: Double infrared filter
• Coverage range in night mode: 8-10 m
Wireless connection
• Wi-Fi IEEE 802.11 b/g/n (2.4ITL4,150 Mbps (Max))
Wired connection
• Type supported network/connector: RJ45
• Built-in microphone and speaker
• Audio compression format: AAC ® G711
Main functions
• Video/image compression format: H.264
• Resolution: 1080P
• Frame rate: 15 fps
• Recording to a TF card
• TF card (up to 32 GB*) slot
• Mobile apps for iOS and Android
• Motion sens
• Protection class dust and water protection: IP63
General
• Power adapter
• Compatible with iOS and Android devices
• Dimensions: 132 x 65 x 65 mm
• Mass: 332 g * Support larger cards is possible, but not guaranteed. PACKAGE CONTENTS • IP-camera Division 600
• Network adapter (12V/1 A)
• Mounting kit
• User manual SAFETY INSTRUCTIONS• Do not disassemble or repair the device yourself. In the event of a malfunction, contact the service centre.
• The permissible ambient temperature in the operation mode is: from 0 to + 35 °C. Storage temperature: from -5 to + 45 °C. Keep the device away from open flame in order to avoid an explosion or fire.
• Do not expose the device to extremely high or low temperatures.
• Avoid contact with water.
• Avoid dropping the device or hitting it with other objects. Do not expose the device to strong mechanical stress. Keep the device away from the sources of electromagnetic radiation.
• Do not use chemicals or detergents to clean the product; always turn off the device before cleaning.
• Use only the accessories approved by the manufacturer. Key settings
Input: DC 12V — 1 A
Power consumption: 9 W - 12 W Mounting rules and conditions
This device does not require any mounting or permanent fixing. Storage conditions
The device should be stored at a temperature between -5 and +45 °C with a relative humidity of no more than 85%, and out of direct sunlight. Transportation conditions
The device is recommended to be transported in its original packaging. Terms of disposal
Contact an authorized service centre to dispose of the product. The production date is indicated on the packaging. The device lifetime is 24 months from the date of sale, but no more than 30 months from the date of production. Warranty period: 1 year |